Integrate Firebase Cloud Messaging in React Native — Permissions, Tokens, Background & In-App UI
This guide wires up Firebase Cloud Messaging (FCM) in a React Native app: iOS APNs configuration, Xcode capabilities, background display on Android with Notifee, permission flows, saving the device token to your backend, handling notification taps for navigation, and foreground in-app banners with Zustand.
It assumes you have already: registered iOS and Android with Firebase (Android, iOS), and set up the backend with the Admin SDK (Part 1, Part 2). If iOS push still fails, confirm your APNs auth key is uploaded in Firebase.
Step 1 — Upload APNs Key in Firebase (iOS)
For iOS, Firebase must talk to Apple’s servers using your APNs authentication key (.p8). Open the Firebase Console → your project → Project settings → Cloud Messaging tab. (This tab appears after Cloud Messaging is enabled and you’ve created at least one messaging campaign, as in Part 1.)
Under Apple app configuration, click Upload next to APNs Authentication Key. In the modal, upload your .p8 file, enter the Key ID and Team ID from the Apple Developer Portal, then confirm.

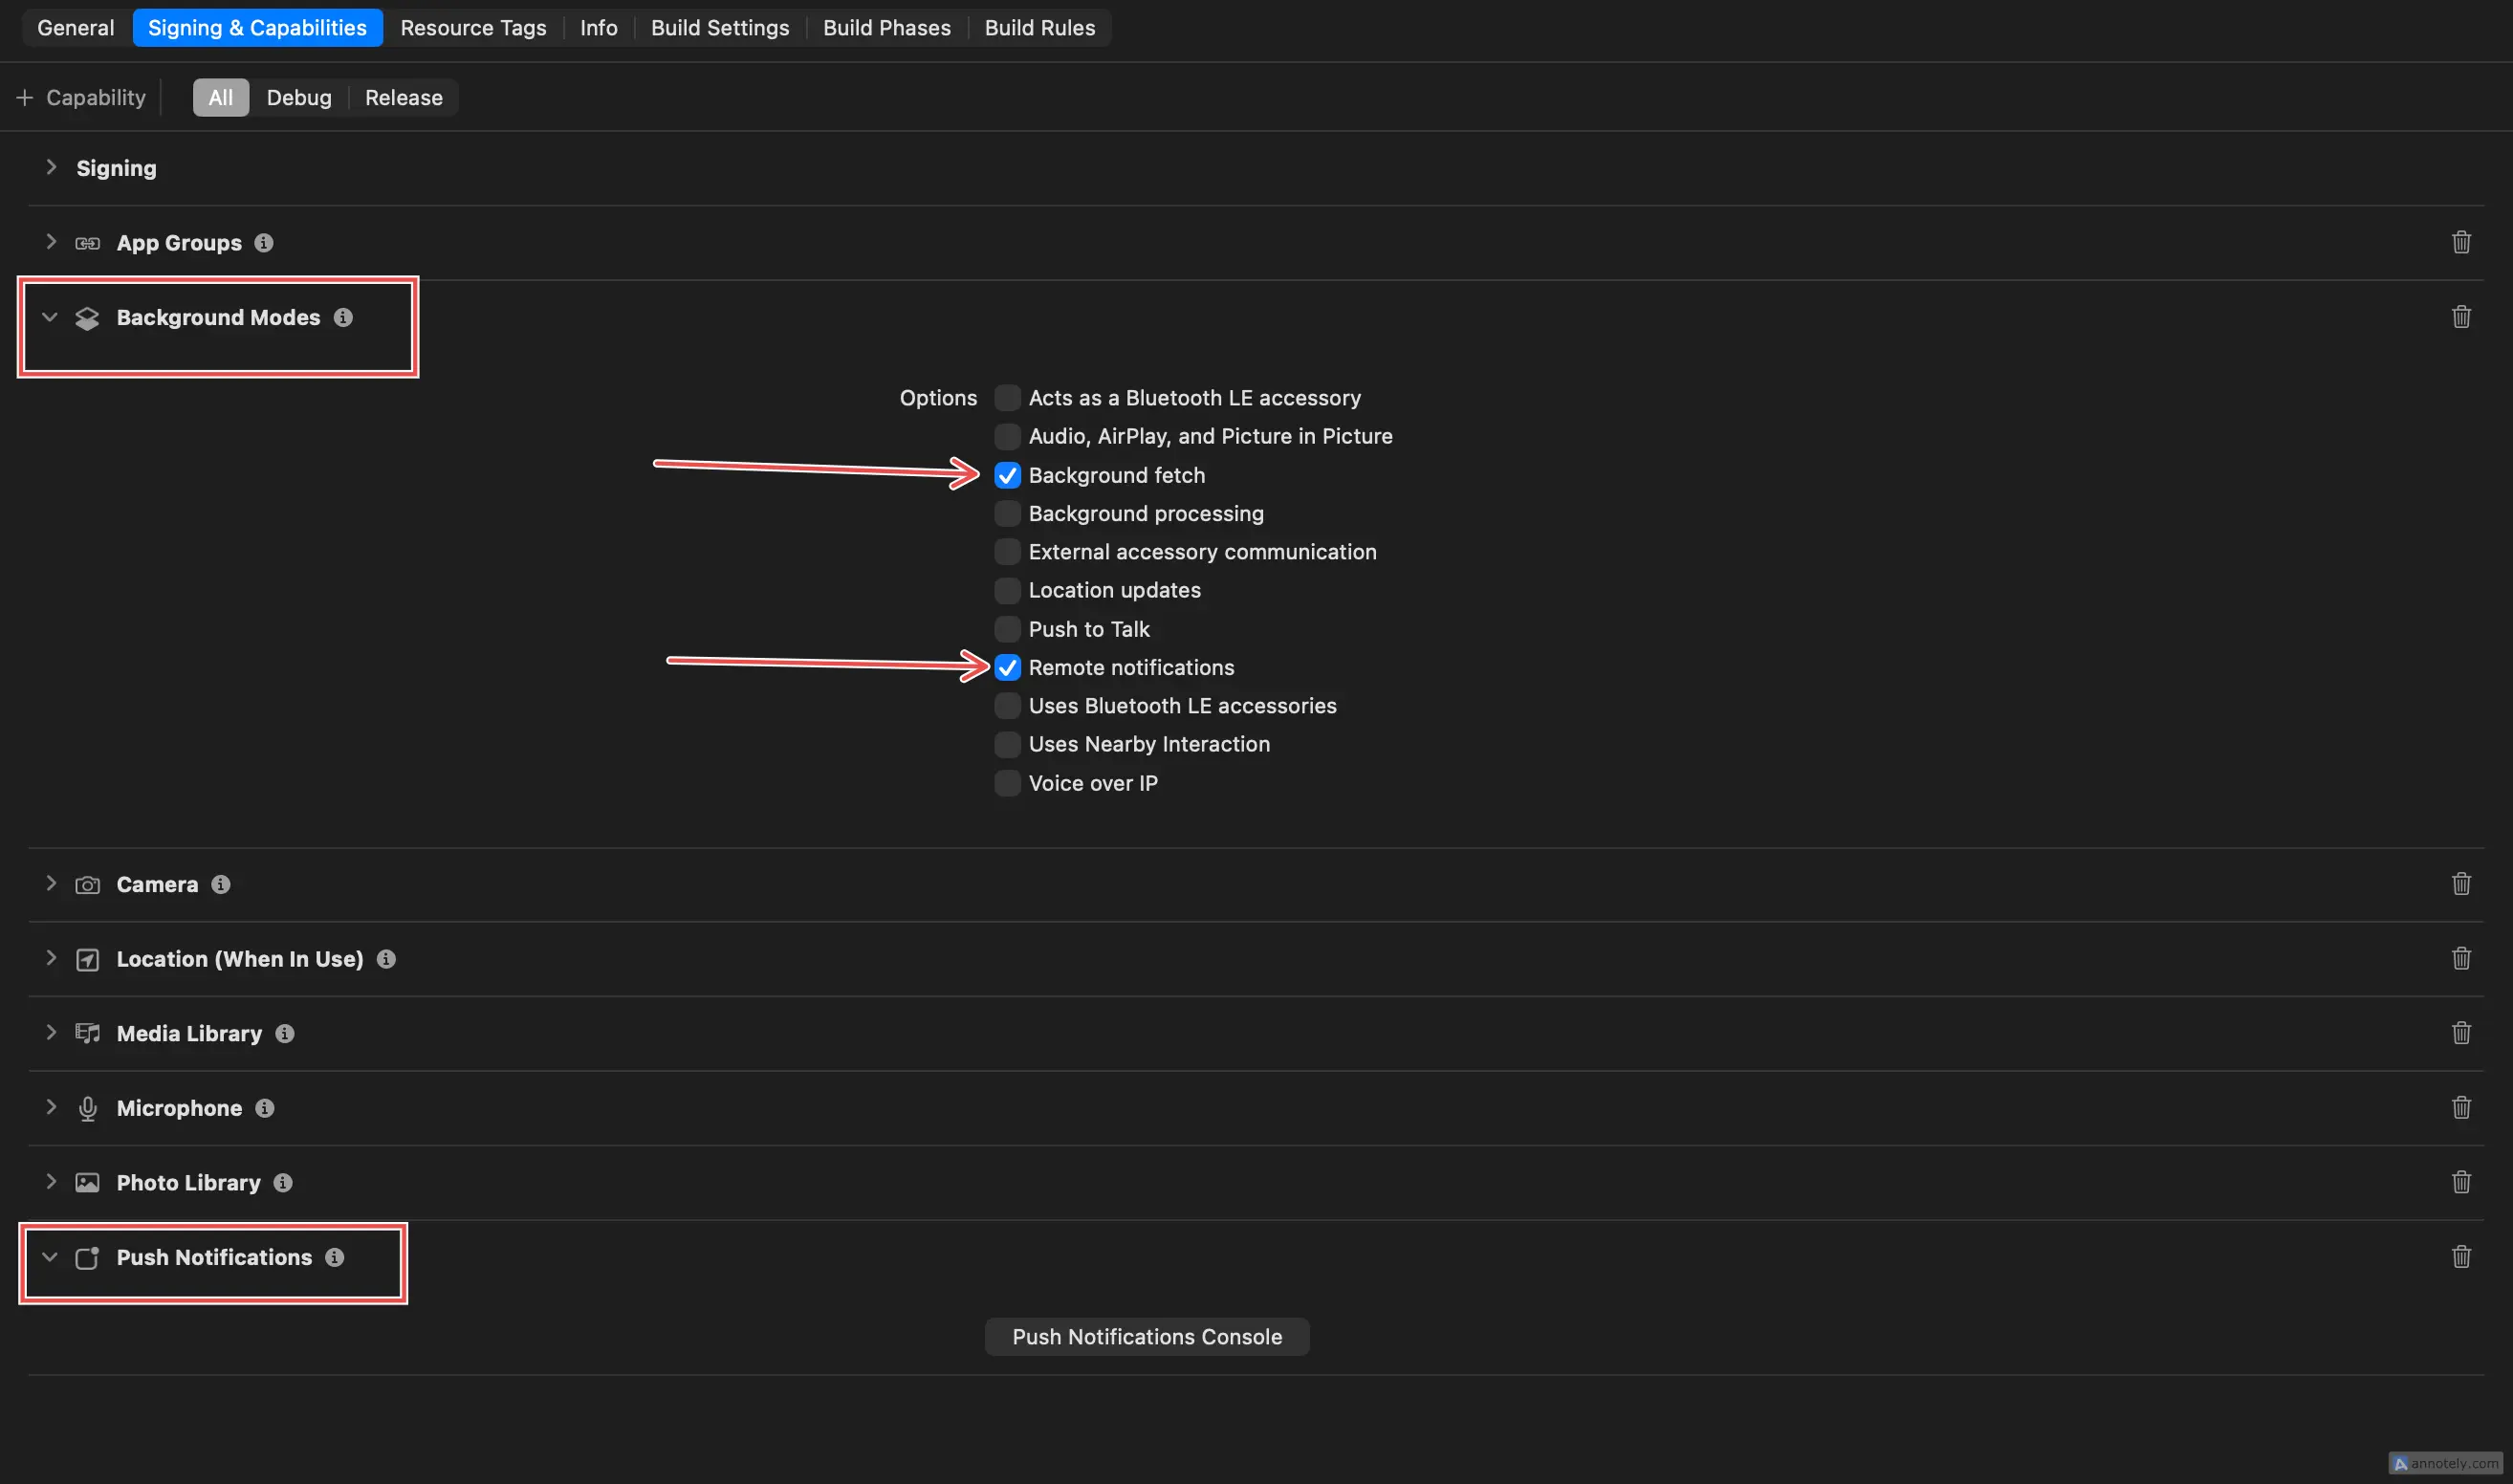
Step 2 — Xcode: Push Notifications & Background Modes
Open your app in Xcode (`ios/*.xcworkspace`). Select your app target (not the test target) → Signing & Capabilities.
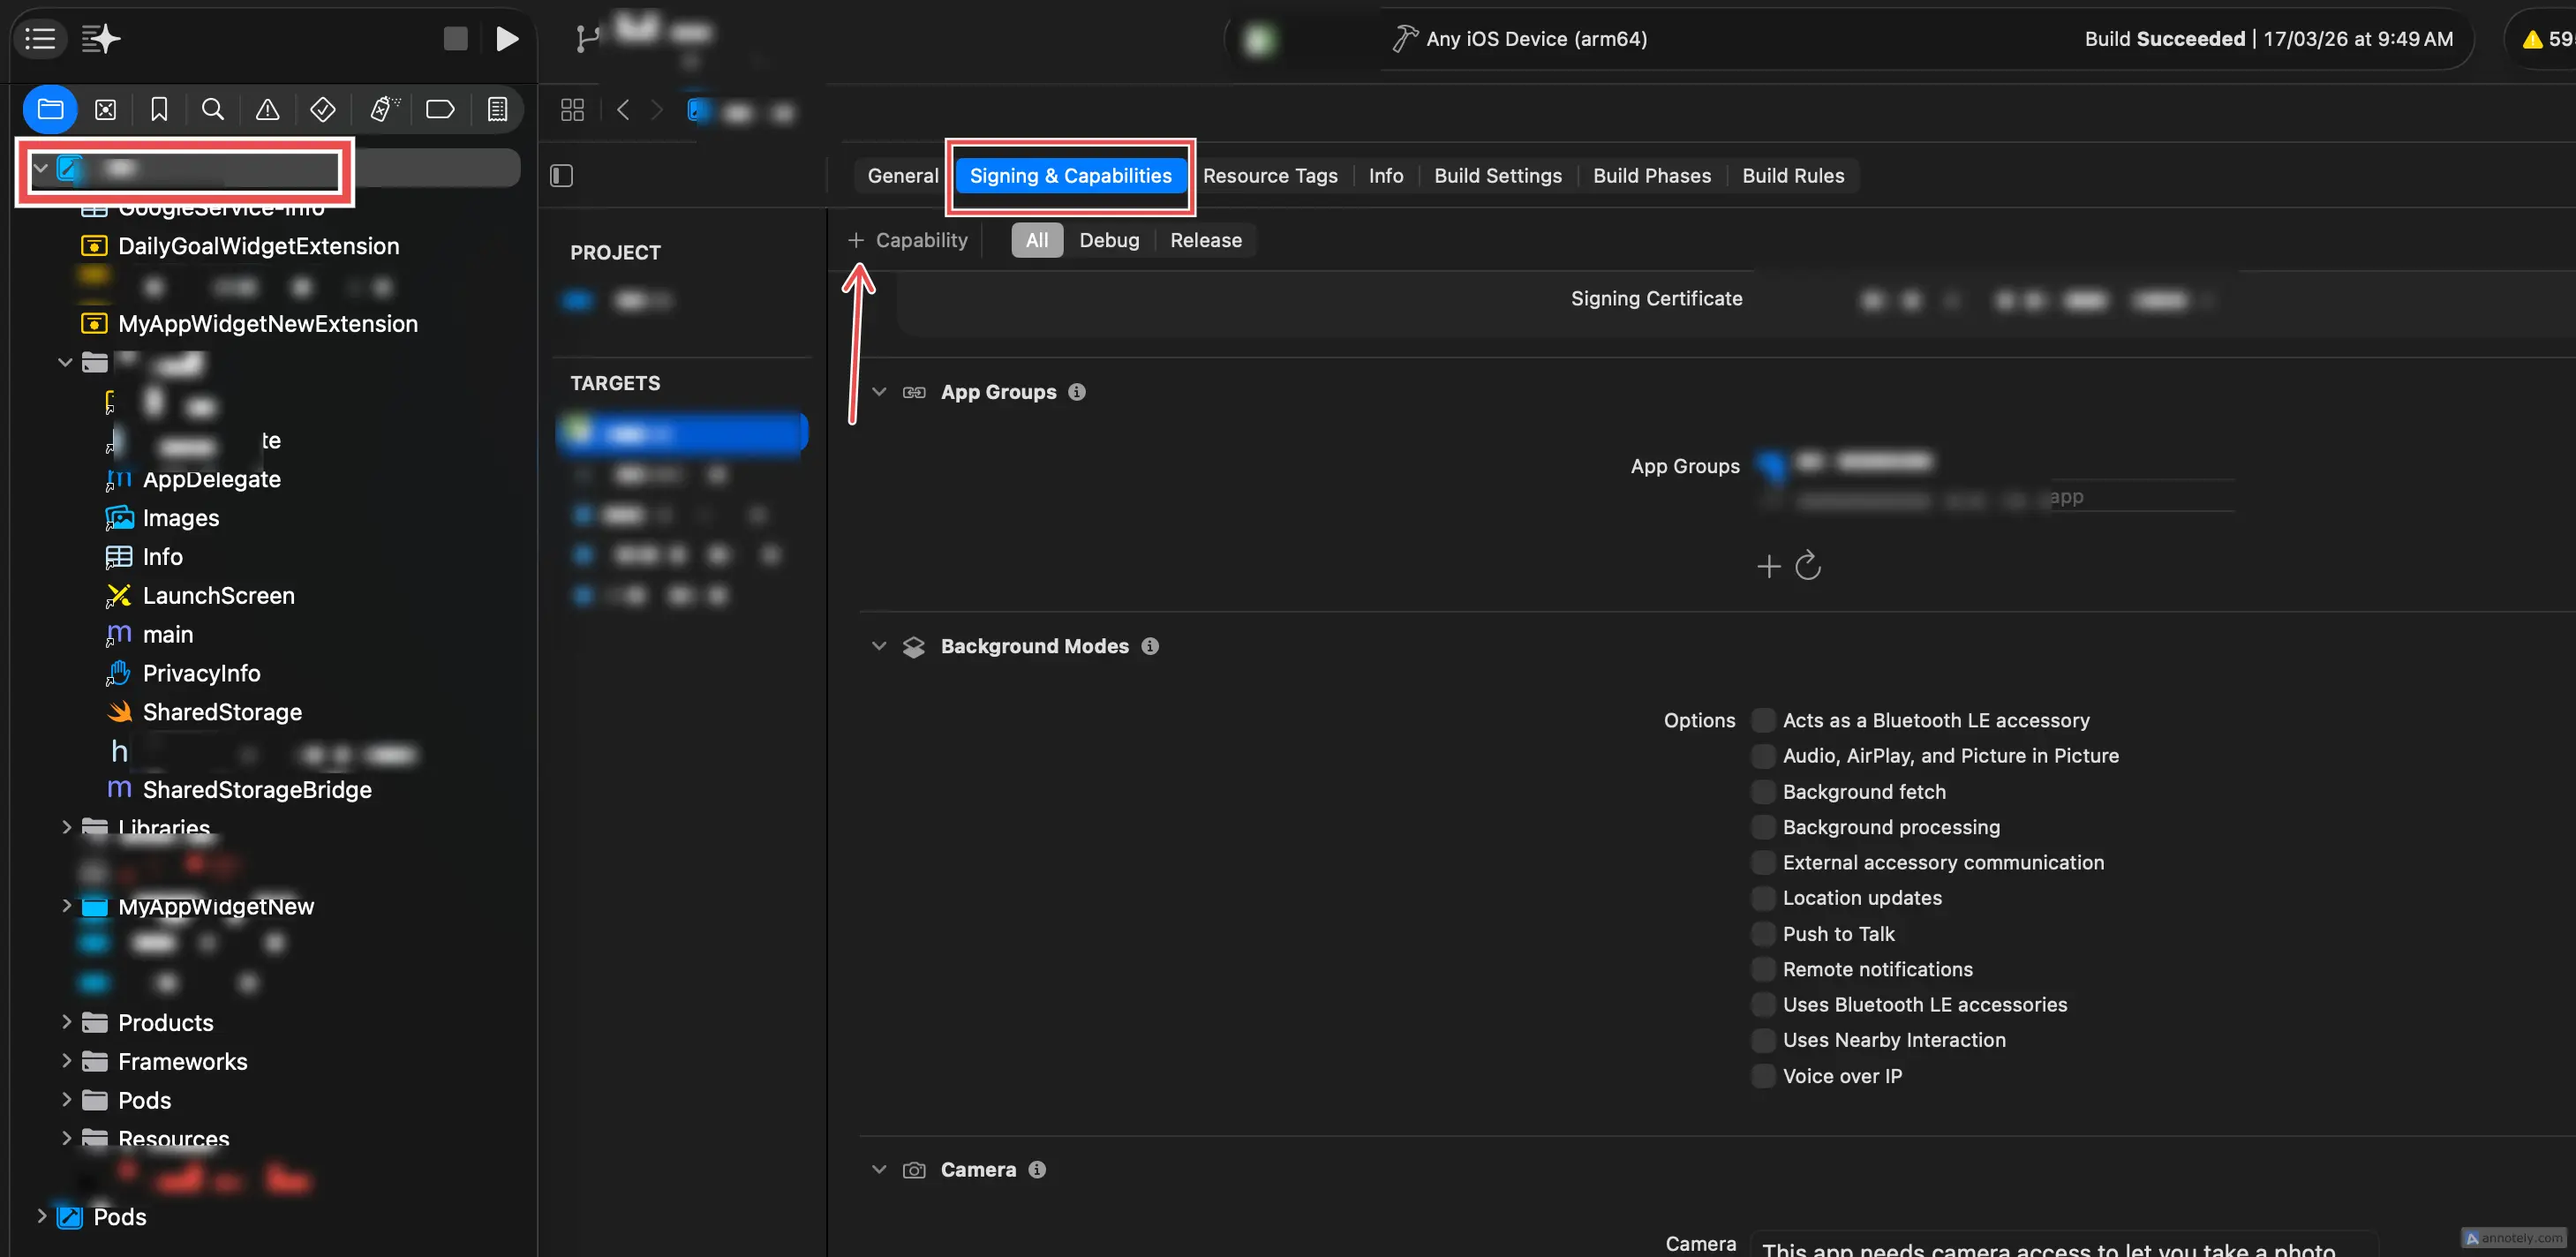
Click + Capability and add Push Notifications. Add Background Modes and enable Remote notifications and Background fetch (or the subset your app needs). This allows the system to wake your app for incoming pushes.
Step 3 — Install Dependencies
yarn add @react-native-firebase/messaging @notifee/react-native react-native-permissions
# iOS
cd ios && pod install && cd ..
Follow @react-native-firebase/messaging and Notifee docs for any extra native steps (e.g. Android Gradle, iOS entitlements).
Step 4 — Background Handler in index.js (Android display)
FCM does not show a system tray notification on Android when the app is in the background unless you display one. Register setBackgroundMessageHandler before your `App` import so it runs in the JS context used for background messages.
import { Platform } from 'react-native';
import '@react-native-firebase/app';
import { getApp } from '@react-native-firebase/app';
import {
  getMessaging,
  setBackgroundMessageHandler,
} from '@react-native-firebase/messaging';
import notifee, { AndroidImportance } from '@notifee/react-native';

const messaging = getMessaging(getApp());

setBackgroundMessageHandler(messaging, async (remoteMessage) => {
  try {
    const notification = remoteMessage.notification;
    const data = remoteMessage.data || {};
    const title = notification?.title ?? data?.title ?? 'Notification';
    const body =
      notification?.body ?? data?.body ?? data?.message ?? '';

    if (Platform.OS === 'android') {
      await notifee.createChannel({
        id: 'default',
        name: 'Default Notifications',
        description: 'Default notification channel',
        importance: AndroidImportance.HIGH,
        vibration: true,
        sound: 'default',
      });
      await notifee.displayNotification({
        title,
        body,
        data,
        android: {
          channelId: 'default',
          importance: AndroidImportance.HIGH,
          pressAction: { id: 'default' },
        },
      });
    }
  } catch (err) {
    console.warn('Background message handler error:', err);
  }
});

import App from './App';
// then AppRegistry.registerComponent(...) as in your template
Note: `Platform` must be imported from `react-native`. Keep AppRegistry.registerComponent after these imports. iOS background display is often handled by the system when a `notification` payload is present; adjust if you also need Notifee on iOS in background.
Step 5 — Android 13+ Notification Permission
Add POST_NOTIFICATIONS to `android/app/src/main/AndroidManifest.xml`:
<uses-permission android:name="android.permission.POST_NOTIFICATIONS" />Step 6 — Request Permission on Launch (react-native-permissions)
Create src/services/notifications/index.ts (fix typos like `notitifcations` in folder names for consistency):
import {
  checkNotifications,
  requestNotifications,
  RESULTS,
} from 'react-native-permissions';
import type { NotificationOption } from 'react-native-permissions';

const NOTIFICATION_OPTIONS: NotificationOption[] = ['alert', 'badge', 'sound'];

function isNotificationGranted(status: string): boolean {
  return status === RESULTS.GRANTED || status === RESULTS.LIMITED;
}

export async function requestNotificationPermissionOnLoad(): Promise<void> {
  try {
    const { status } = await checkNotifications();
    if (isNotificationGranted(status)) return;
    await requestNotifications(NOTIFICATION_OPTIONS);
  } catch {
    // Simulator or already denied
  }
}
In App.tsx, run once on mount:
useEffect(() => {
  requestNotificationPermissionOnLoad();
}, []);
Step 7 — Get FCM Token and Send to Backend
Extend the same service file. Replace `saveDeviceToken` with your API client that calls the secure endpoint from Part 2 (e.g. `POST /users/fcm-token` with the token in the body).
import { getMessaging, getToken } from '@react-native-firebase/messaging';
import { getApp } from '@react-native-firebase/app';
import { saveDeviceToken } from '../api'; // your API wrapper

export async function initNotifications(userId: number | string) {
  if (!userId) return;

  try {
    const { status } = await checkNotifications();
    if (!isNotificationGranted(status)) {
      const { status: newStatus } =
        await requestNotifications(NOTIFICATION_OPTIONS);
      if (!isNotificationGranted(newStatus)) return;
    }

    const messaging = getMessaging(getApp());
    const fcm_token = await getToken(messaging);
    await saveDeviceToken({ fcm_token });
  } catch (error) {
    console.warn('initNotifications', error);
  }
}
Call initNotifications only when the user is logged in, and only once per session (or when token refreshes — see `onTokenRefresh`). Example next to your auth-aware navigator:
const hasRegisteredToken = useRef(false);

useEffect(() => {
  if (userId && !hasRegisteredToken.current) {
    initNotifications(userId);
    hasRegisteredToken.current = true;
  }
}, [userId]);
For production, also subscribe to onTokenRefresh and PATCH the new token to your backend.
Step 8 — Open-App Navigation: PushNotificationController
Create src/utils/PushNotificationController.tsx. It listens for onNotificationOpenedApp and getInitialNotification (quit state), and Notifee foreground press events. Implement handleNotificationPress with your navigation ref to deep-link using `remoteMessage.data` (e.g. `screen`, `id`).
import { useEffect, useCallback } from 'react';
import { Platform } from 'react-native';
import notifee, { AndroidImportance, EventType } from '@notifee/react-native';
import {
  getInitialNotification,
  getMessaging,
  onNotificationOpenedApp,
} from '@react-native-firebase/messaging';
import { getApp } from '@react-native-firebase/app';

const messaging = getMessaging(getApp());

const PushNotificationController = () => {
  const handleNotificationPress = useCallback(
    async (data: Record<string, string> | undefined) => {
      if (!data) return;
      // navigationRef.navigate(data.screen, { id: data.id });
    },
    [],
  );

  const createNotificationChannel = useCallback(async () => {
    if (Platform.OS === 'android') {
      await notifee.createChannel({
        id: 'default',
        name: 'Default Notifications',
        importance: AndroidImportance.HIGH,
        vibration: true,
        sound: 'default',
      });
    }
  }, []);

  useEffect(() => {
    createNotificationChannel();

    const unsubOpen = onNotificationOpenedApp(messaging, (remoteMessage) => {
      handleNotificationPress(remoteMessage.data as Record<string, string>);
    });

    getInitialNotification(messaging).then((remoteMessage) => {
      if (remoteMessage) {
        handleNotificationPress(remoteMessage.data as Record<string, string>);
      }
    });

    const unsubNotifee = notifee.onForegroundEvent(({ type, detail }) => {
      if (type === EventType.PRESS) {
        handleNotificationPress(
          detail.notification?.data as Record<string, string>,
        );
      }
    });

    notifee.onBackgroundEvent(async ({ type, detail }) => {
      if (type === EventType.PRESS) {
        // Often handled when app returns to foreground
      }
    });

    return () => {
      unsubOpen();
      unsubNotifee();
    };
  }, [createNotificationChannel, handleNotificationPress]);

  return null;
};

export default PushNotificationController;
Mount it inside NavigationContainer but outside your stack screens so it always runs:
<NavigationContainer ref={navigationRef} linking={linking}>
  <PushNotificationController />
  <RootStack />
</NavigationContainer>
Step 9 — Foreground: Zustand Store + Banner UI
When the app is foregrounded, onMessage fires; the OS won’t show a banner. Use a small global store and a top overlay component.
src/store/useInAppNotificationStore.ts — use a named export so imports stay consistent:
import { create } from 'zustand';

export interface InAppNotificationPayload {
  title: string;
  body?: string;
  imageUrl?: string | null;
  data?: Record<string, string>;
}

interface State {
  visible: boolean;
  title: string;
  body: string;
  imageUrl: string | null;
  data: Record<string, string> | null;
}

interface Actions {
  show: (payload: InAppNotificationPayload) => void;
  dismiss: () => void;
}

const initial: State = {
  visible: false,
  title: '',
  body: '',
  imageUrl: null,
  data: null,
};

export const useInAppNotificationStore = create<State & Actions>((set) => ({
  ...initial,
  show: (payload) =>
    set({
      visible: true,
      title: payload.title ?? 'Notification',
      body: payload.body ?? '',
      imageUrl: payload.imageUrl ?? null,
      data: payload.data ?? null,
    }),
  dismiss: () => set(initial),
}));
Add InAppNotificationBanner (your styles from the idea: absolute top, card, dismiss, auto-dismiss timer). Place it inside the root view or navigation wrapper so it sits above content.
src/services/notifications/useNotifications.ts — subscribe to onMessage and push into the store:
import { useEffect } from 'react';
import { getApp } from '@react-native-firebase/app';
import { getMessaging, onMessage } from '@react-native-firebase/messaging';
import { useInAppNotificationStore } from '../../store/useInAppNotificationStore';

export function useNotifications() {
  useEffect(() => {
    const messaging = getMessaging(getApp());
    const unsubscribe = onMessage(messaging, async (remoteMessage) => {
      const n = remoteMessage.notification;
      const title = n?.title ?? 'Notification';
      const body = n?.body ?? '';
      const imageUrl =
        (n as { android?: { imageUrl?: string } })?.android?.imageUrl ??
        (n as { imageUrl?: string })?.imageUrl ??
        null;
      const data = remoteMessage.data as Record<string, string> | undefined;

      useInAppNotificationStore.getState().show({
        title,
        body,
        imageUrl: imageUrl ?? undefined,
        data,
      });
    });
    return unsubscribe;
  }, []);
}
Call useNotifications() once in App.tsx (or a root provider) and render <InAppNotificationBanner /> alongside your navigator.
Checklist
✓  APNs key uploaded in Firebase Cloud Messaging
✓  Xcode: Push Notifications + Background Modes
✓  @react-native-firebase/messaging + Notifee installed
✓  Background handler in index.js (Android channel + display)
✓  POST_NOTIFICATIONS on Android 13+
✓  Permission prompt on launch
✓  Token saved to backend after login (once + on refresh)
✓  PushNotificationController for cold/background open
✓  Foreground onMessage → Zustand → in-app banner
Recap
You now have a full FCM loop: Firebase + Apple configuration, native capabilities, background display on Android via Notifee, permissions, token registration with your Node backend, tap handling for navigation, and foreground UX with a Zustand-driven banner. Tune `handleNotificationPress` and payload `data` keys to match your product screens.
Related Articles

End-to-End Guide: Enable Firebase Crashlytics in React Native (Android + iOS)
A complete guide to setting up Firebase Crashlytics in your React Native app — from Gradle configuration and CocoaPods to a reusable Crashlytics service, React Error Boundary integration, and verifying crash reports in the Firebase Console.
How to Register an Android App with Firebase in React Native (2026 Guide)
A complete step-by-step guide to adding Firebase to your React Native Android app — from creating the app in the Firebase Console to configuring Gradle files and verifying the setup.