How to Register an iOS App with Firebase in React Native (2026 Guide)
If you're building a React Native app and want to use Firebase services on iOS — push notifications, authentication, analytics, crashlytics — you first need to register your iOS app with your Firebase project. This guide walks you through the entire process, from the Firebase Console to your Xcode project configuration.
This is the iOS counterpart to our Android Firebase setup guide. If you've already done the Android side, the Firebase Console steps will feel familiar — but the project configuration is completely different since iOS uses Xcode, GoogleService-Info.plist, and AppDelegate instead of Gradle files.
Prerequisites
Before you start, make sure you have: a Firebase project already created in the Firebase Console, a React Native project with iOS set up, Xcode installed on your Mac, and CocoaPods or Swift Package Manager for dependency management. If you haven't created a Firebase project yet, it takes less than a minute — just head to the console and click "Add project".
Step 1 — Open Your Firebase Project and Add an iOS App
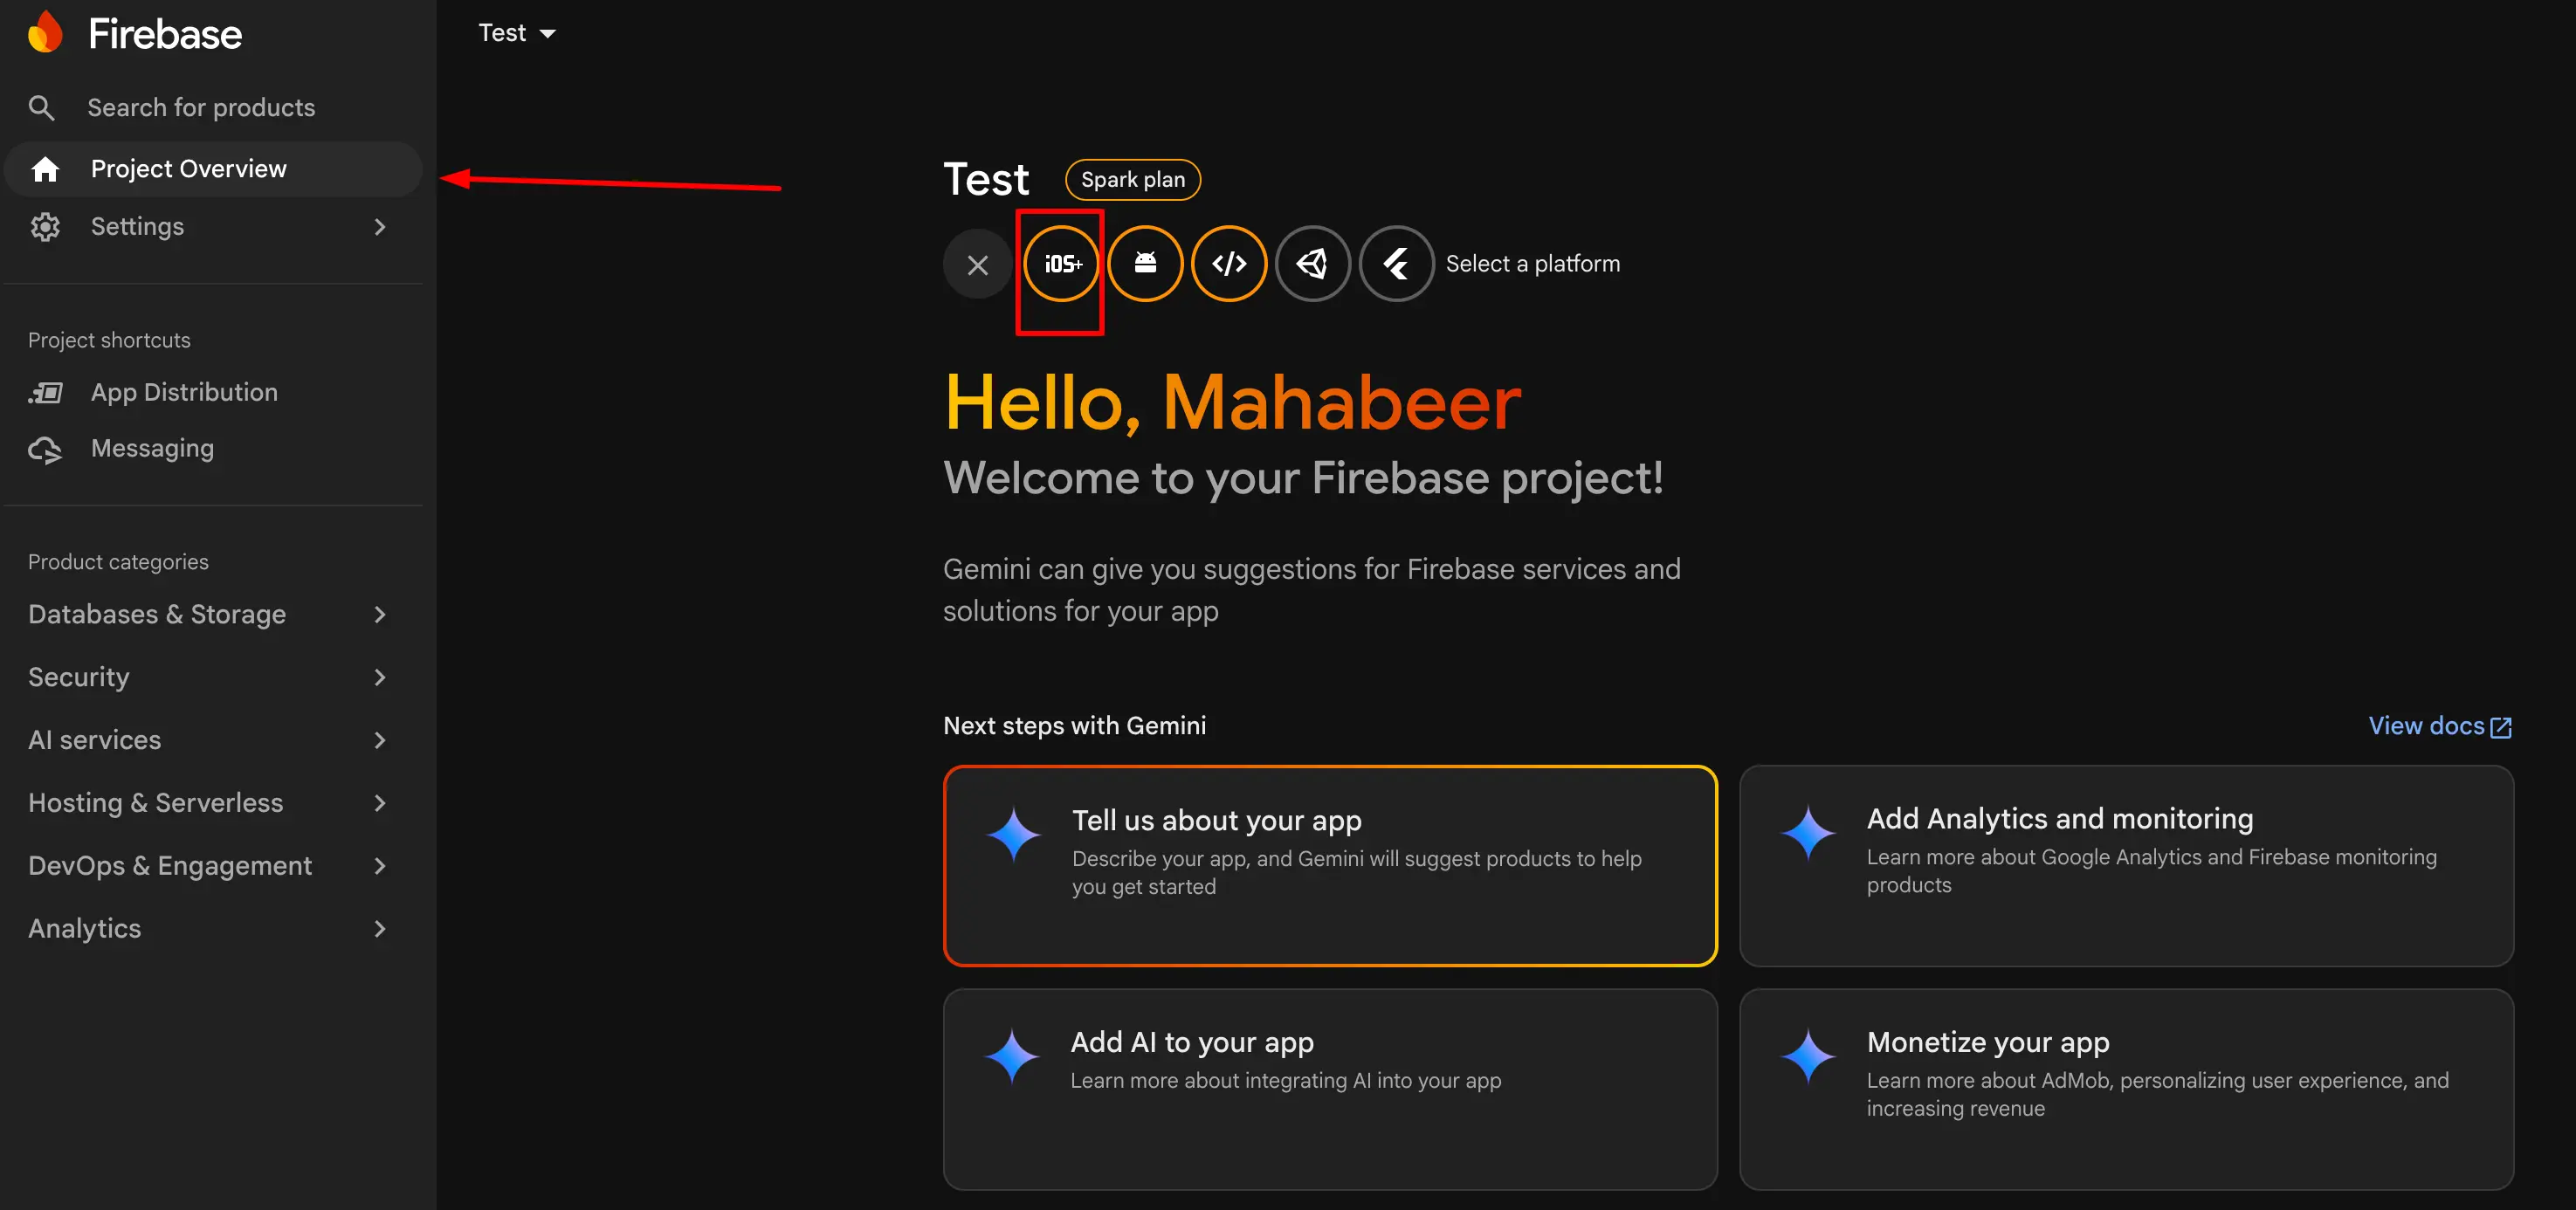
Navigate to the Firebase Console and select your project. Open the Project Overview tab from the left sidebar and click 'Add app'. From the platform options, click the iOS icon to start the iOS app registration wizard.
Step 2 — Find Your Apple Bundle ID
The first field Firebase asks for is your Apple Bundle ID. This is the unique identifier for your iOS app, and you need to get it from Xcode. Here's how:
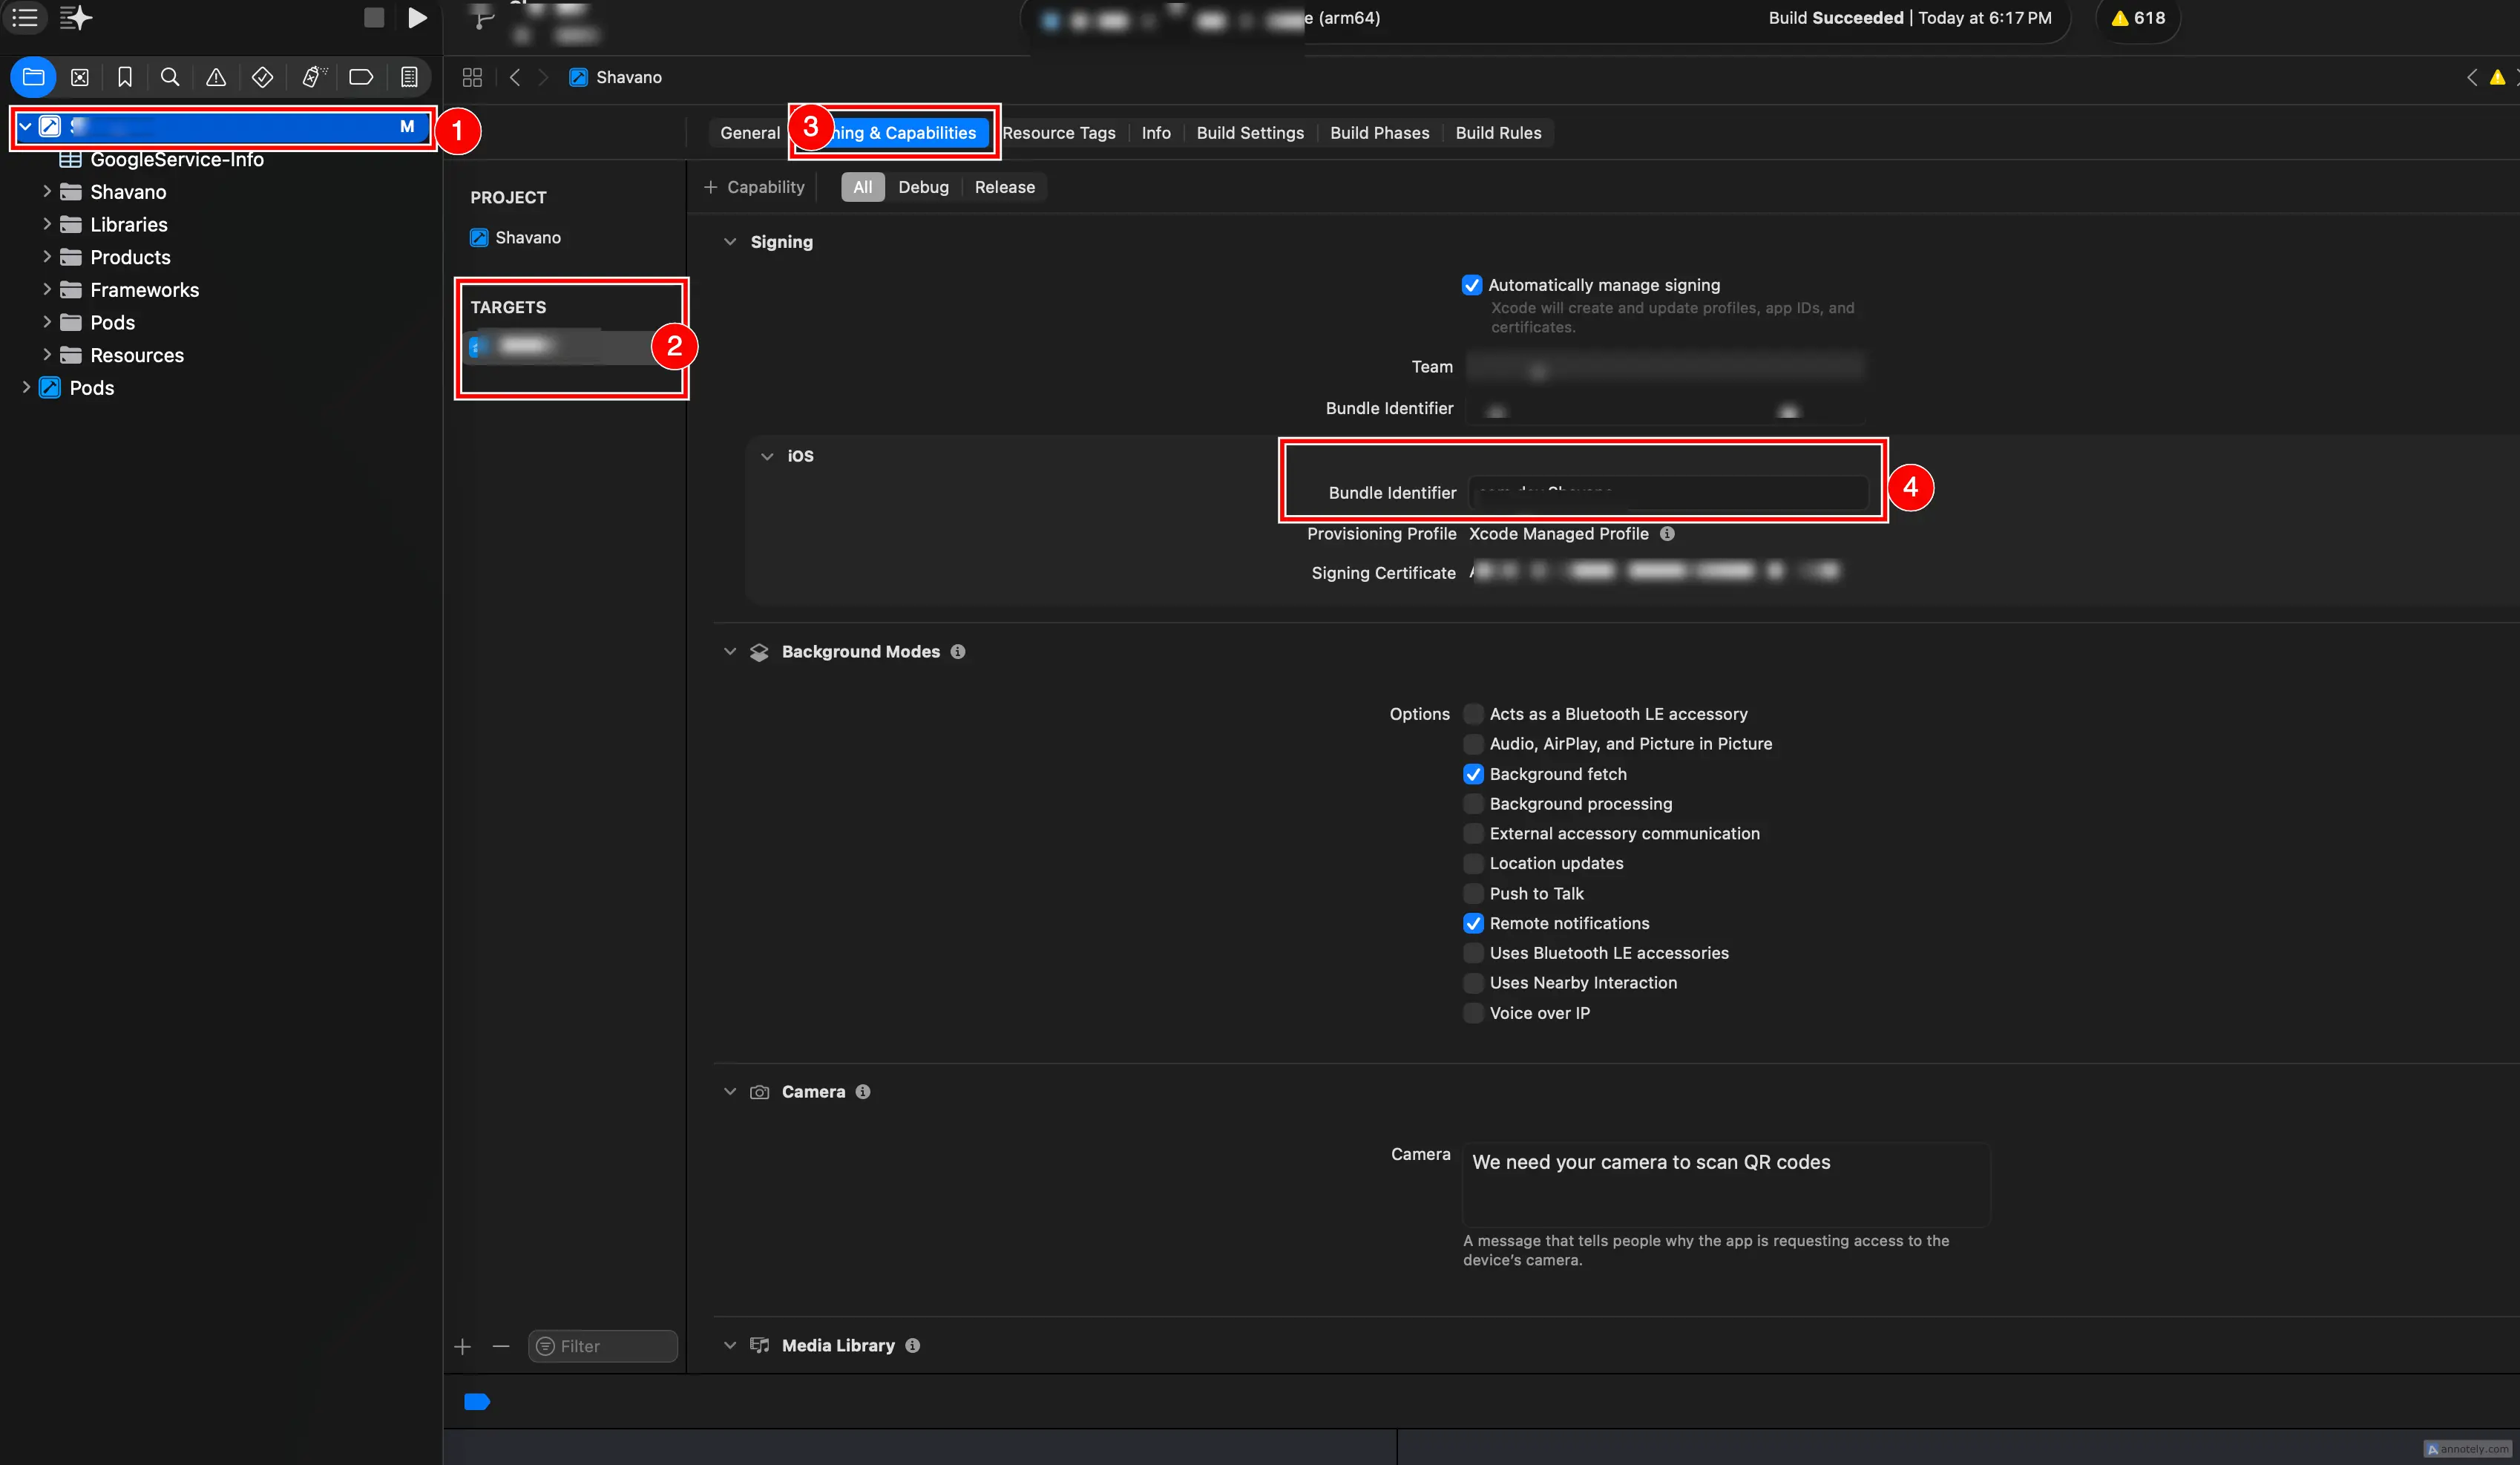
Open your React Native project in Xcode by opening the `.xcworkspace` file (not `.xcodeproj`) located in the `ios/` folder:
open ios/YourApp.xcworkspaceIn Xcode, select your app folder from the left sidebar (the top-level project entry). Under the Targets section, select your main app target — do not select the .Tests target. Then click on the 'Signing & Capabilities' tab from the tab bar at the top.
Under the Signing section, expand iOS and you'll see the Bundle Identifier for your app. It typically looks like `com.yourcompany.yourapp`. Copy this value.
Step 3 — Register the iOS App in Firebase
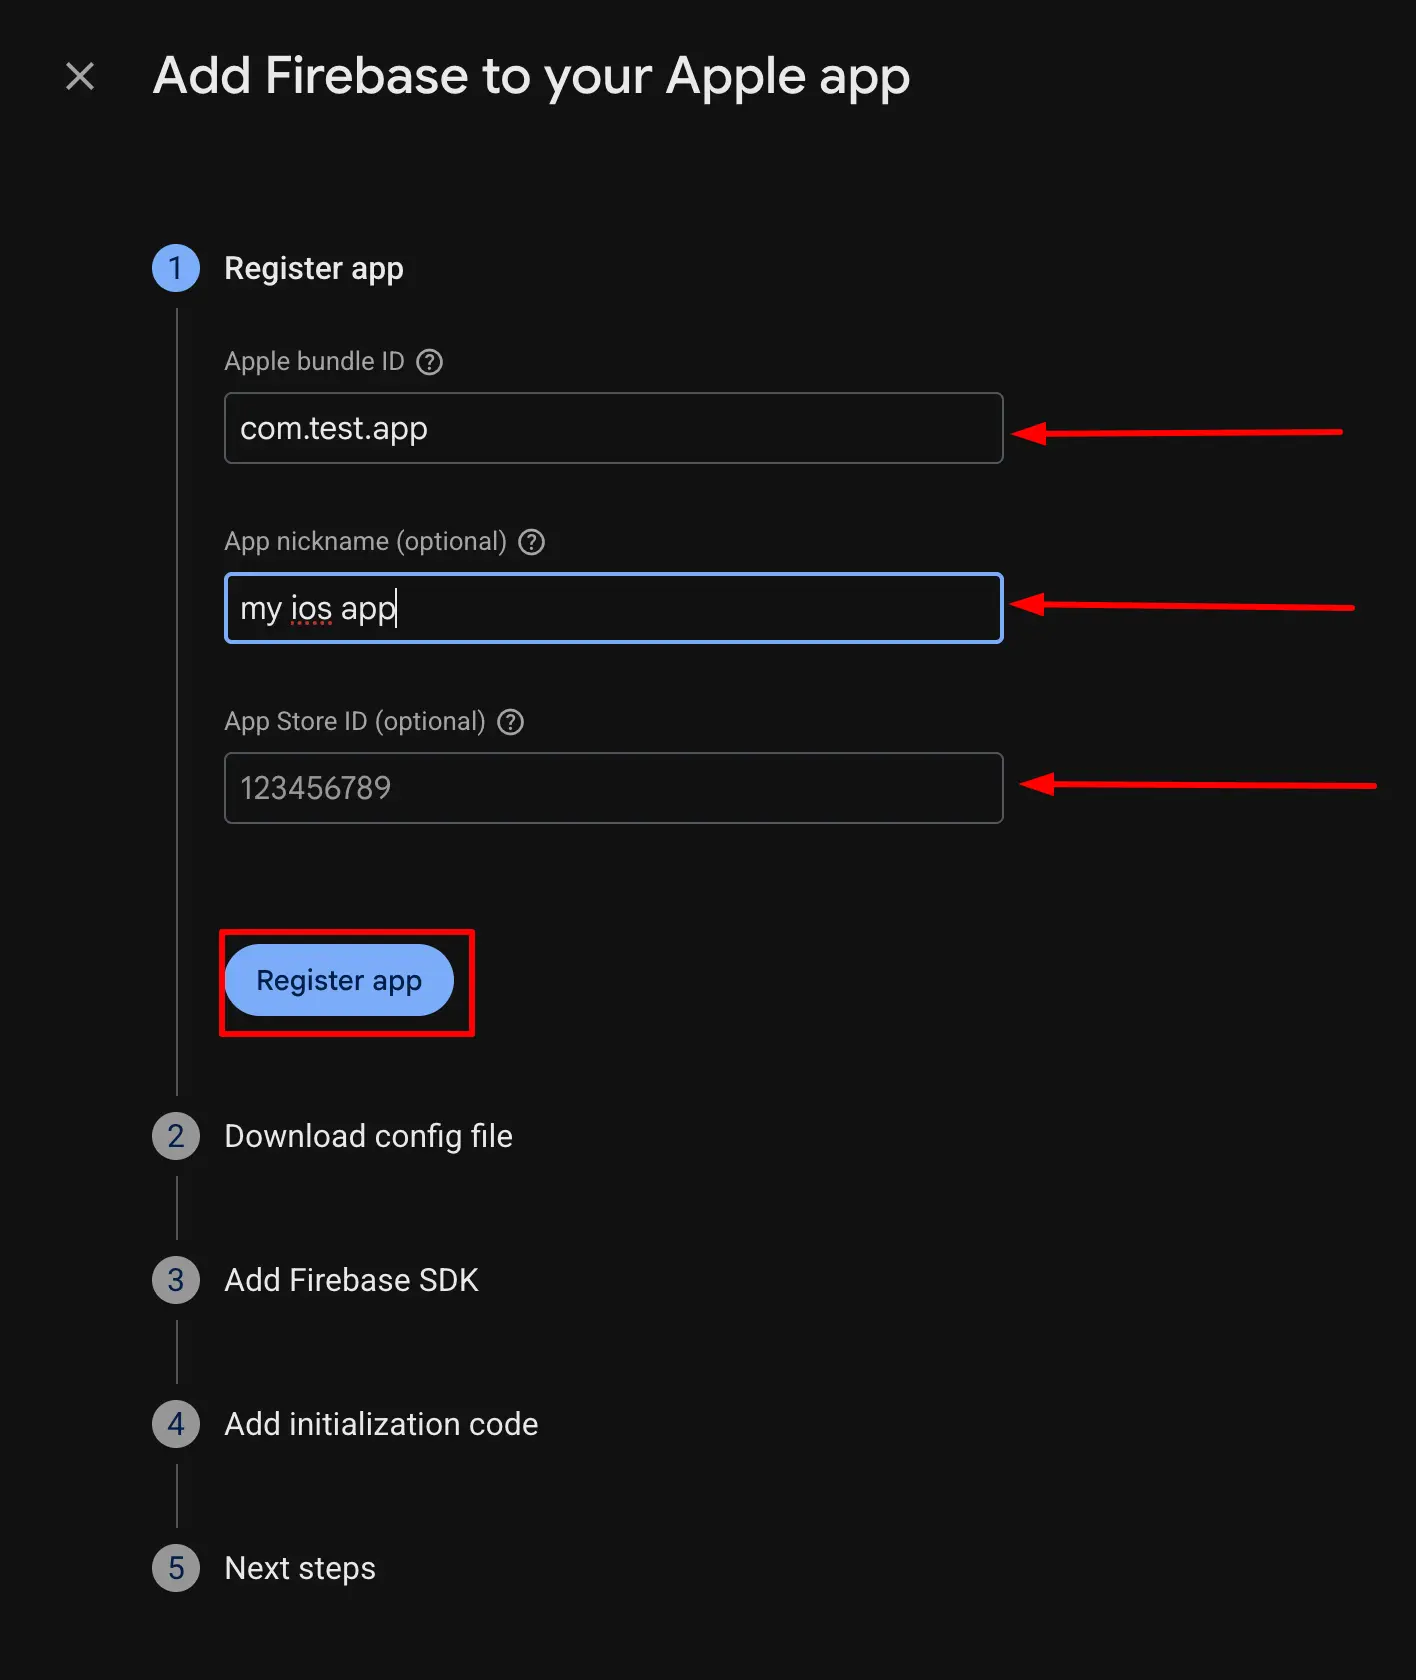
Back in the Firebase Console, paste your Bundle ID into the 'Apple bundle ID' field. Optionally, add an App nickname — this is helpful if you're registering multiple iOS apps (like staging and production) under the same Firebase project. You can also add your App Store ID if your app is already published.
Click 'Register app' to proceed.
Step 4 — Download GoogleService-Info.plist
After registration, Firebase generates a GoogleService-Info.plist configuration file for your iOS app. Click the 'Download GoogleService-Info.plist' button and save it to your machine. Then click 'Next'.
Now you need to add this file to your Xcode project. Open your project in Xcode, then in the left sidebar, right-click on your main project folder and select 'Add Files to "YourProjectName"' from the context menu.
Select the downloaded GoogleService-Info.plist file, make sure 'Copy items if needed' is checked, and click 'Finish'. The file should now appear in your project navigator.
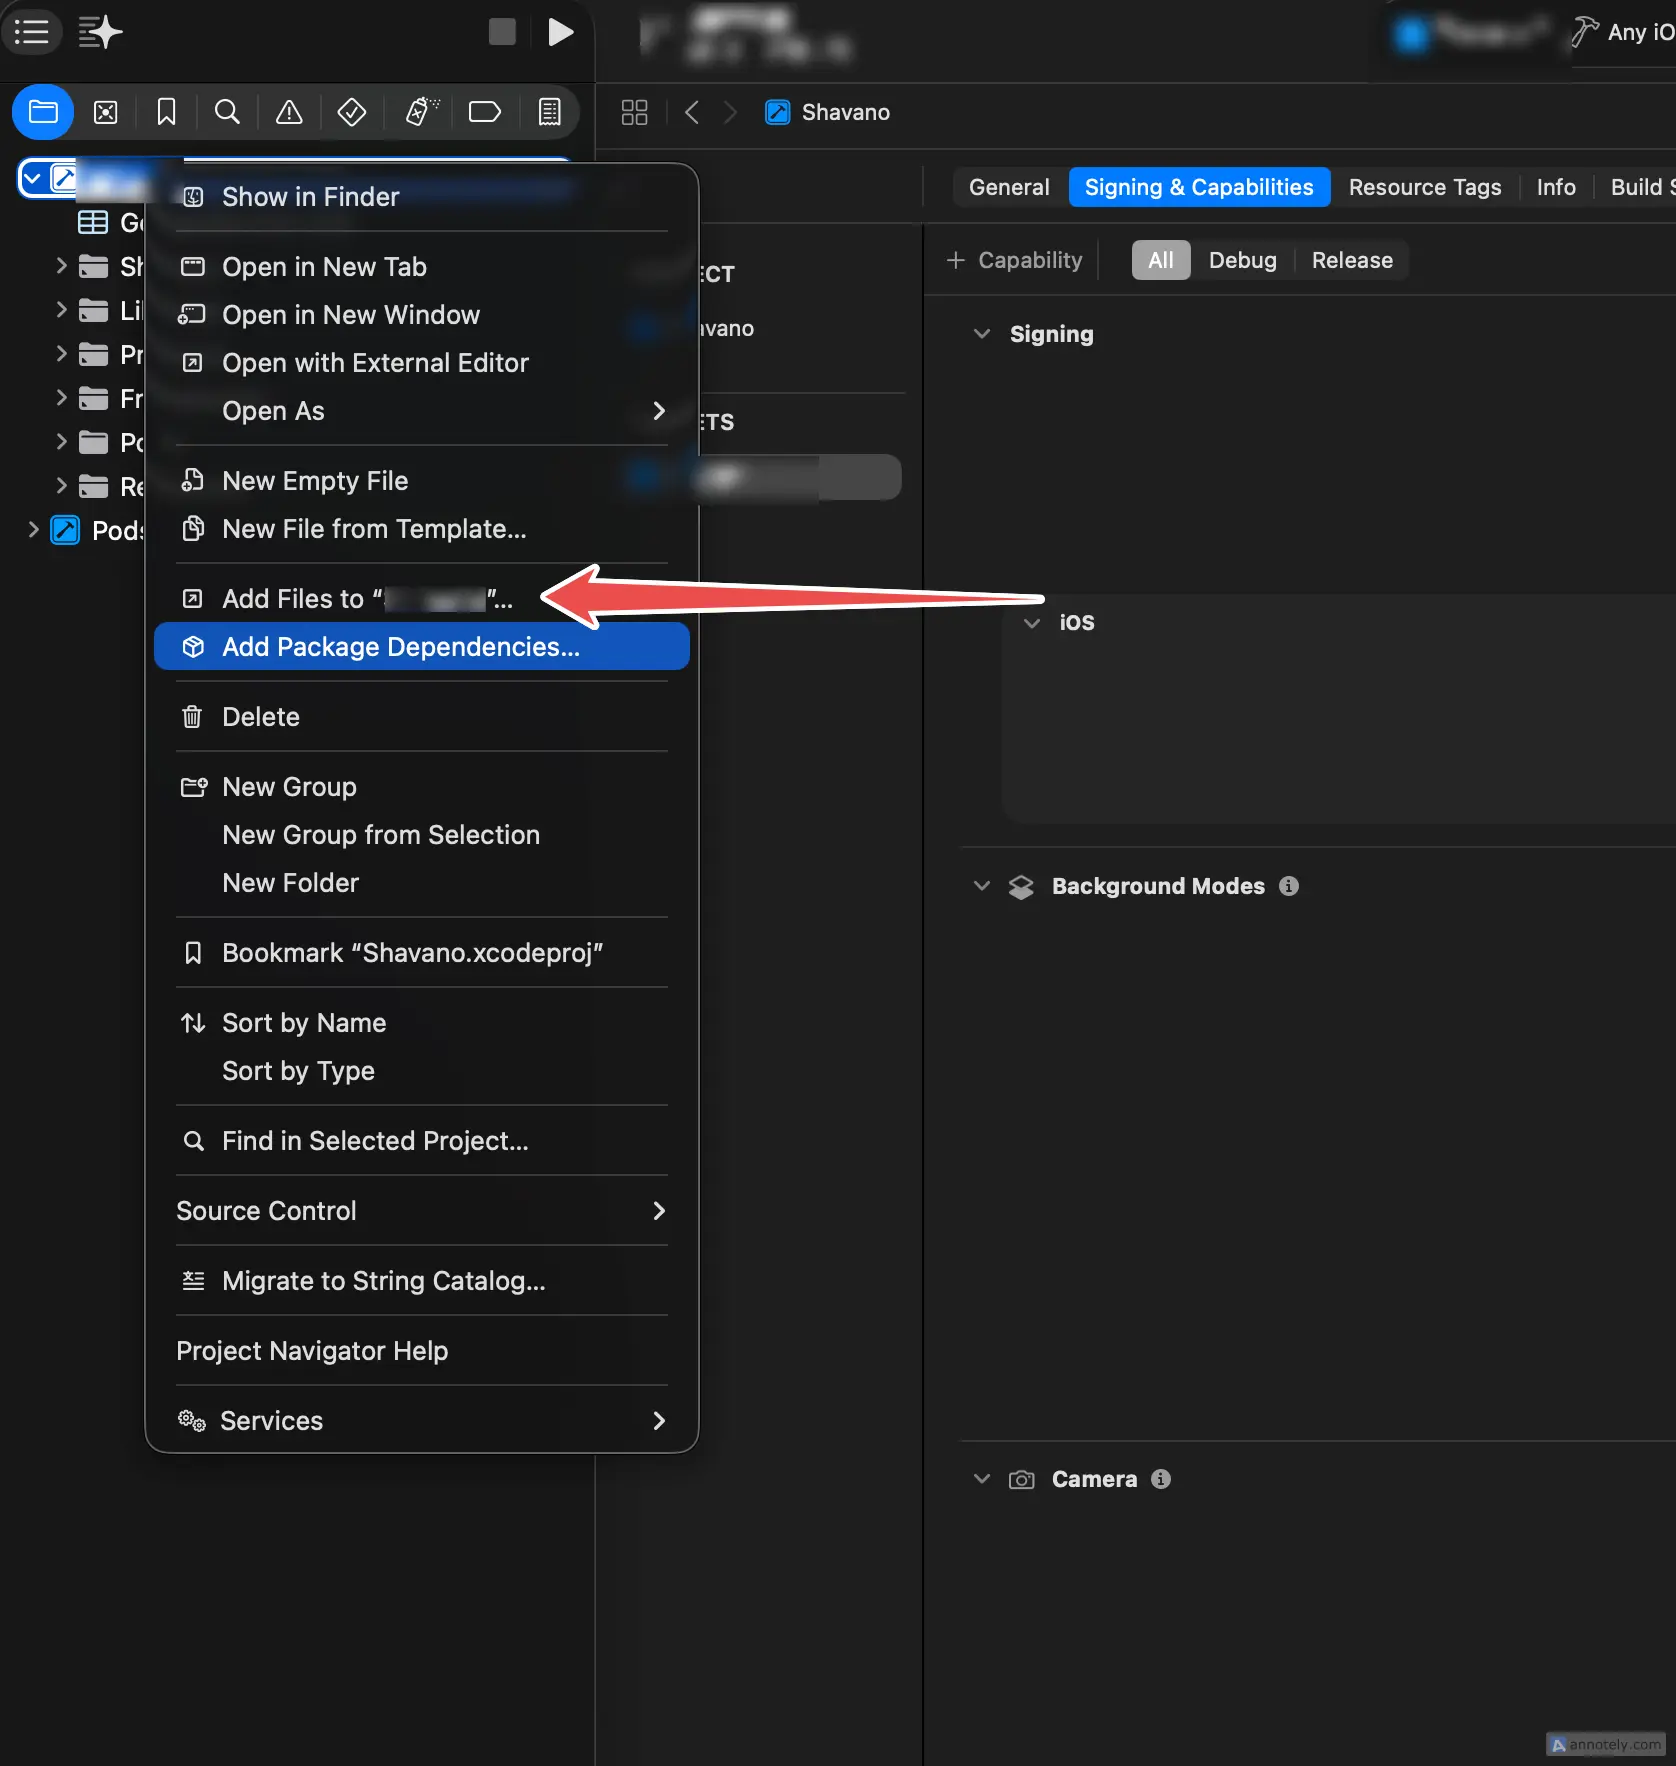
Important: The file must be named exactly `GoogleService-Info.plist` and placed in the root of your app target. If you rename it or place it in a subfolder, Firebase won't be able to find it at runtime.
Step 5 — Configure AppDelegate for Firebase
Now you need to initialize Firebase when your app launches. Open the AppDelegate file in your React Native project. For Swift-based projects, it's located at:
your-project/
└── ios/
    └── YourApp/
        └── AppDelegate.swift
Add the FirebaseCore import at the top of the file and call FirebaseApp.configure() inside the `application(_:didFinishLaunchingWithOptions:)` method:
import UIKit
import FirebaseCore

@UIApplicationMain
class AppDelegate: UIResponder, UIApplicationDelegate {

  var window: UIWindow?

  func application(_ application: UIApplication,
    didFinishLaunchingWithOptions launchOptions:
      [UIApplication.LaunchOptionsKey: Any]?) -> Bool {
    FirebaseApp.configure()

    return true
  }
}
The key line is FirebaseApp.configure() — this reads the `GoogleService-Info.plist` file and initializes all Firebase services. It must be called as early as possible in your app lifecycle, ideally as the first line in `didFinishLaunchingWithOptions`.
For React Native projects using the newer architecture with a bridging header or Objective-C AppDelegate, the equivalent Objective-C code would be:
#import <Firebase.h>

- (BOOL)application:(UIApplication *)application
    didFinishLaunchingWithOptions:(NSDictionary *)launchOptions {
  [FIRApp configure];
  // ... rest of your setup
  return YES;
}
Step 6 — Install Firebase iOS SDK via CocoaPods
If you're using @react-native-firebase, the Firebase iOS SDK is managed automatically via CocoaPods. Make sure your `Podfile` includes the Firebase dependency, then run:
cd ios && pod install && cd ..If you're managing Firebase manually without @react-native-firebase, add the Firebase pod to your `ios/Podfile`:
# ios/Podfile
pod 'Firebase/Core'
# Add specific Firebase modules as needed:
# pod 'Firebase/Messaging'
# pod 'Firebase/Auth'
# pod 'Firebase/Analytics'
Then run `pod install` again. Always open the .xcworkspace file after running pod install — not the `.xcodeproj` file.
Step 7 — Complete Setup and Verify
Back in the Firebase Console, click 'Continue to console' to complete the setup wizard. Firebase may attempt to verify communication with your app — this will succeed once you build and run.
Build and run your app on an iOS simulator or physical device:
npx react-native run-iosIf the app compiles and launches without errors, Firebase is successfully integrated with your iOS app. You're now ready to use Firebase services like Authentication, Cloud Firestore, Cloud Messaging, Analytics, Crashlytics, and more.
Complete File Reference
Here's a summary of all the files involved in the iOS Firebase setup:
your-react-native-project/
├── ios/
│   ├── YourApp.xcworkspace          ← Always open this (not .xcodeproj)
│   ├── Podfile                      ← Firebase pod dependencies
│   └── YourApp/
│       ├── AppDelegate.swift        ← Added FirebaseApp.configure()
│       └── GoogleService-Info.plist ← Downloaded from Firebase Console
└── ...
Common Mistakes to Avoid
Wrong Bundle ID — The Bundle ID in Firebase must exactly match the one in Xcode. Even a single character difference will cause Firebase to silently fail. Double-check by comparing Xcode → Signing & Capabilities with what you entered in the Firebase Console.
Missing GoogleService-Info.plist — If you forgot to add the plist file to Xcode or placed it in the wrong target, your app will crash on launch with a Firebase configuration error. Make sure the file appears in the project navigator under your main app target.
Opening .xcodeproj instead of .xcworkspace — After running `pod install`, you must open the `.xcworkspace` file. Opening `.xcodeproj` will result in missing framework errors because CocoaPods dependencies are linked through the workspace.
FirebaseApp.configure() not called — If you forget to add this line to AppDelegate, Firebase SDKs will throw runtime errors when you try to use any service. Always call it before any other Firebase API.
What's Next?
With Firebase connected to your iOS app, you can now: set up push notifications (you'll need an APNs key from the Apple Developer Portal), add Firebase Authentication for sign-in flows, enable Crashlytics for real-time crash reporting, and activate Analytics for user engagement tracking. Check out @react-native-firebase for production-ready React Native bindings for all Firebase services.
Related Articles
Integrate Firebase Cloud Messaging in React Native — Permissions, Tokens, Background & In-App UI
End-to-end guide: APNs key in Firebase, Xcode capabilities, @react-native-firebase/messaging + Notifee, Android 13+ permissions, saving FCM tokens to your backend, navigation on tap, and a Zustand-powered in-app notification banner.

End-to-End Guide: Enable Firebase Crashlytics in React Native (Android + iOS)
A complete guide to setting up Firebase Crashlytics in your React Native app — from Gradle configuration and CocoaPods to a reusable Crashlytics service, React Error Boundary integration, and verifying crash reports in the Firebase Console.