How to Register an Android App with Firebase in React Native (2026 Guide)
Firebase is the go-to backend-as-a-service for mobile developers, offering everything from authentication and real-time databases to push notifications and analytics. If you're building a React Native app and want to use any Firebase service on Android, the first step is registering your Android app with your Firebase project. This guide walks you through every step with screenshots — from the Firebase Console to your Gradle configuration.
This guide follows the React Native ecosystem specifically. While the Firebase Console steps are the same for any Android app, the file paths and Gradle configuration are tailored for a standard React Native project structure.
Prerequisites
Before you begin, make sure you have a Firebase project already created. If you don't have one yet, head over to the Firebase Console and create a new project — it takes about 60 seconds. You'll also need a React Native project set up and running on Android (either on an emulator or a physical device).
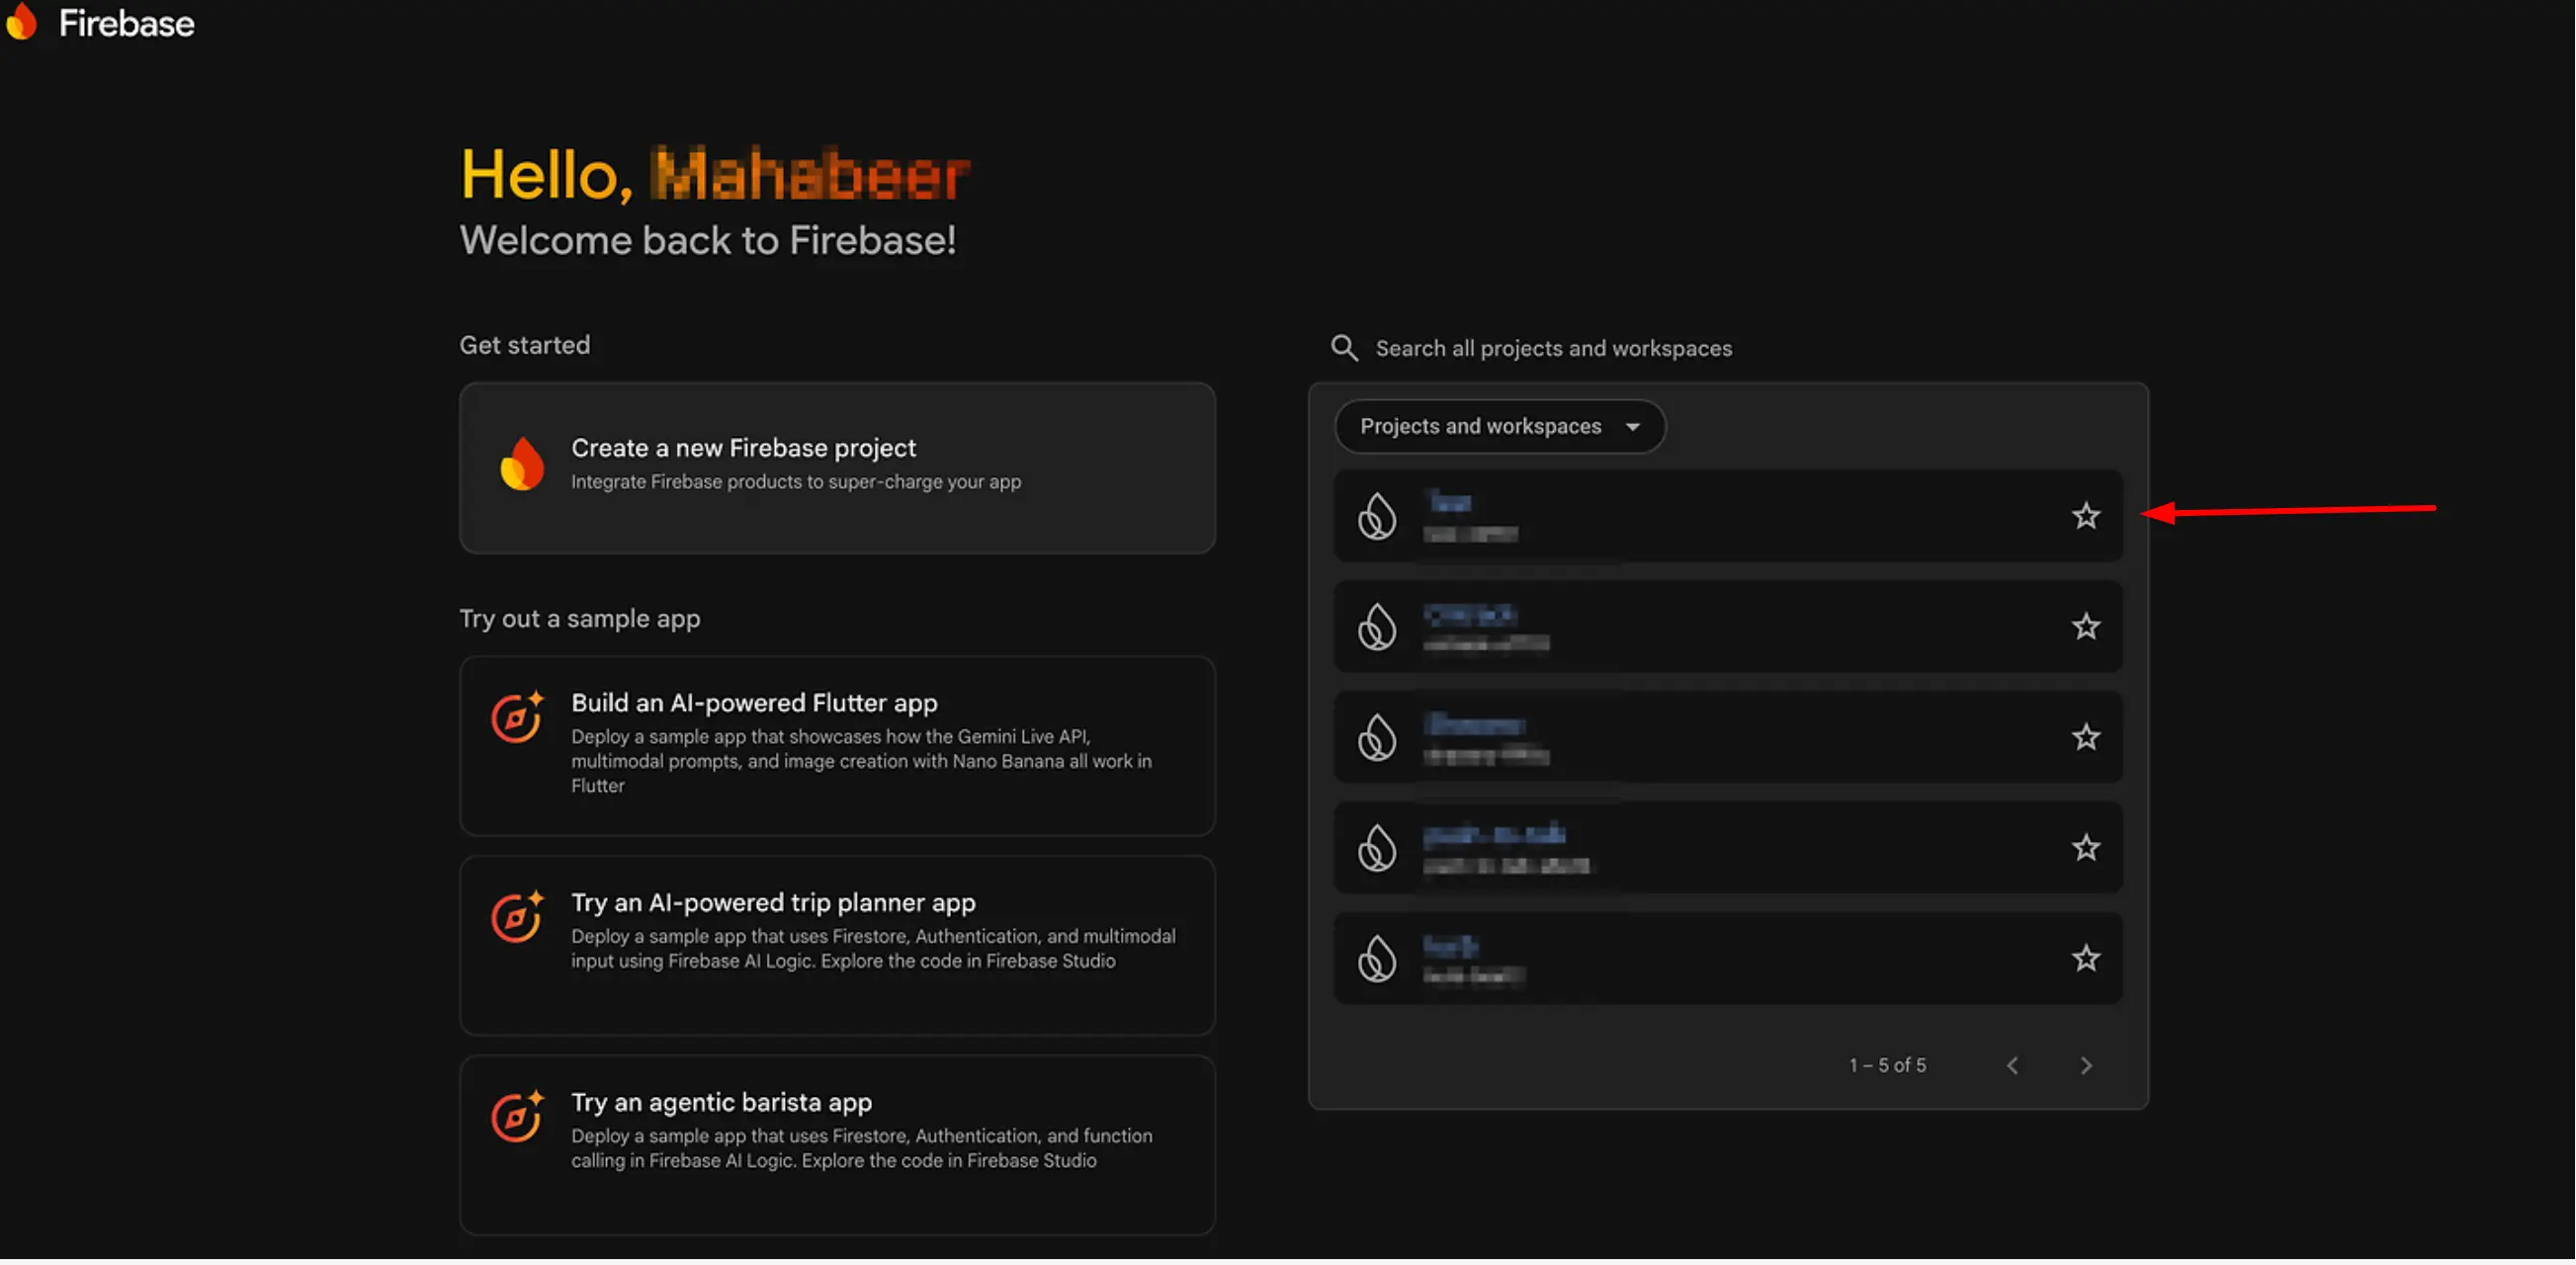
Step 1 — Open Your Firebase Project
Navigate to the Firebase Console and sign in with your Google account. From the dashboard, select the project you want to add your Android app to. If you have multiple projects, make sure you're selecting the correct one.
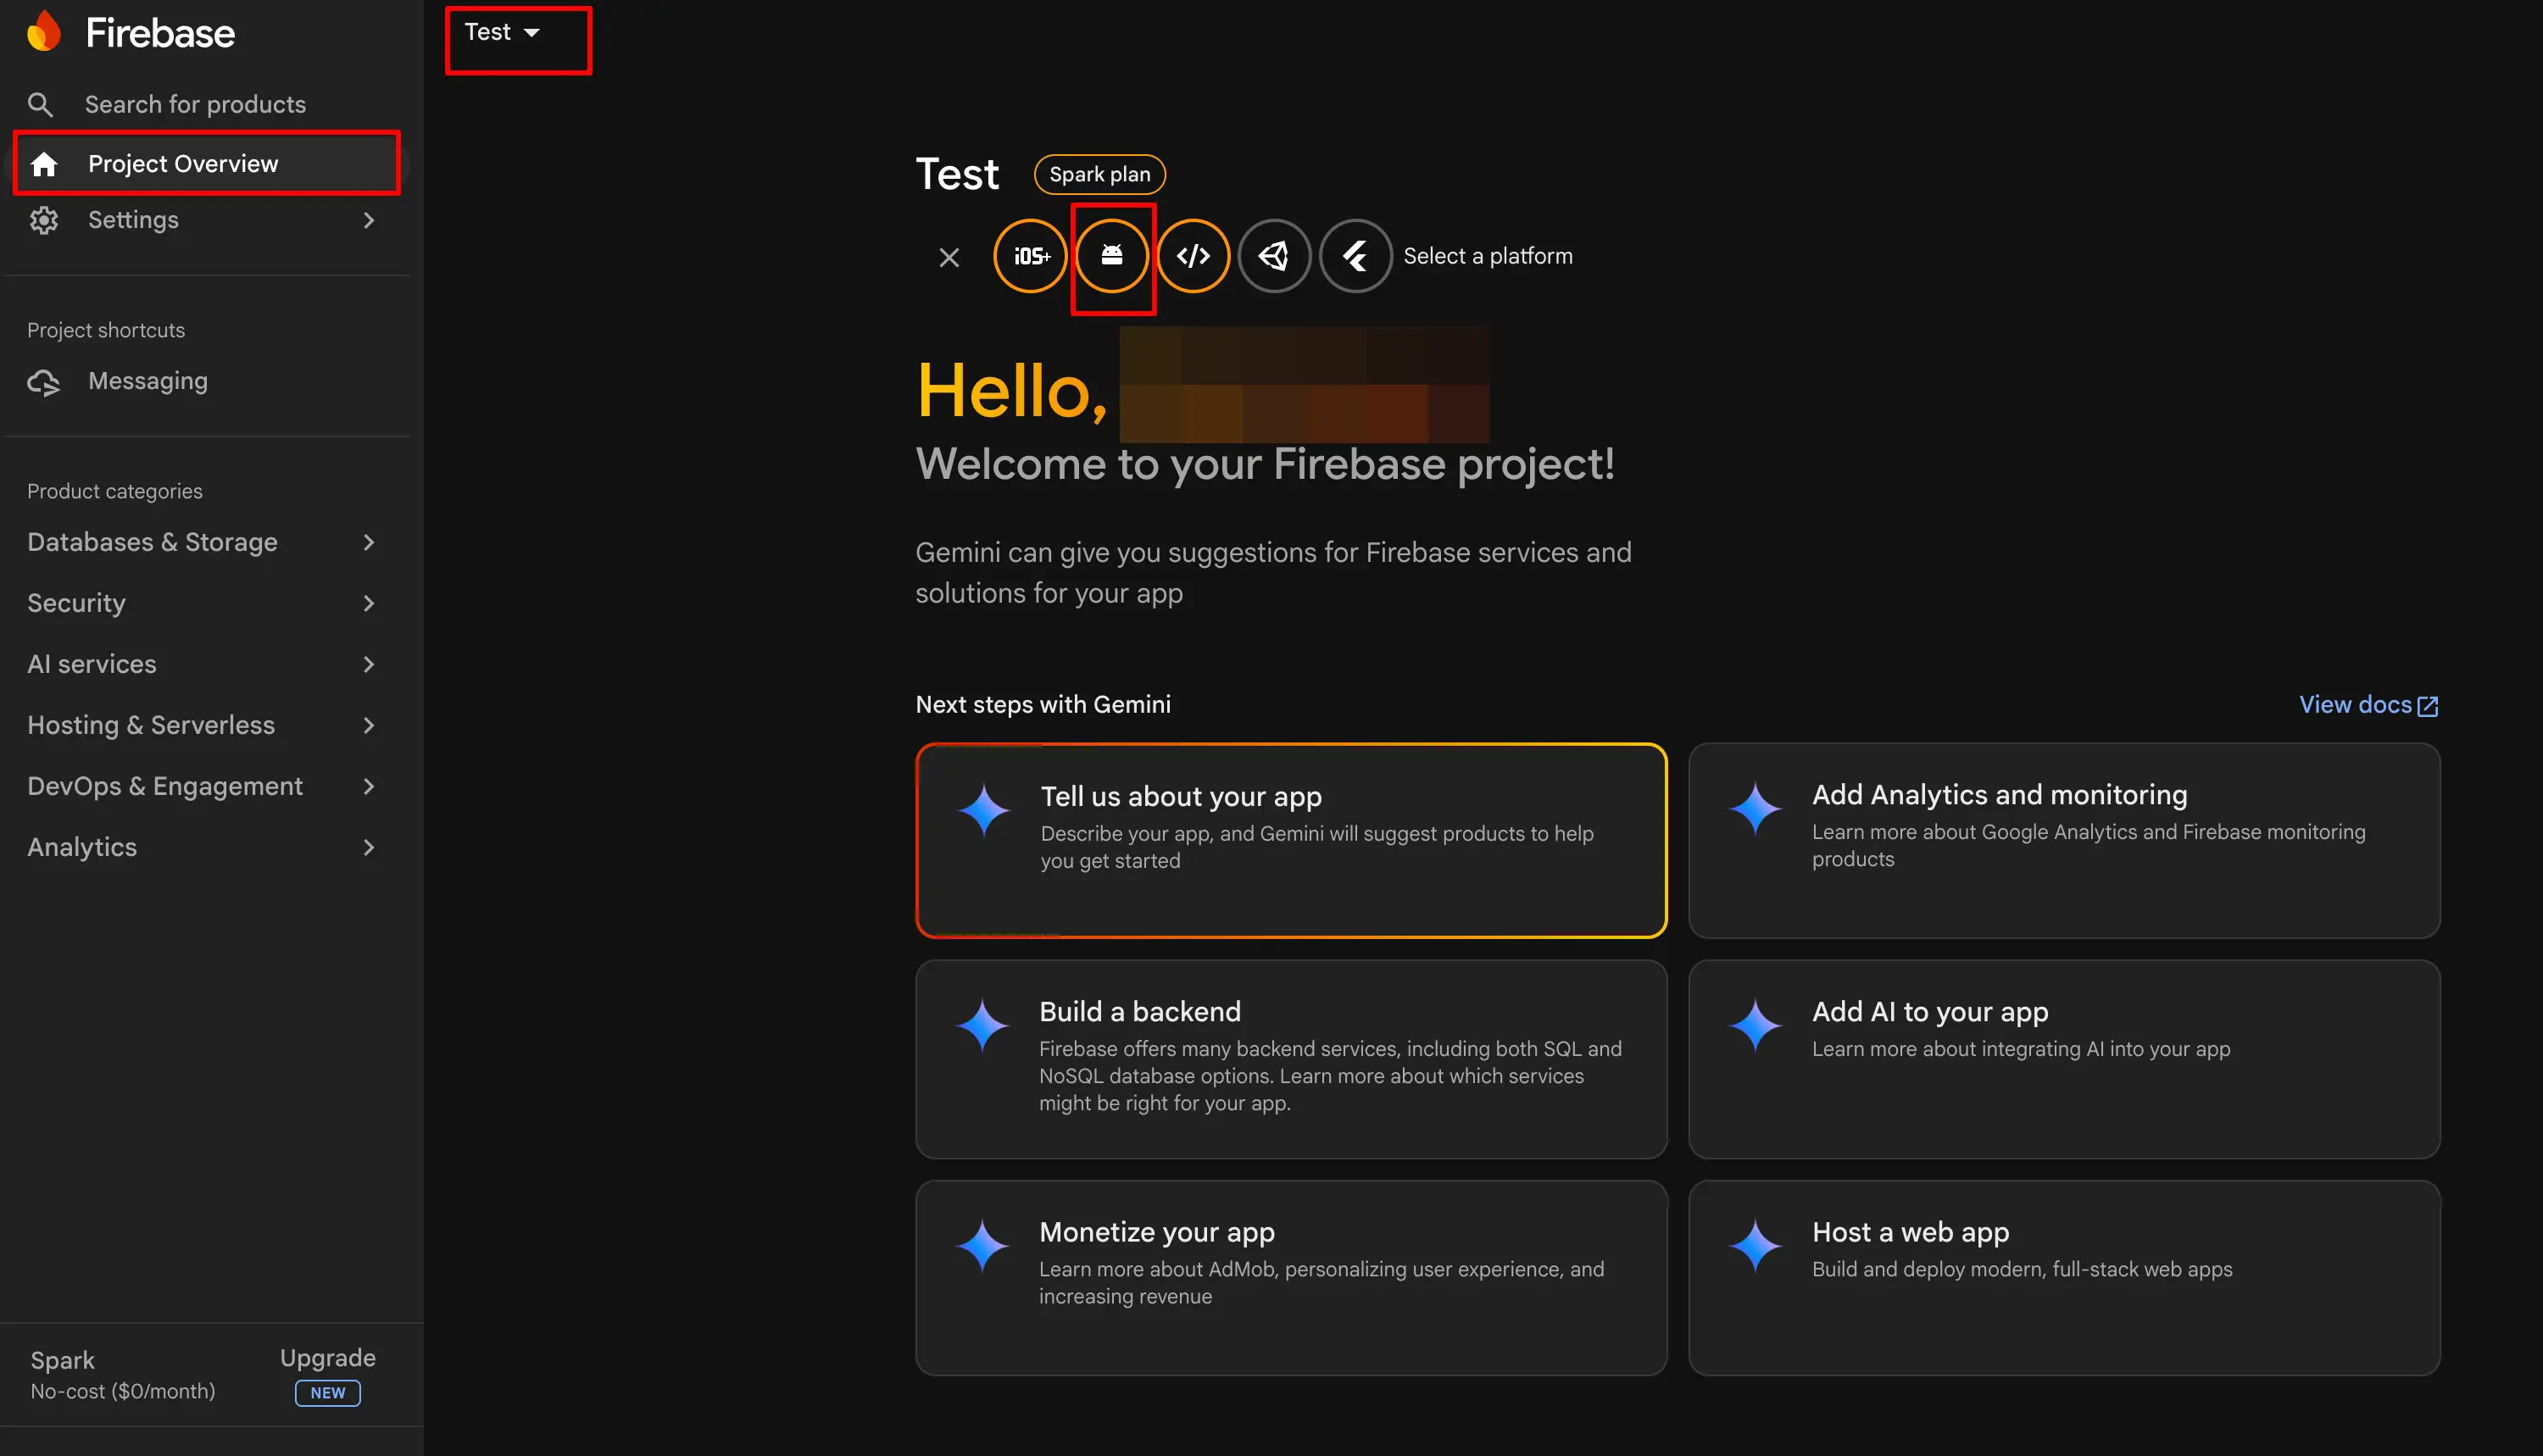
Step 2 — Add an Android App to Your Project
Once inside your project, open the Project Overview tab from the left sidebar. Click the "Add app" button (or the Android icon if this is your first app). This will launch the setup wizard for registering a new Android app with Firebase.
Step 3 — Enter Your Android Package Name
The first screen of the wizard asks for your Android package name. This is the unique identifier for your app. In a React Native project, you can find it in the MainApplication.kt or MainActvity.kt file located at:
android/app/src/main/java/com/yourapp/MainApplication.ktLook for the package declaration at the very top of the file — it will look something like:
package com.yourappEnter this package name (e.g., com.yourapp) in the Firebase Console. You can also provide an optional App Nickname — this is especially helpful if you're registering multiple Android apps (like staging and production) under the same Firebase project. The nickname is only visible in the Firebase Console and won't affect your app.
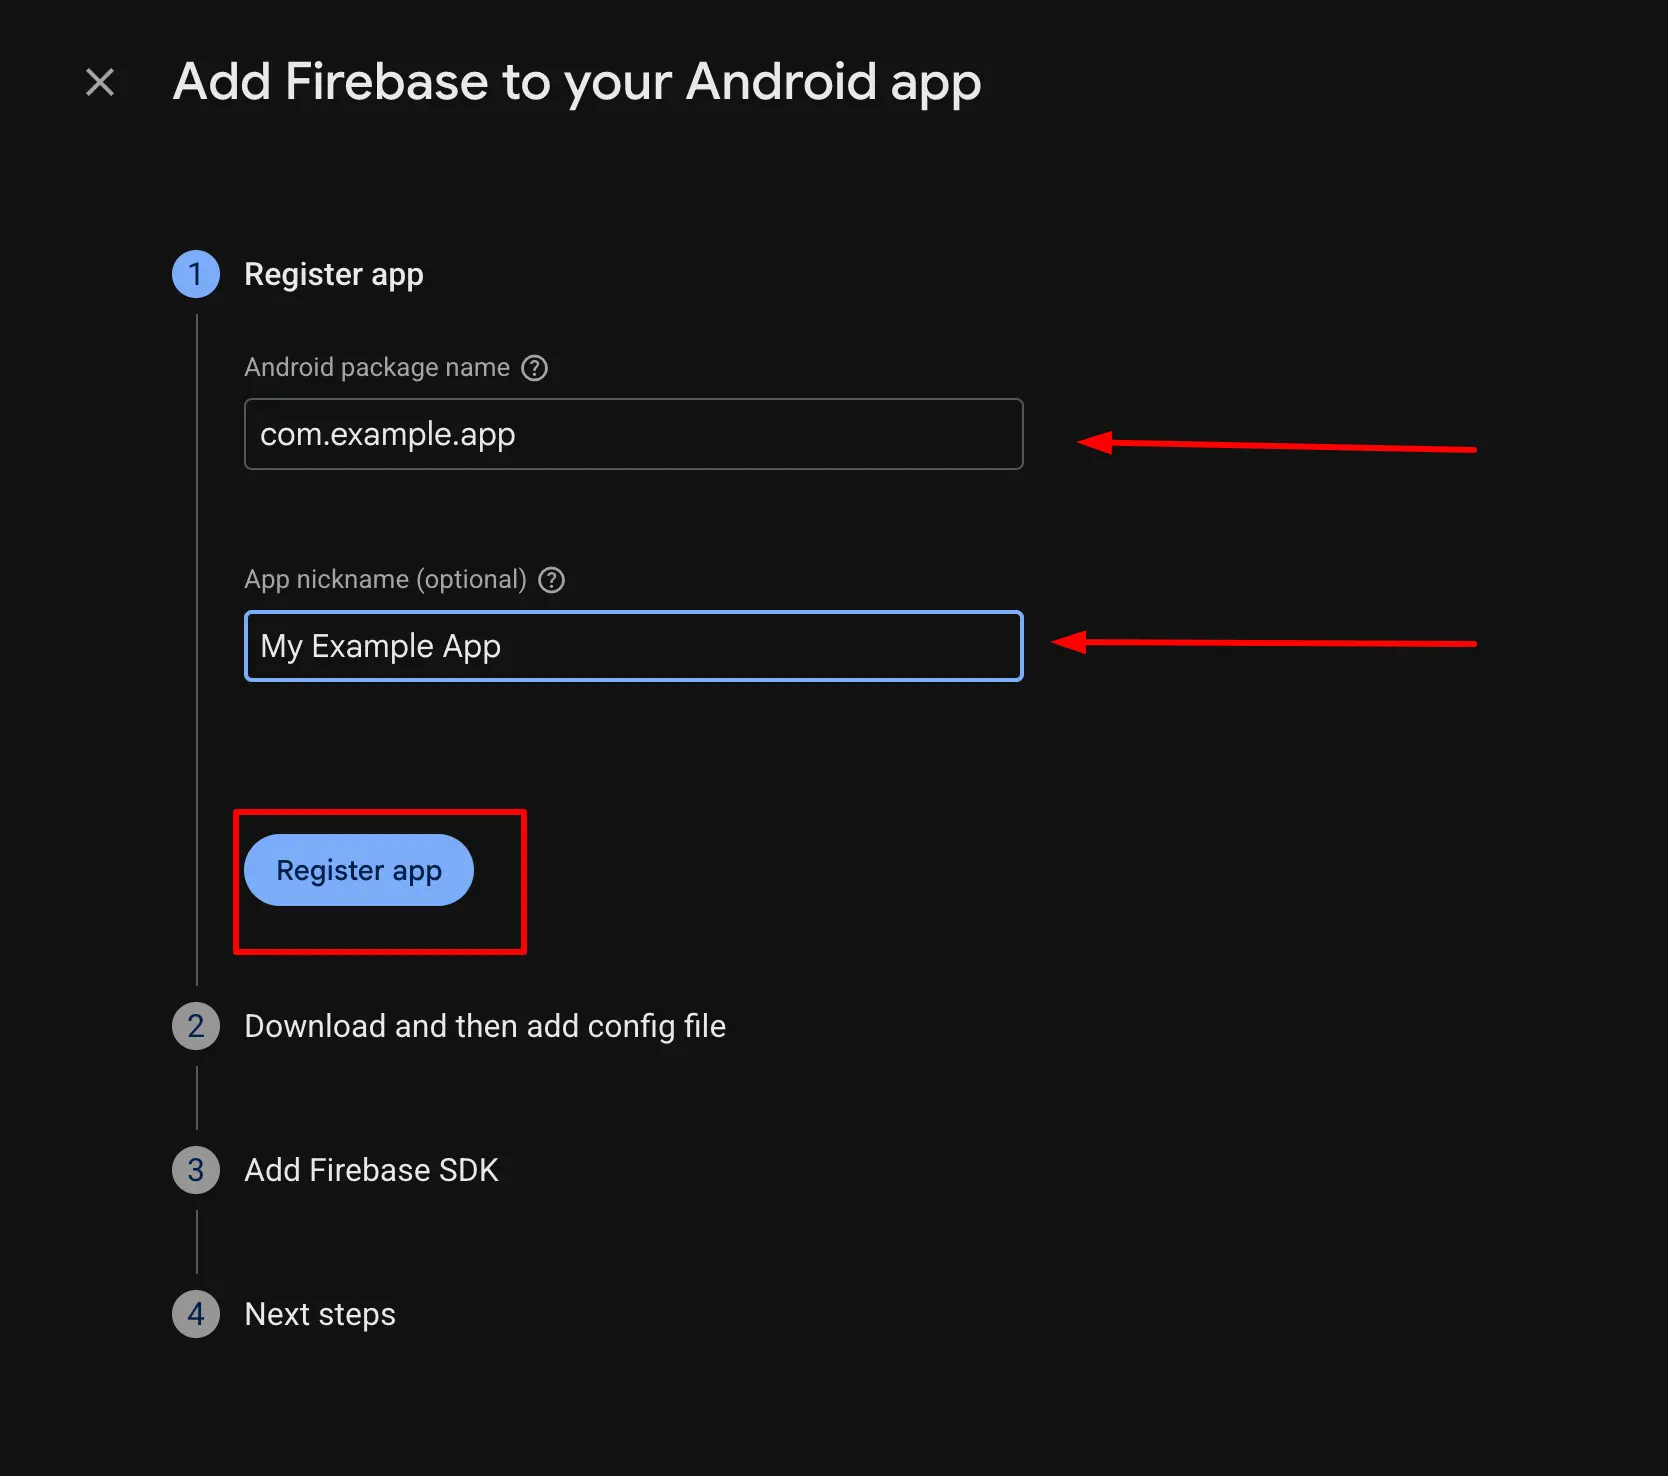
Click "Register app" to proceed to the next step.
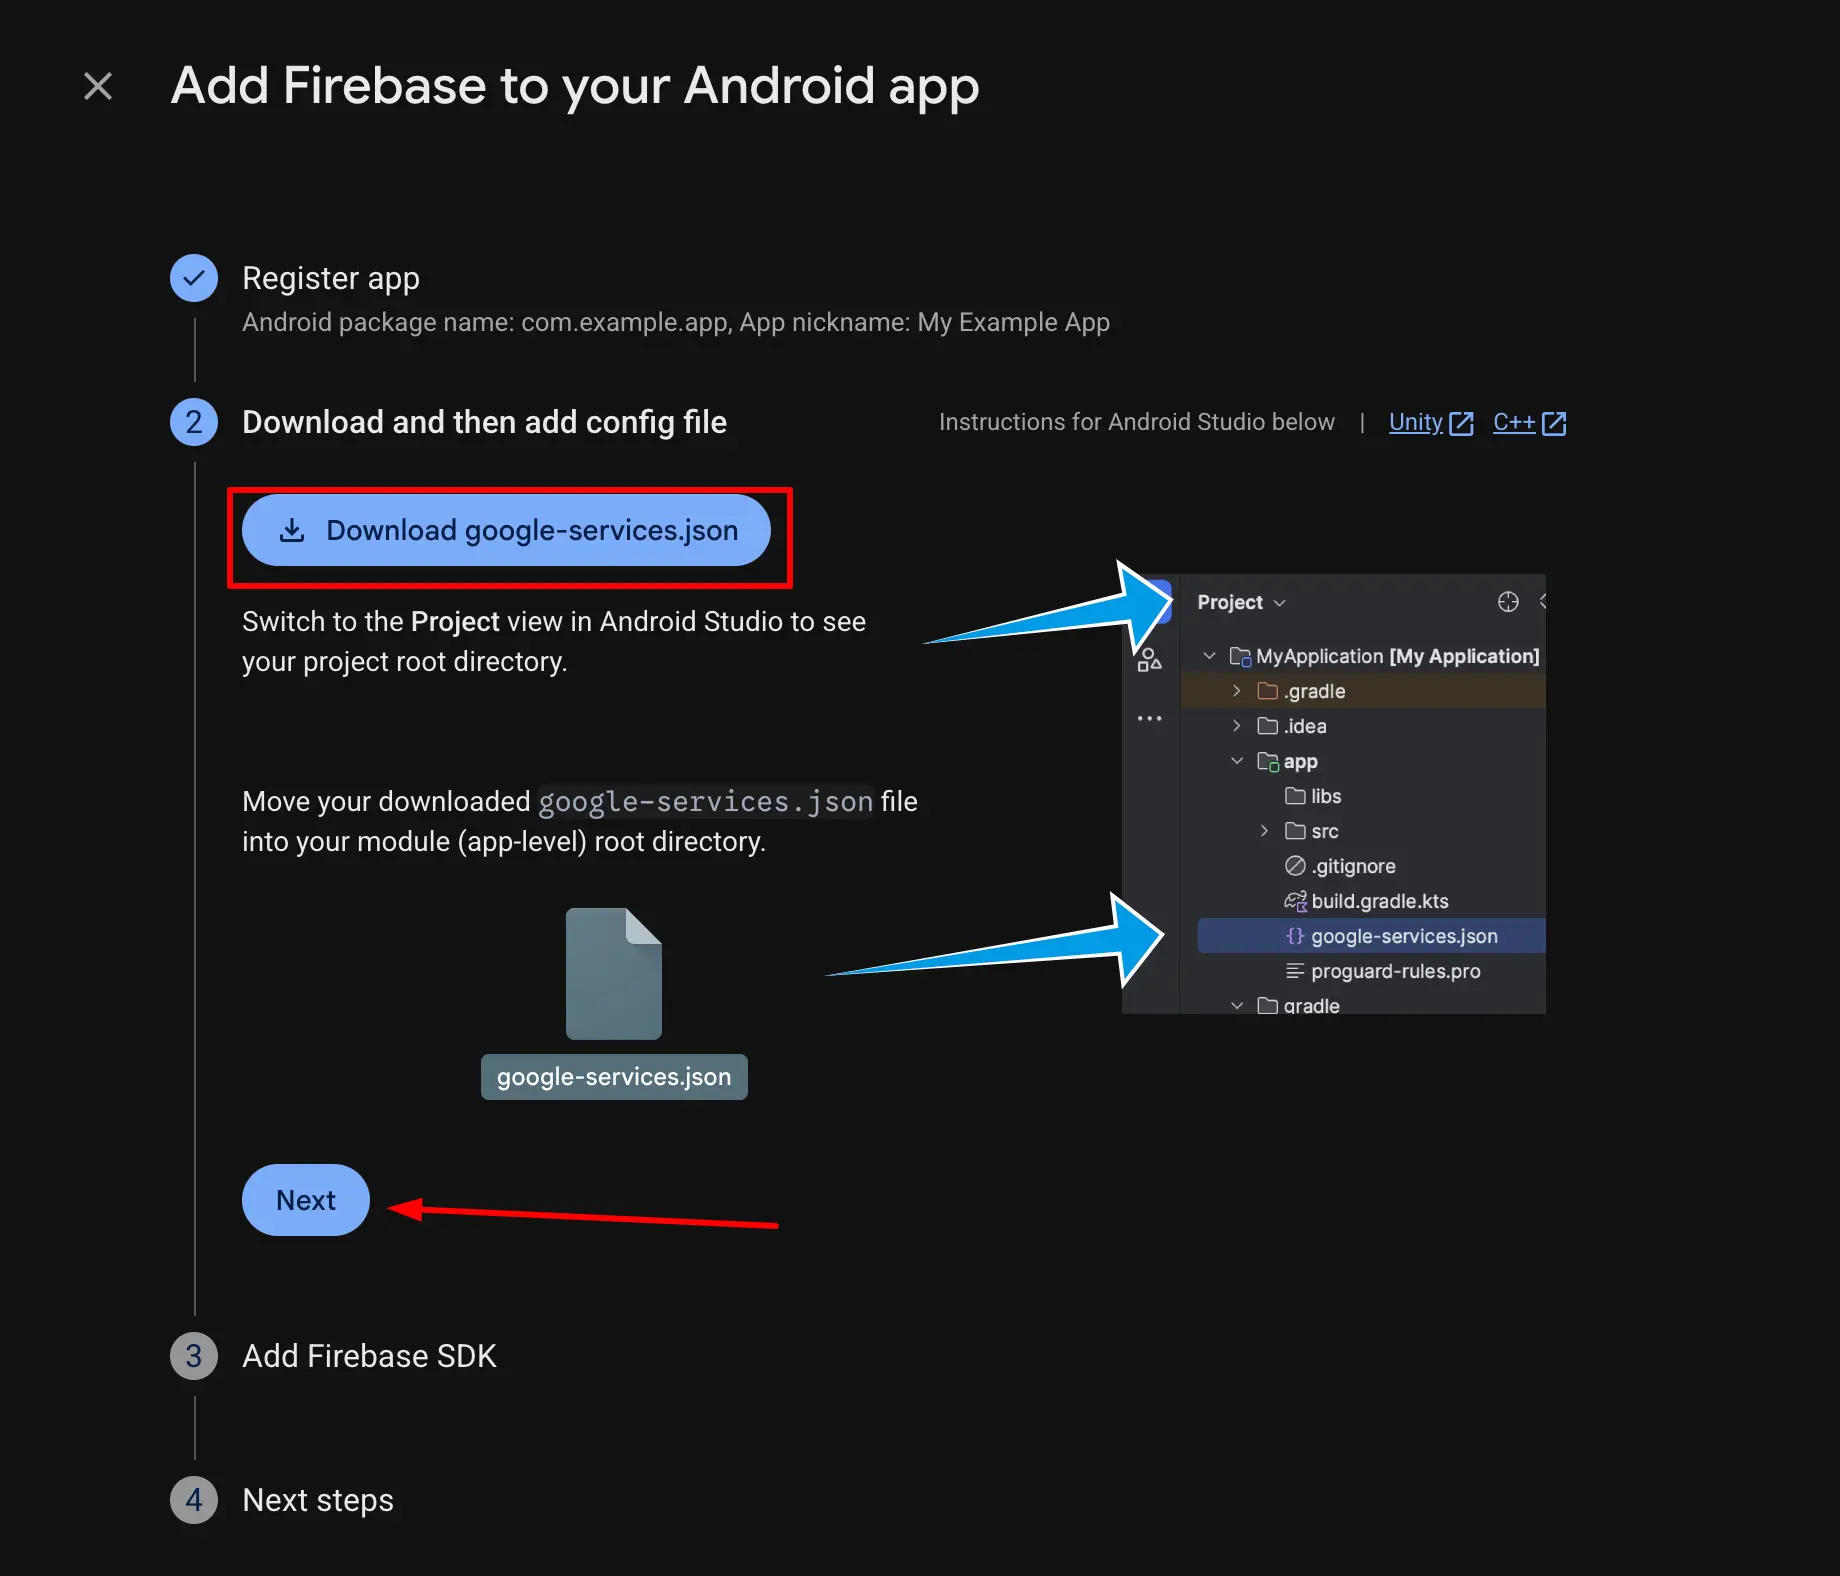
Step 4 — Download google-services.json
After registering, Firebase will generate a google-services.json configuration file for your app. Click the "Download google-services.json" button and place the downloaded file in the following location in your React Native project:
your-project/
└── android/
    └── app/
        └── google-services.json   ← place it here
This file contains your Firebase project's configuration — API keys, project ID, app ID, and other identifiers. It's essential for the Firebase SDK to know which Firebase project your app belongs to. Do NOT commit this file to a public repository as it contains your API keys.
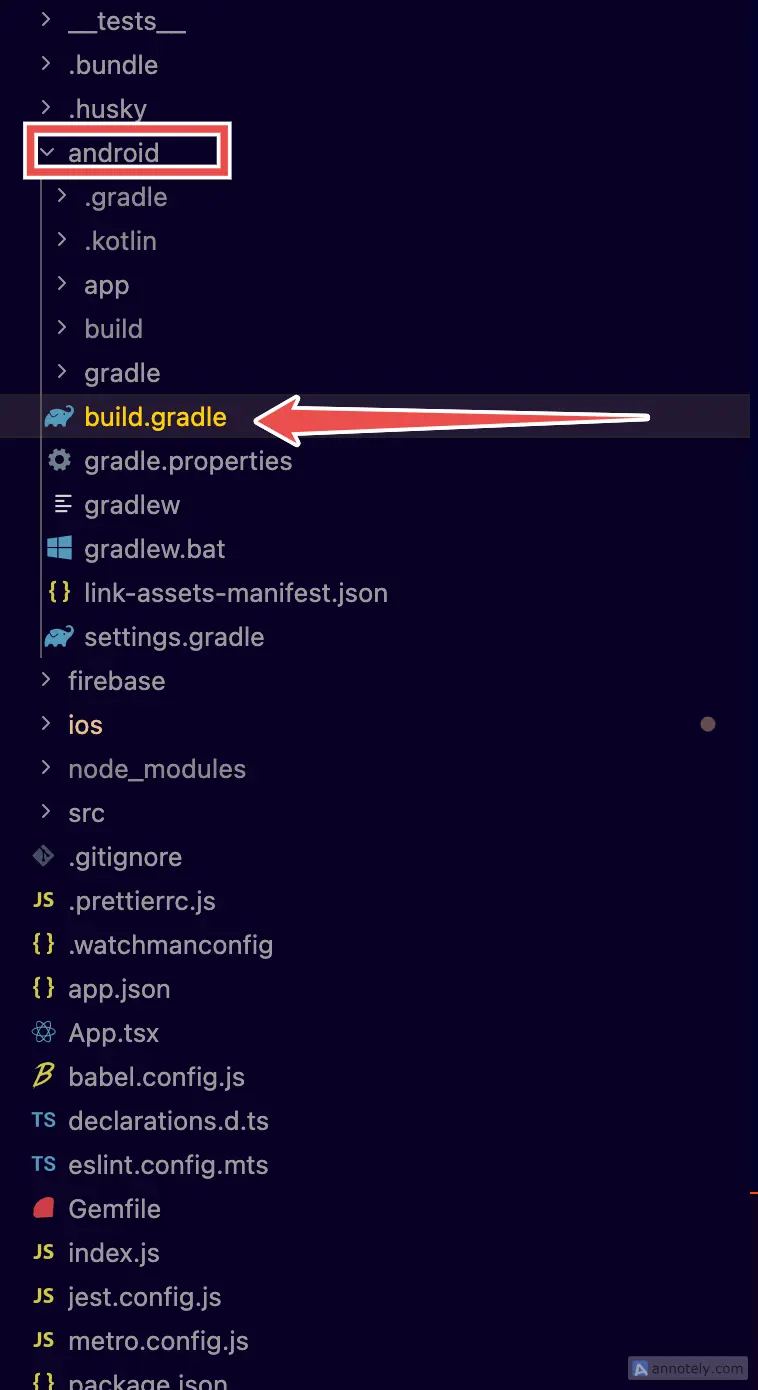
Step 5 — Add the Google Services Plugin to Project-Level Gradle
Now you need to configure your Android build system to use the Google Services plugin. Open the project-level build.gradle (or build.gradle.kts) file located at:
your-project/
└── android/
    └── build.gradle   ← this file
Inside the dependencies block under buildscript, add the Google Services classpath:
buildscript {
    dependencies {
        // ... existing dependencies
        classpath("com.google.gms:google-services:4.4.2")
    }
}
Step 6 — Apply the Plugin in App-Level Gradle
Next, open the app-level build.gradle file at:
your-project/
└── android/
    └── app/
        └── build.gradle   ← this file
At the very top of this file, add the following line to apply the Google Services plugin:
apply plugin: "com.google.gms.google-services"Then, in the same file, locate the dependencies block and add the Firebase BoM (Bill of Materials). The BoM ensures all Firebase libraries in your project use compatible versions — you only need to specify the BoM version, and it handles the rest:
dependencies {
    // ... existing dependencies

    // Firebase BoM — manages versions for all Firebase libraries
    implementation platform('com.google.firebase:firebase-bom:34.7.0')
}
The BoM version 34.7.0 is the latest at the time of writing. Always check the Firebase Android Release Notes for the latest BoM version before adding it to your project.
Step 7 — Complete the Firebase Setup Wizard
Back in the Firebase Console, click "Next" through any remaining steps and finally click "Continue to console" to complete the setup wizard. Firebase may show a verification step — don't worry if it says "Checking if the app has communicated with our servers". This will resolve automatically once you run the app.
Step 8 — Rebuild and Verify
Now it's time to verify everything works. Clean and rebuild your React Native Android app:
cd android && ./gradlew clean && cd ..
npx react-native run-android
If the app compiles and launches without any build errors, congratulations — Firebase is successfully integrated with your Android app. You're now ready to use any Firebase service like Authentication, Cloud Firestore, Cloud Messaging (push notifications), Analytics, Crashlytics, and more.
If you encounter build errors, the most common issues are: incorrect package name in Firebase Console, google-services.json placed in the wrong directory, or mismatched Gradle plugin versions. Double-check each step above to resolve them.
Complete File Reference
Here's a quick summary of all the files you modified and where they live in a standard React Native project:
your-react-native-project/
├── android/
│   ├── build.gradle                    ← Added google-services classpath
│   └── app/
│       ├── build.gradle                ← Applied plugin + Firebase BoM
│       └── google-services.json        ← Downloaded from Firebase Console
└── ...
Important Version Note
The versions used in this guide (Google Services plugin 4.4.2, Firebase BoM 34.7.0) are the latest available at the time of publishing. Firebase regularly releases updates with new features, bug fixes, and security patches. Before adding these to your project, always verify the latest versions from the official Firebase documentation to ensure compatibility.
What's Next?
Now that Firebase is connected to your Android app, here are common next steps depending on what you're building: set up Firebase Cloud Messaging for push notifications (you'll need an APNs key if you're also targeting iOS), integrate Firebase Authentication for login flows, add Crashlytics for real-time crash reporting, or enable Analytics to track user engagement. Each Firebase service has its own React Native library — check out @react-native-firebase for well-maintained, community-driven packages.
Related Articles
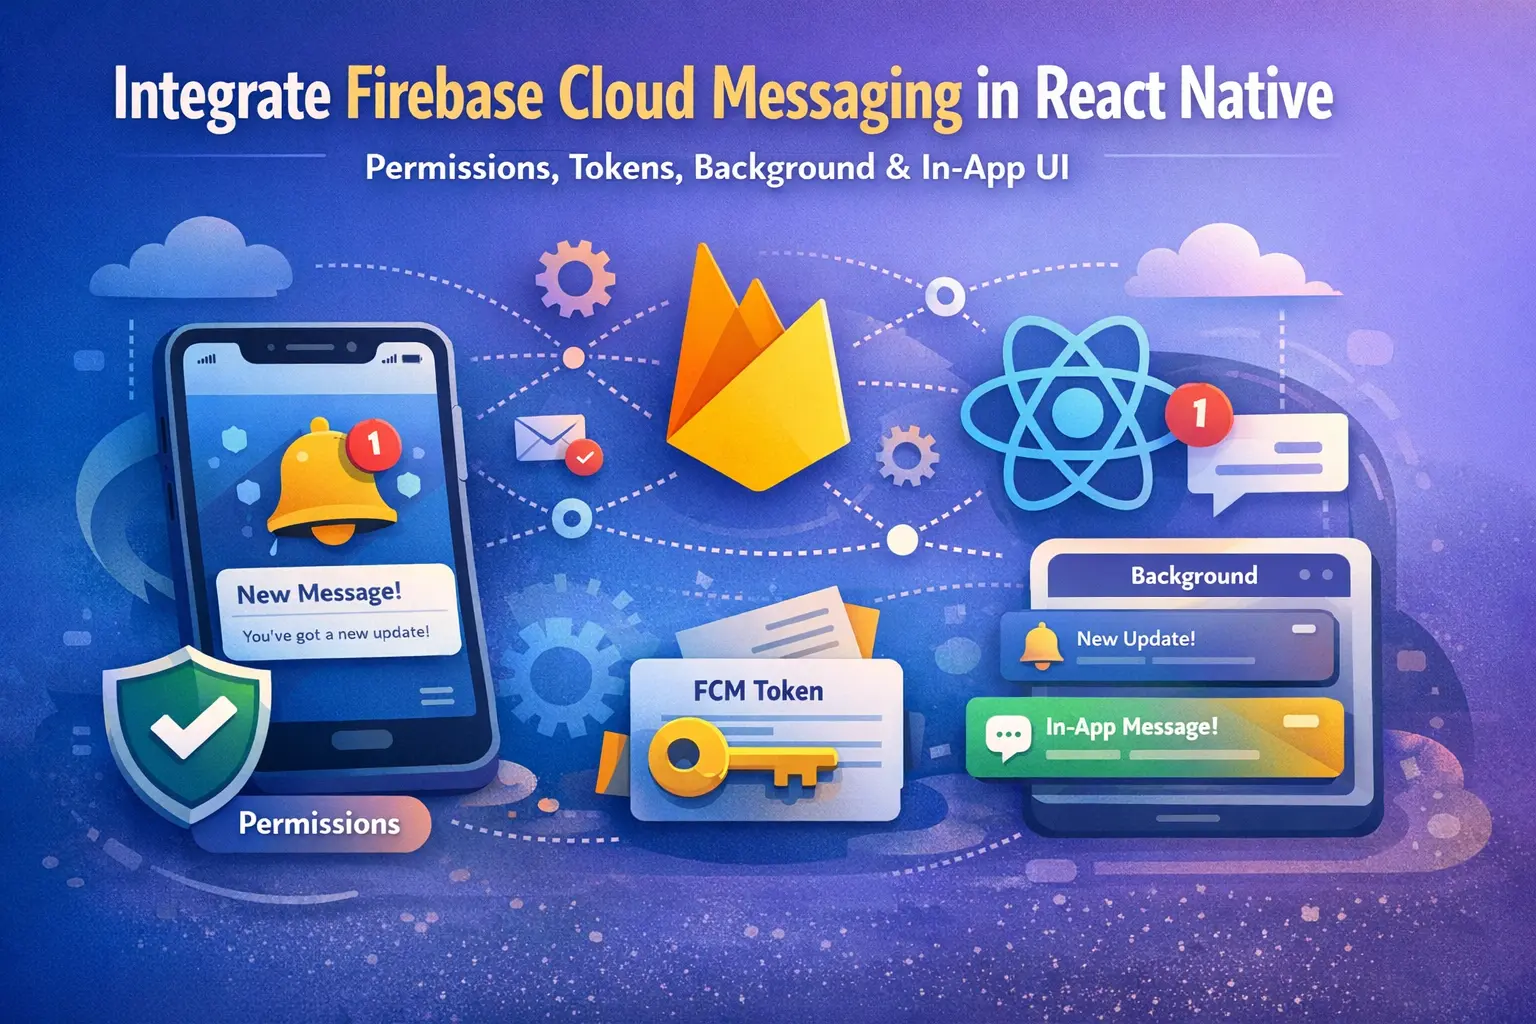
Integrate Firebase Cloud Messaging in React Native — Permissions, Tokens, Background & In-App UI
End-to-end guide: APNs key in Firebase, Xcode capabilities, @react-native-firebase/messaging + Notifee, Android 13+ permissions, saving FCM tokens to your backend, navigation on tap, and a Zustand-powered in-app notification banner.

How to Send Push Notifications from Node.js with Firebase — Part 1: Firebase Console Setup
Step-by-step guide to configuring Firebase Cloud Messaging for your Node.js backend — generating the Admin SDK key, enabling Cloud Messaging, and sending your first test notification to iOS and Android devices.