How to Send Push Notifications from Node.js with Firebase — Part 1: Firebase Console Setup
Sending push notifications from your backend is one of the most common requirements in mobile app development. Whether it's order updates, chat messages, or promotional alerts — your server needs a way to reach users on their devices. Firebase Cloud Messaging (FCM) is the industry standard for this, and it works across both iOS and Android with a single API.
This is Part 1 of a two-part guide. In this part, we'll set up everything on the Firebase Console side — generating the Admin SDK credentials, enabling Cloud Messaging, and verifying the setup by sending a test notification. Part 2 will cover the Node.js code implementation with the firebase-admin SDK.
Prerequisites
This guide follows an industry-standard directory structure for a Node.js project. Before you begin, make sure you have:
A Firebase project already created in the Firebase Console. Your iOS and Android apps registered with Firebase — if not, follow our Android setup guide and iOS setup guide first.
Step 1 — Generate the Firebase Admin SDK Private Key
The Firebase Admin SDK lets your Node.js server authenticate with Firebase and send notifications on behalf of your project. To use it, you need a service account private key — a JSON file that contains your project credentials.
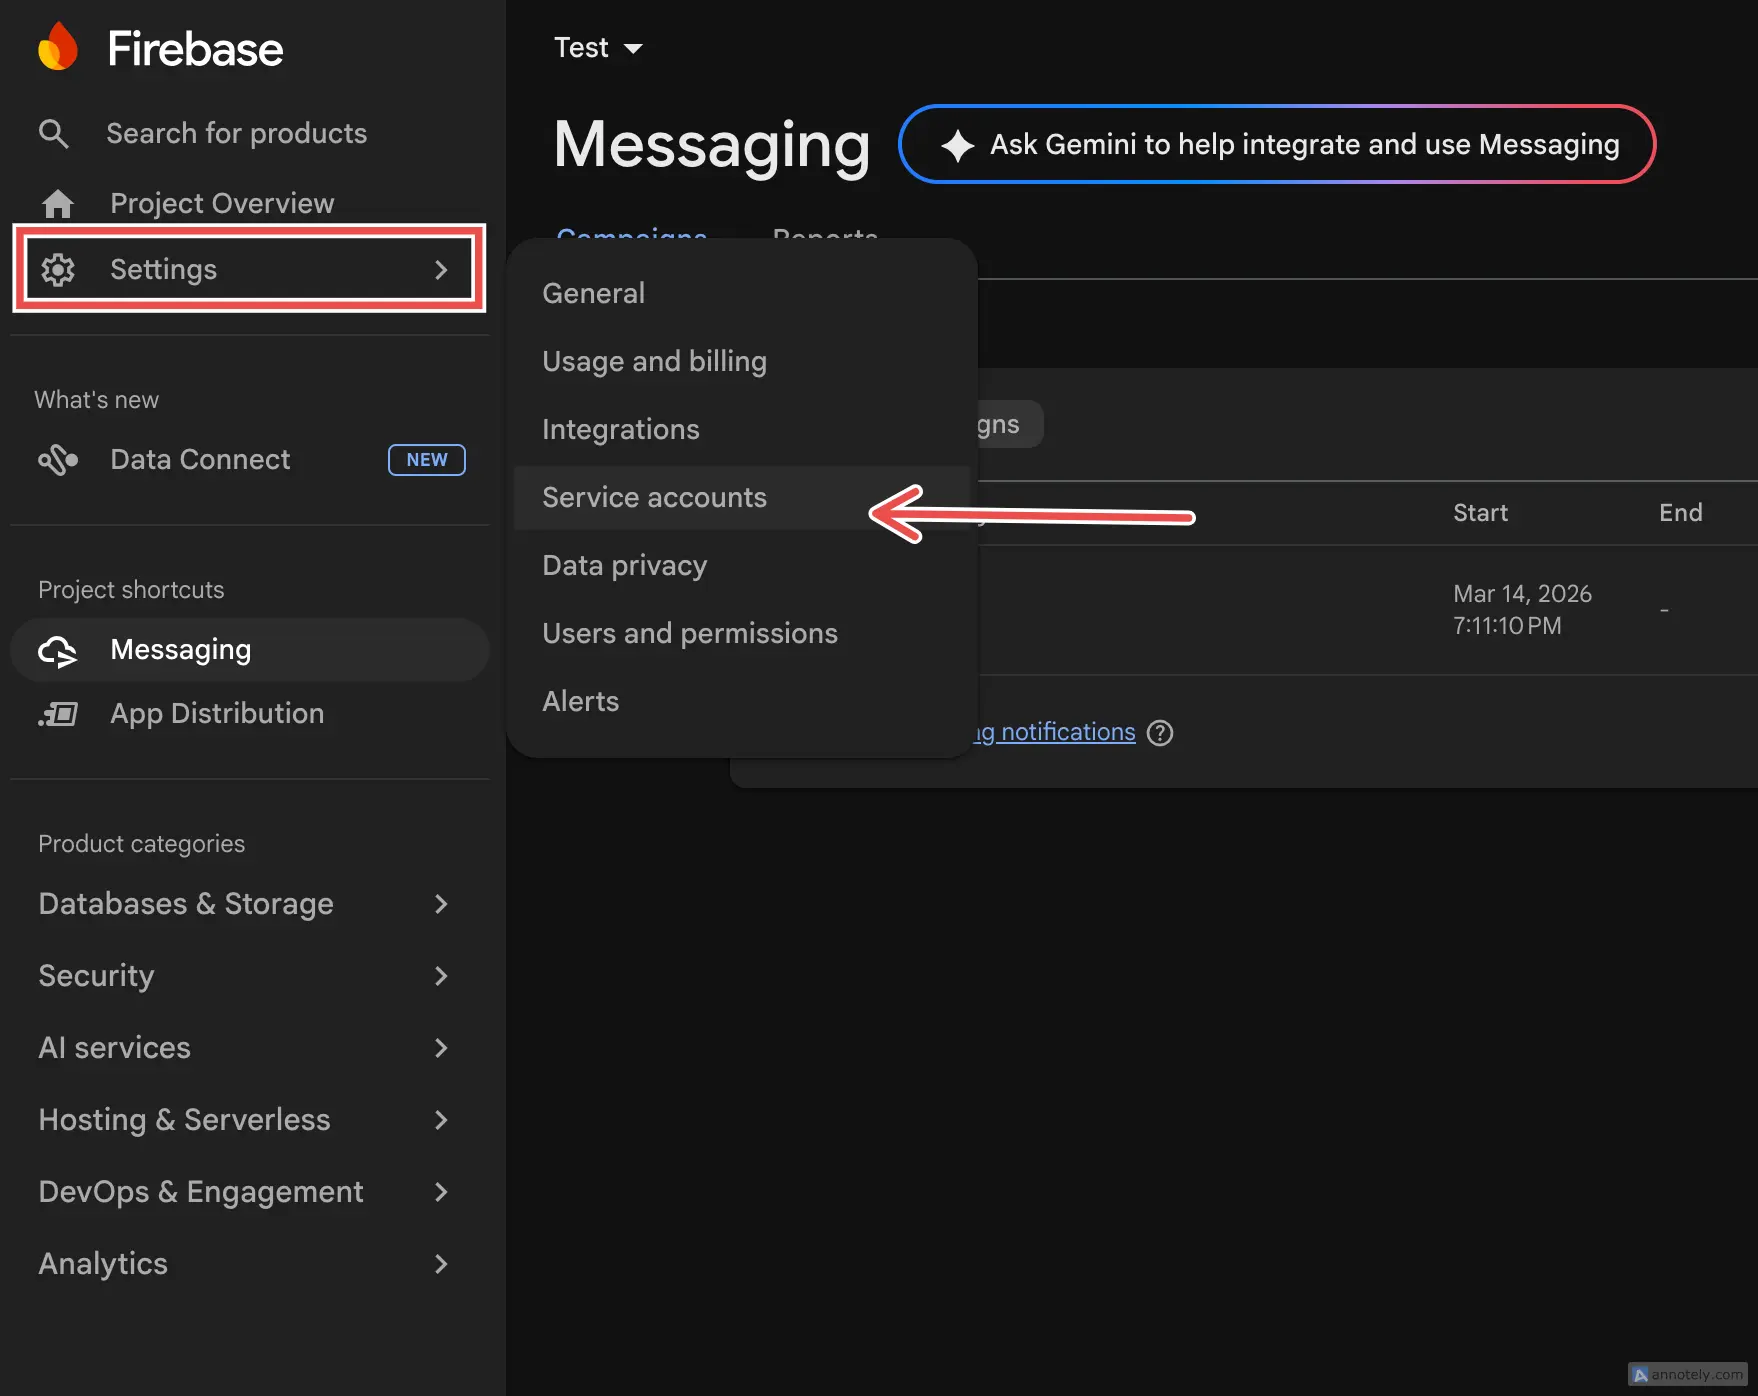
Open the Firebase Console and select your project. From the left sidebar, click the gear icon (Settings) and select Service accounts from the menu.
Step 2 — Download the Admin SDK JSON File
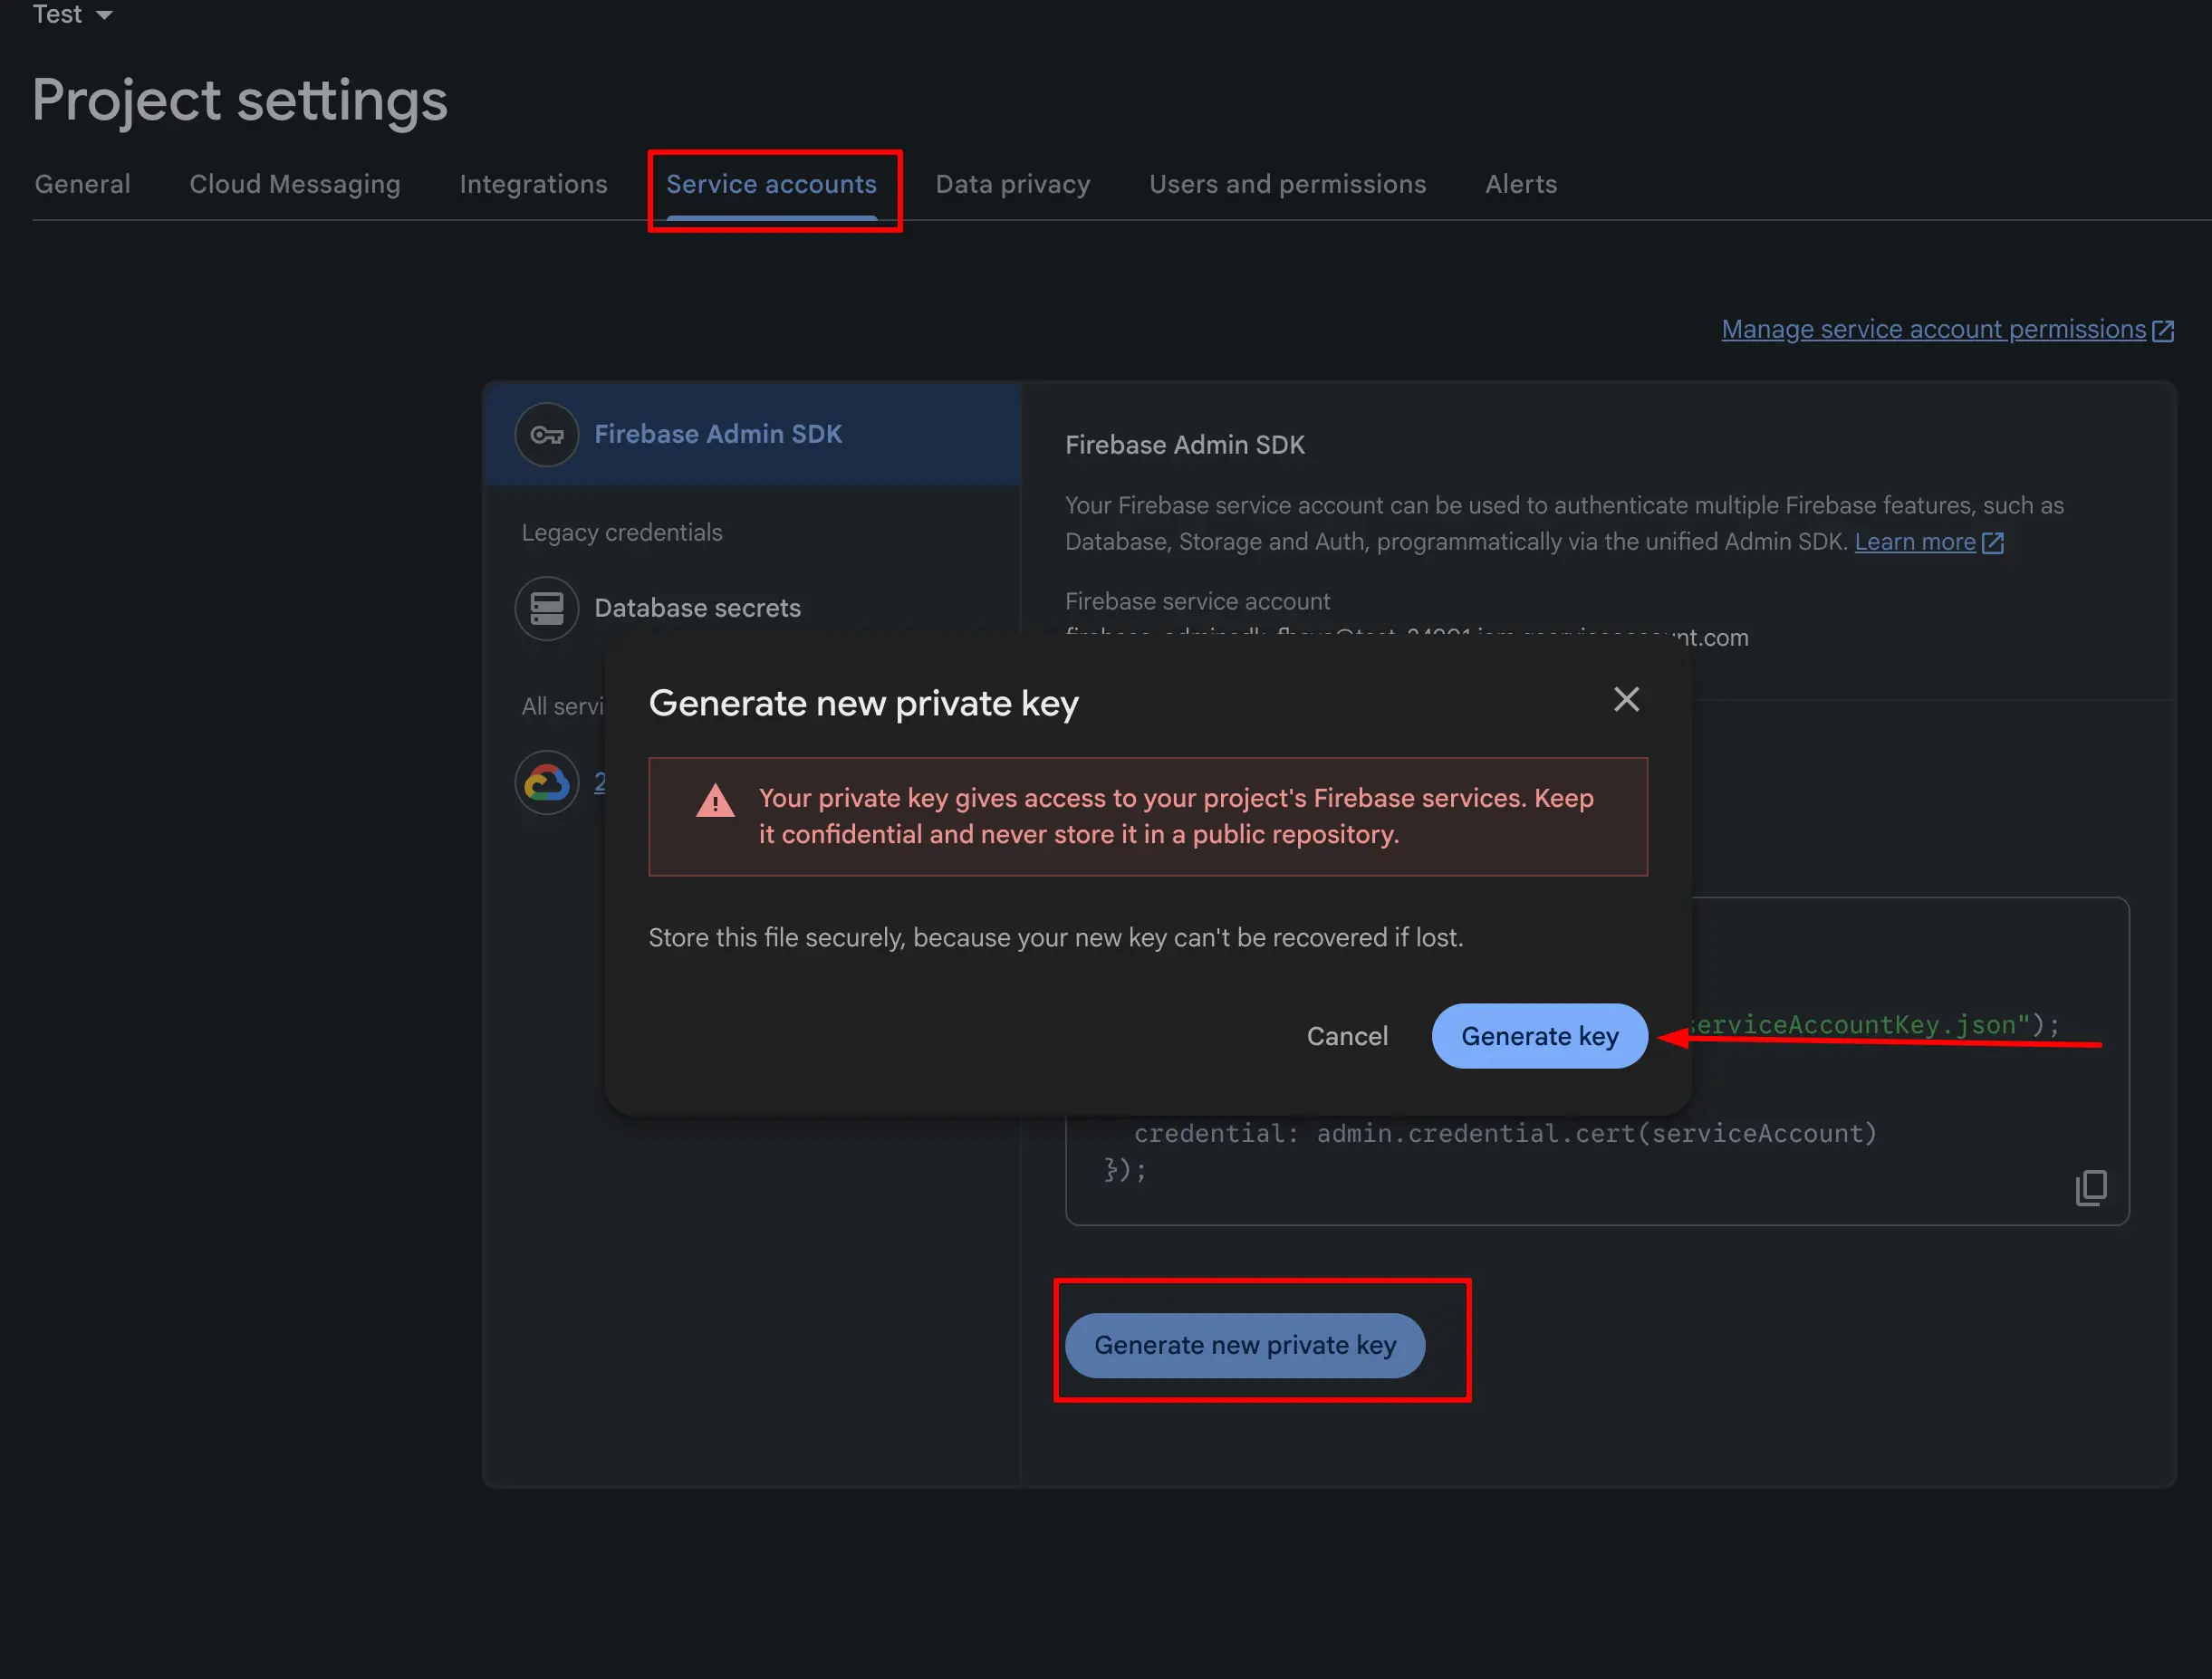
On the Service accounts page, you'll see the Firebase Admin SDK section. Make sure Node.js is selected as the language tab (it should be selected by default). Then click the 'Generate new private key' button.
A confirmation modal will appear warning you to keep the key secure. Click 'Generate key' to confirm. A JSON file will automatically download — this is your `admin-sdk.json` (or similarly named file like `serviceAccountKey.json`).
Security warning: This file contains your project's private key. Never commit it to version control. Add it to your `.gitignore` immediately. In production, store it as an environment variable or use a secrets manager (AWS Secrets Manager, GCP Secret Manager, etc.).
# Add to .gitignore
echo 'admin-sdk.json' >> .gitignore
echo 'serviceAccountKey.json' >> .gitignore
Place the downloaded JSON file in your Node.js project. A common convention is to put it in a `config/` or root directory:
your-nodejs-project/
├── config/
│   └── admin-sdk.json      ← place it here
├── src/
│   └── ...
├── .gitignore               ← make sure admin-sdk.json is listed
└── package.json
Step 3 — Enable Cloud Messaging in Firebase Console
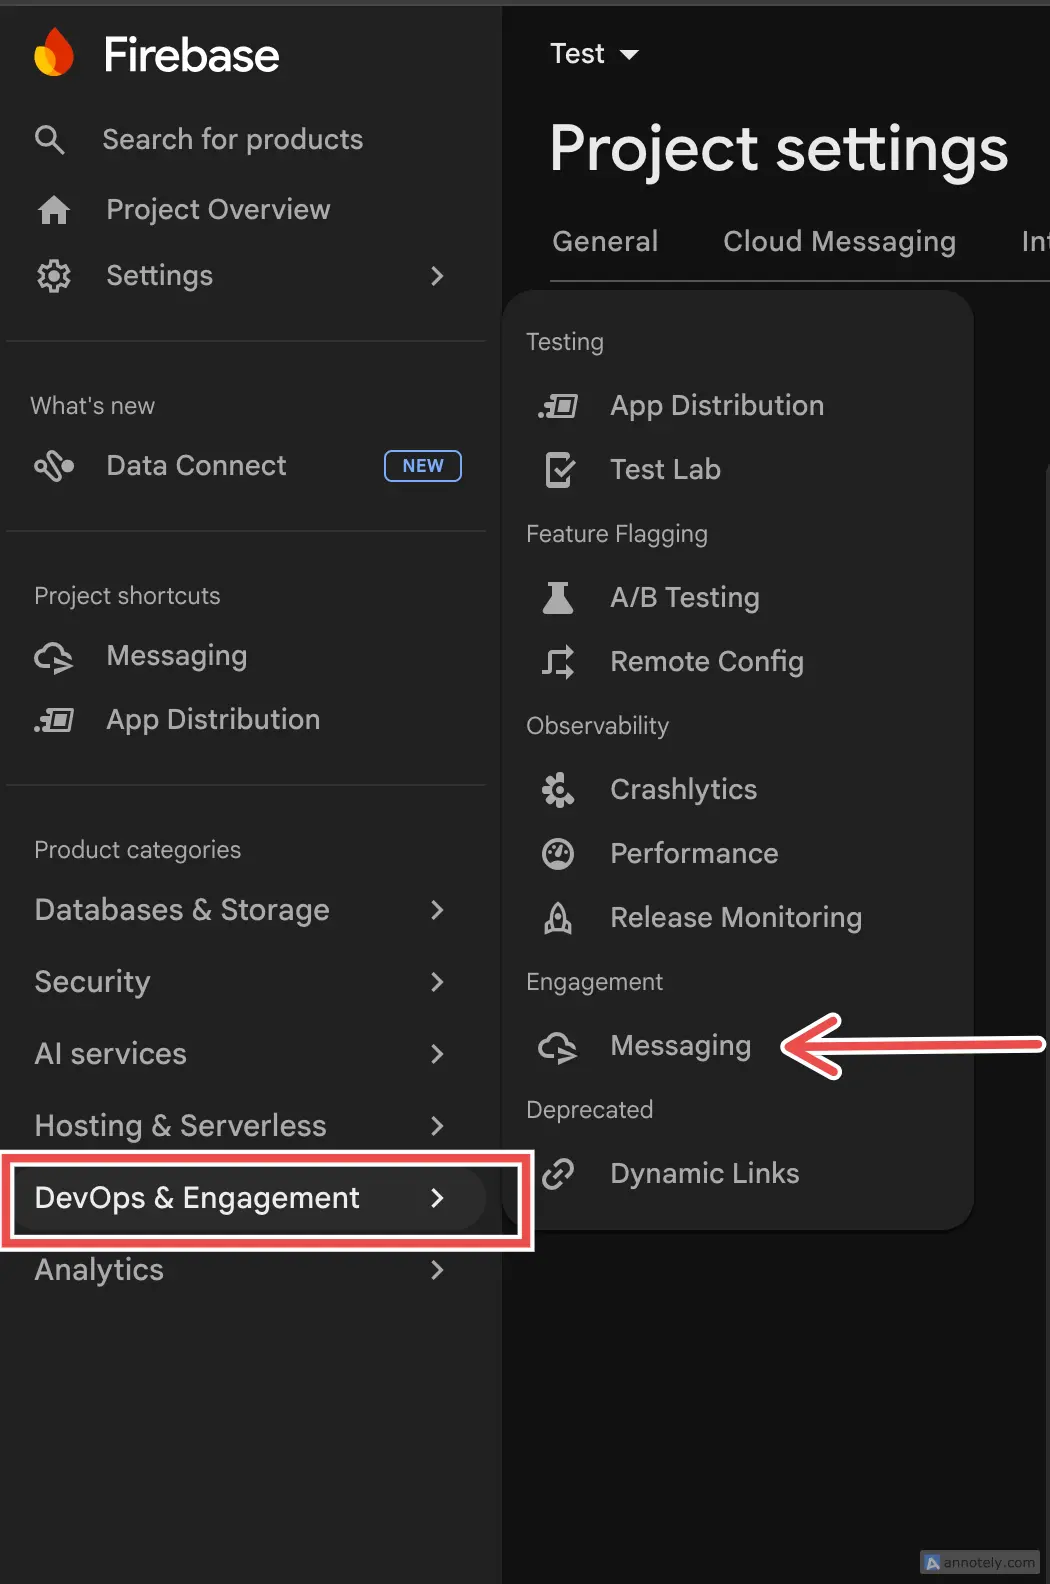
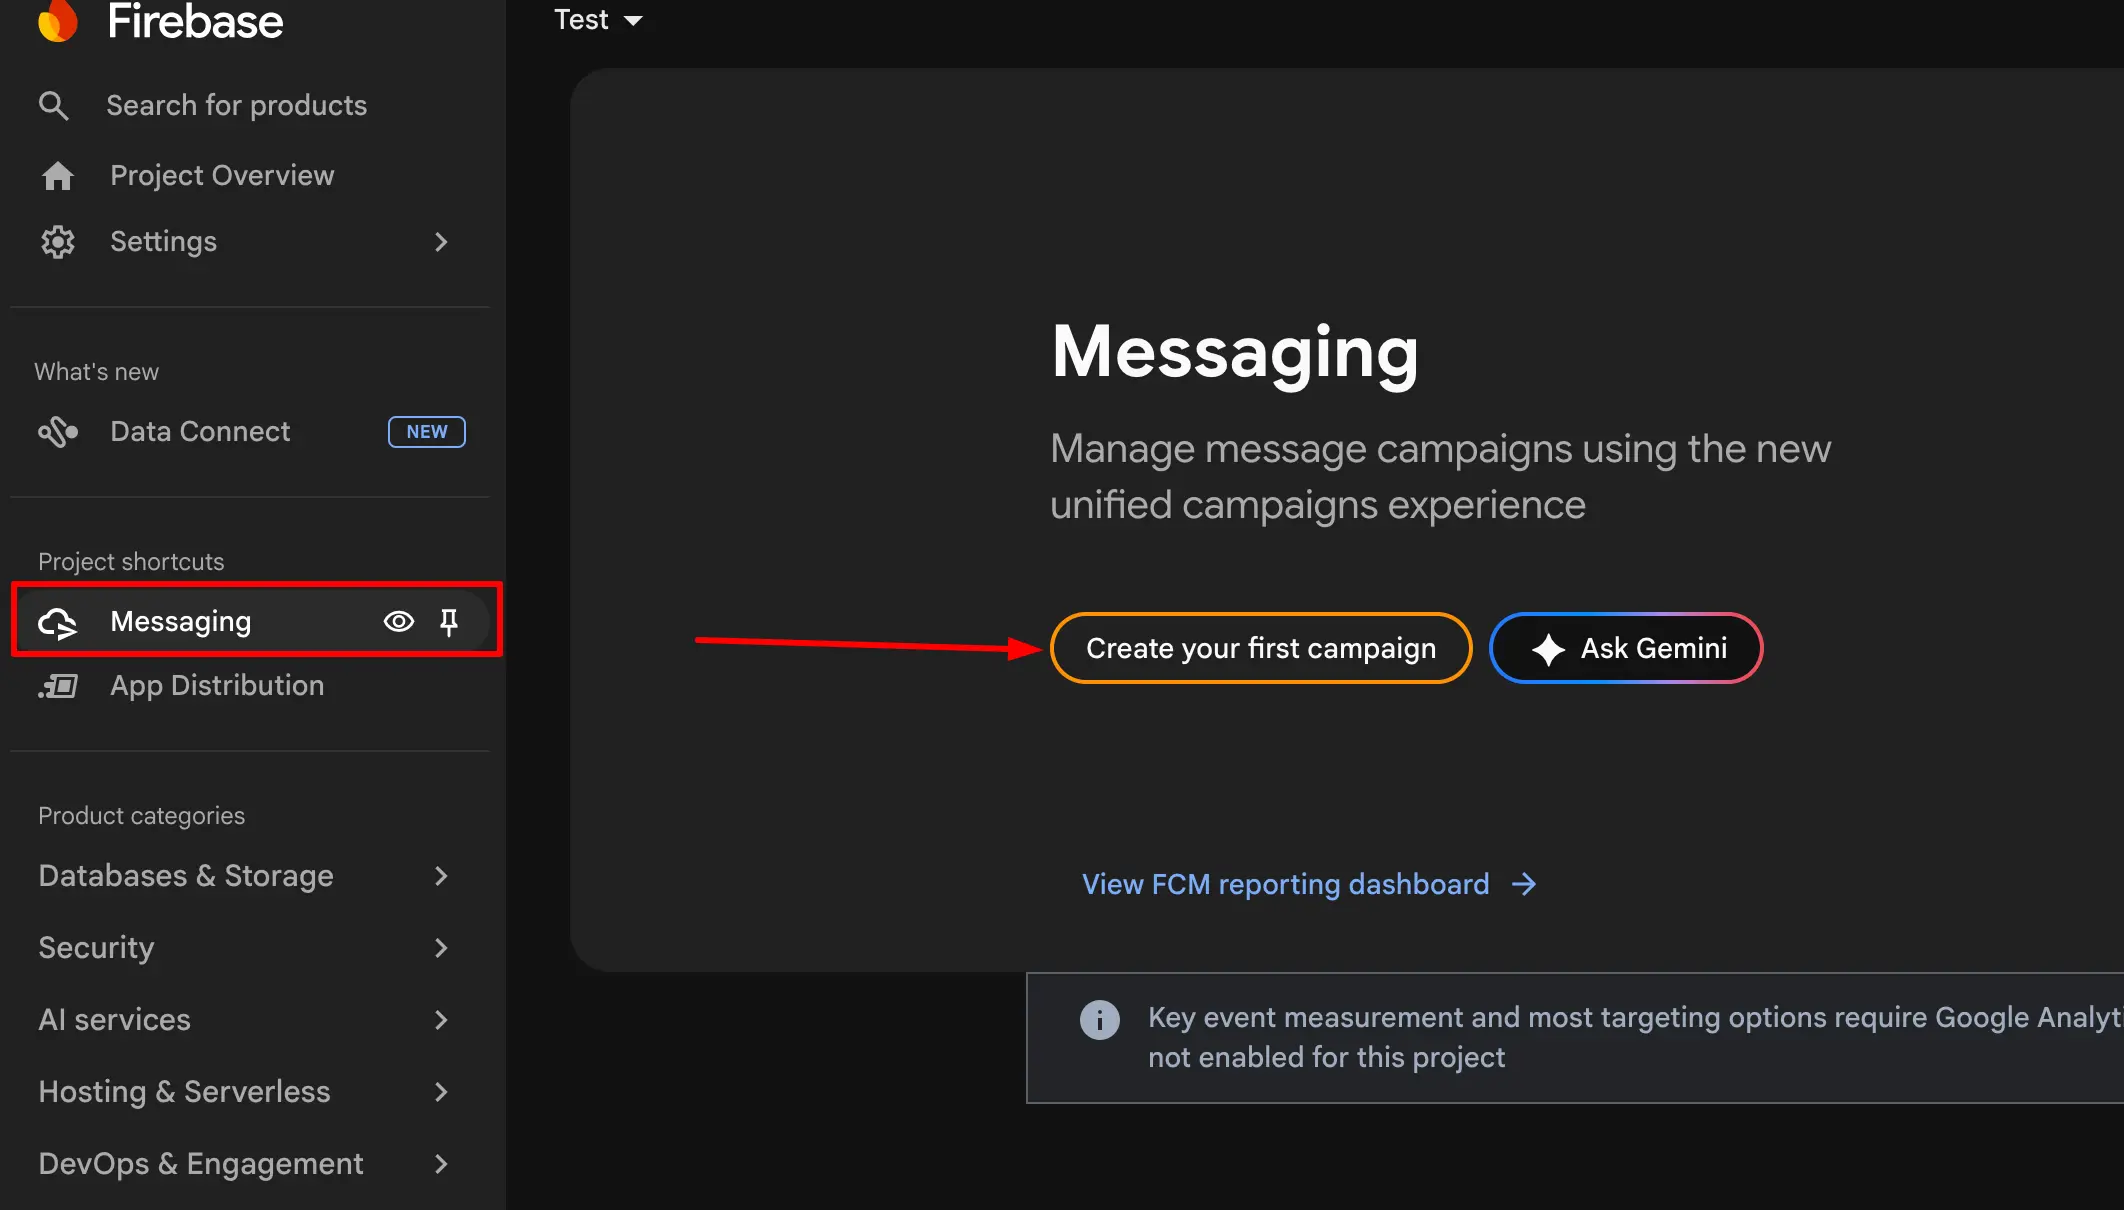
Now you need to enable Firebase Cloud Messaging for your project. In the Firebase Console sidebar, look for the Engage section (previously called "Grow" or "DevOps & Engagement"). Click on Messaging.
If this is your first time using Cloud Messaging, you'll see a welcome screen. Click 'Create your first campaign' to get started.
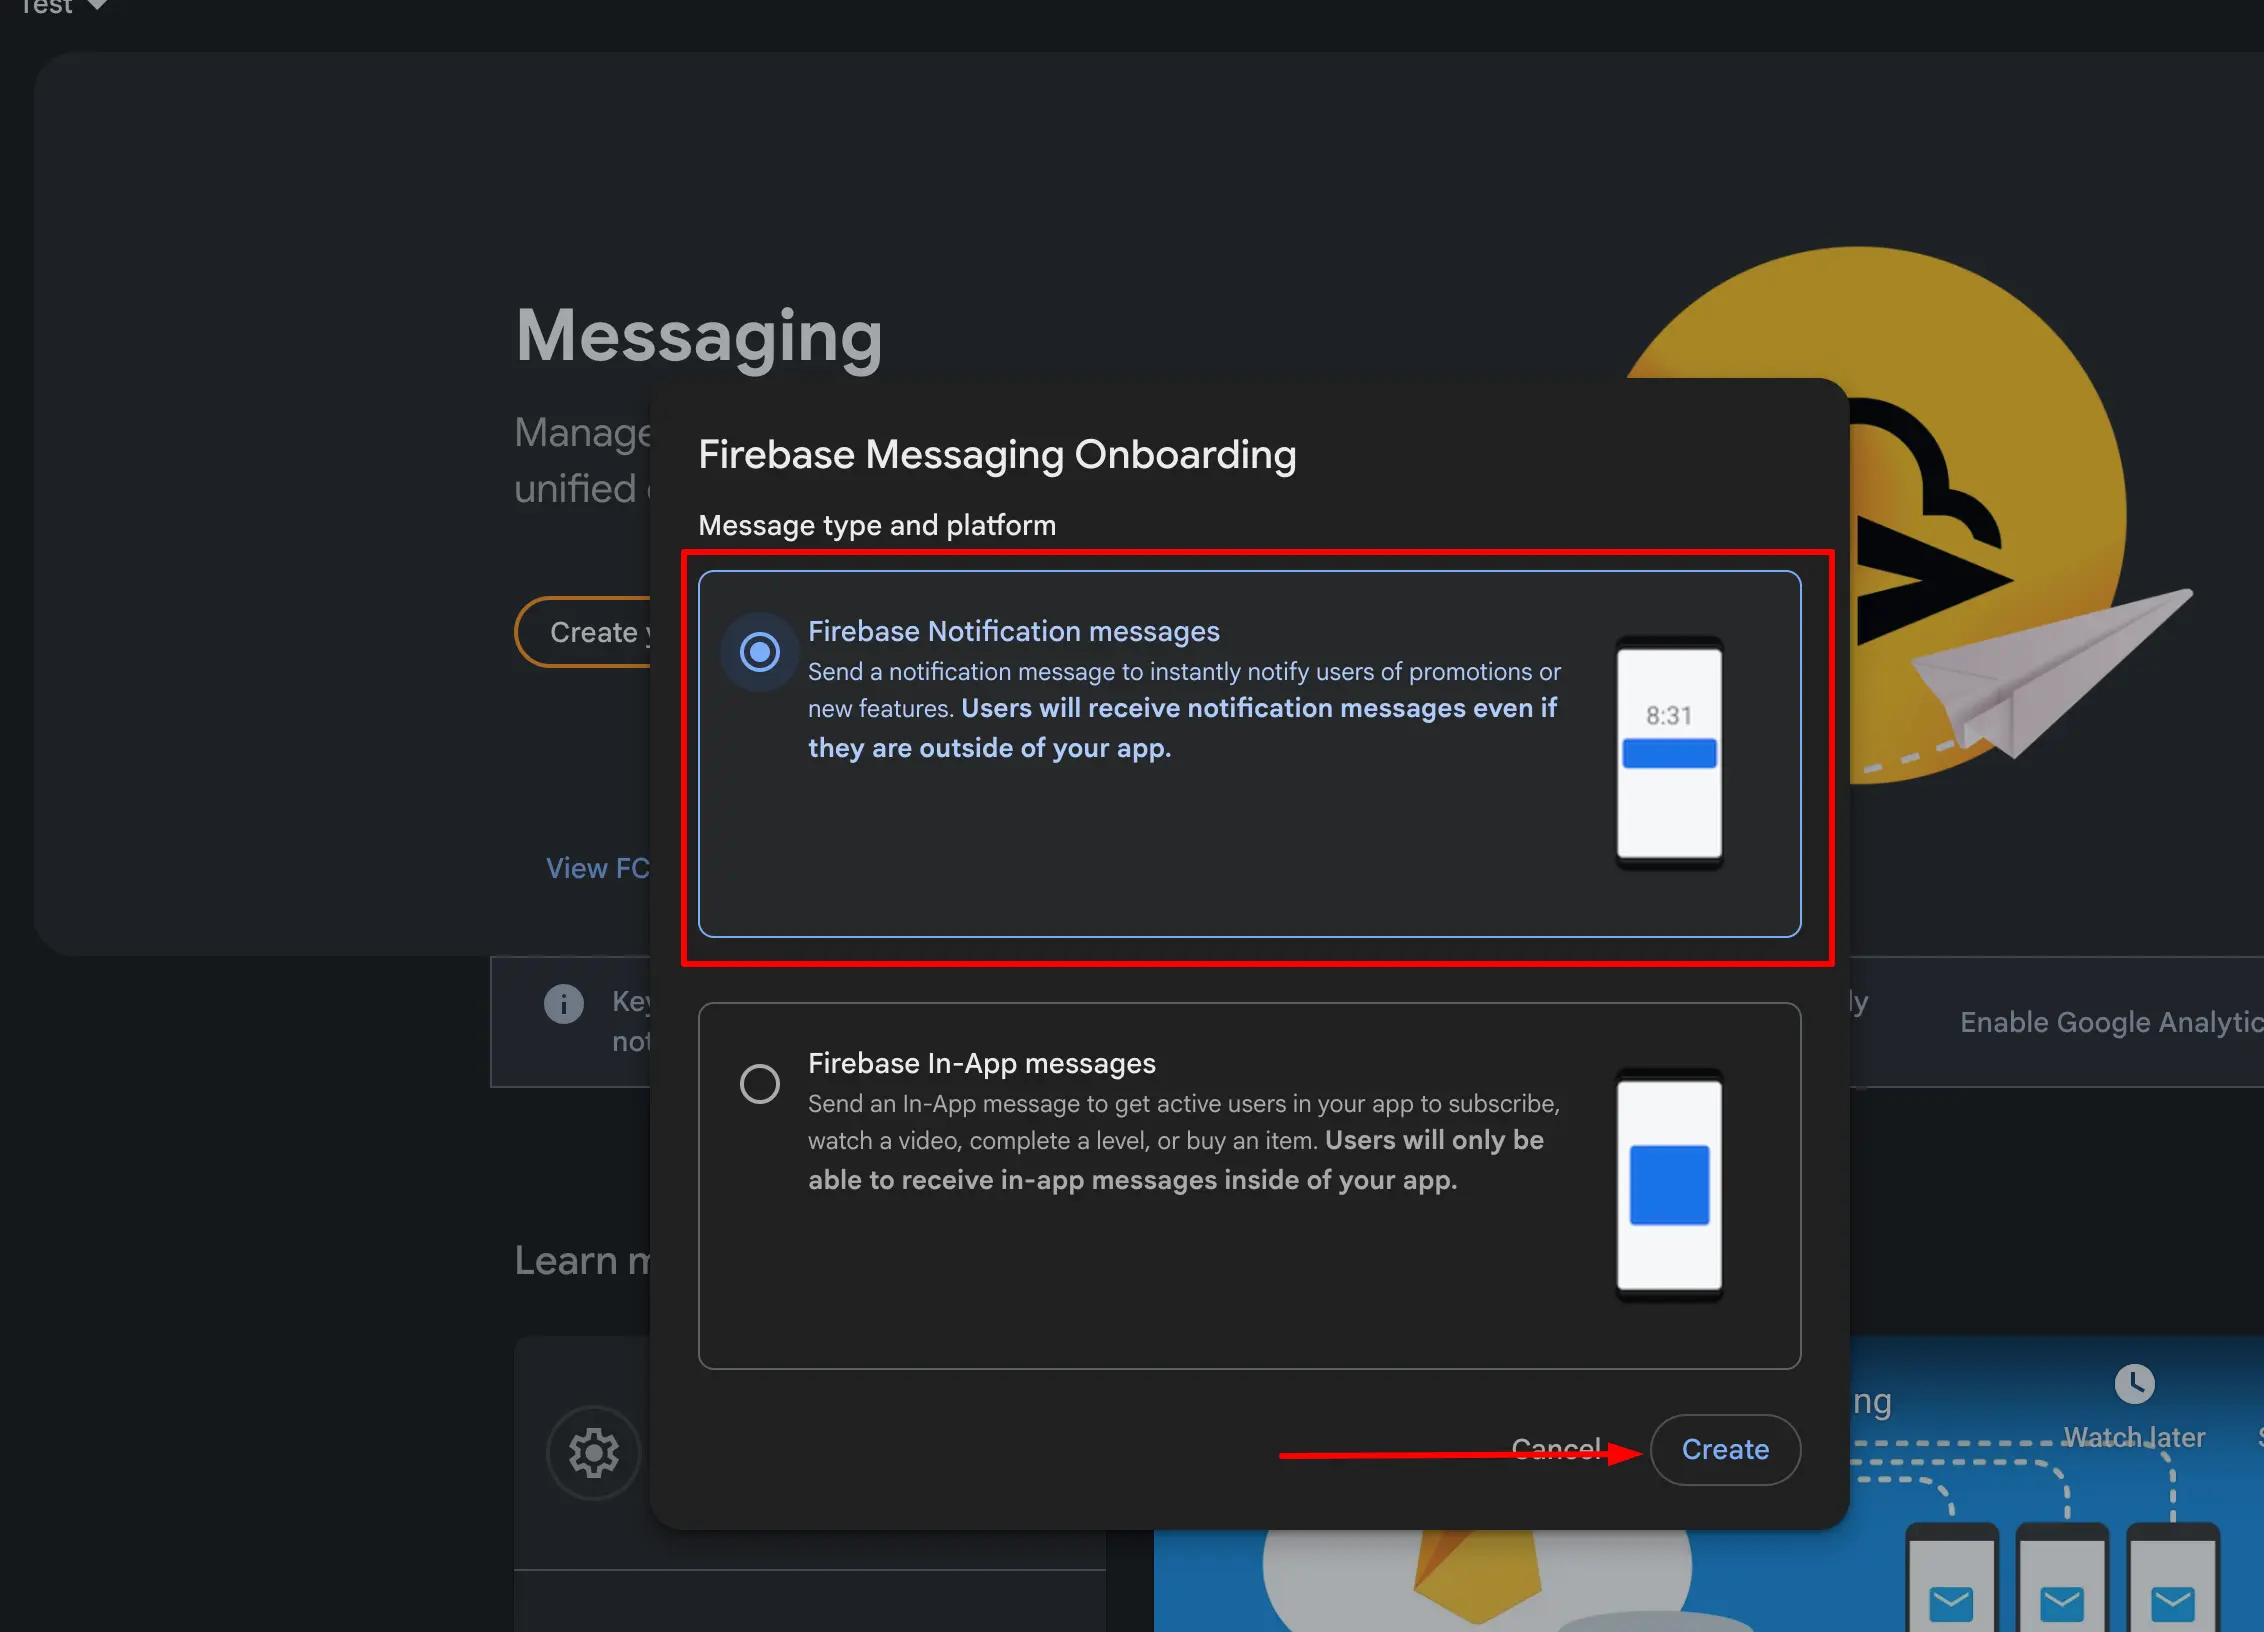
You'll be prompted to choose a message type. Select 'Firebase Notification messages' and click 'Create'. This is the standard notification type that works with both iOS and Android devices.
Step 4 — Send a Test Notification
Now let's verify the setup by sending a test notification. The campaign creation wizard has multiple steps. In Step 1 (Notification), fill in the following:
Notification title:  test
Notification text:   This is a test notification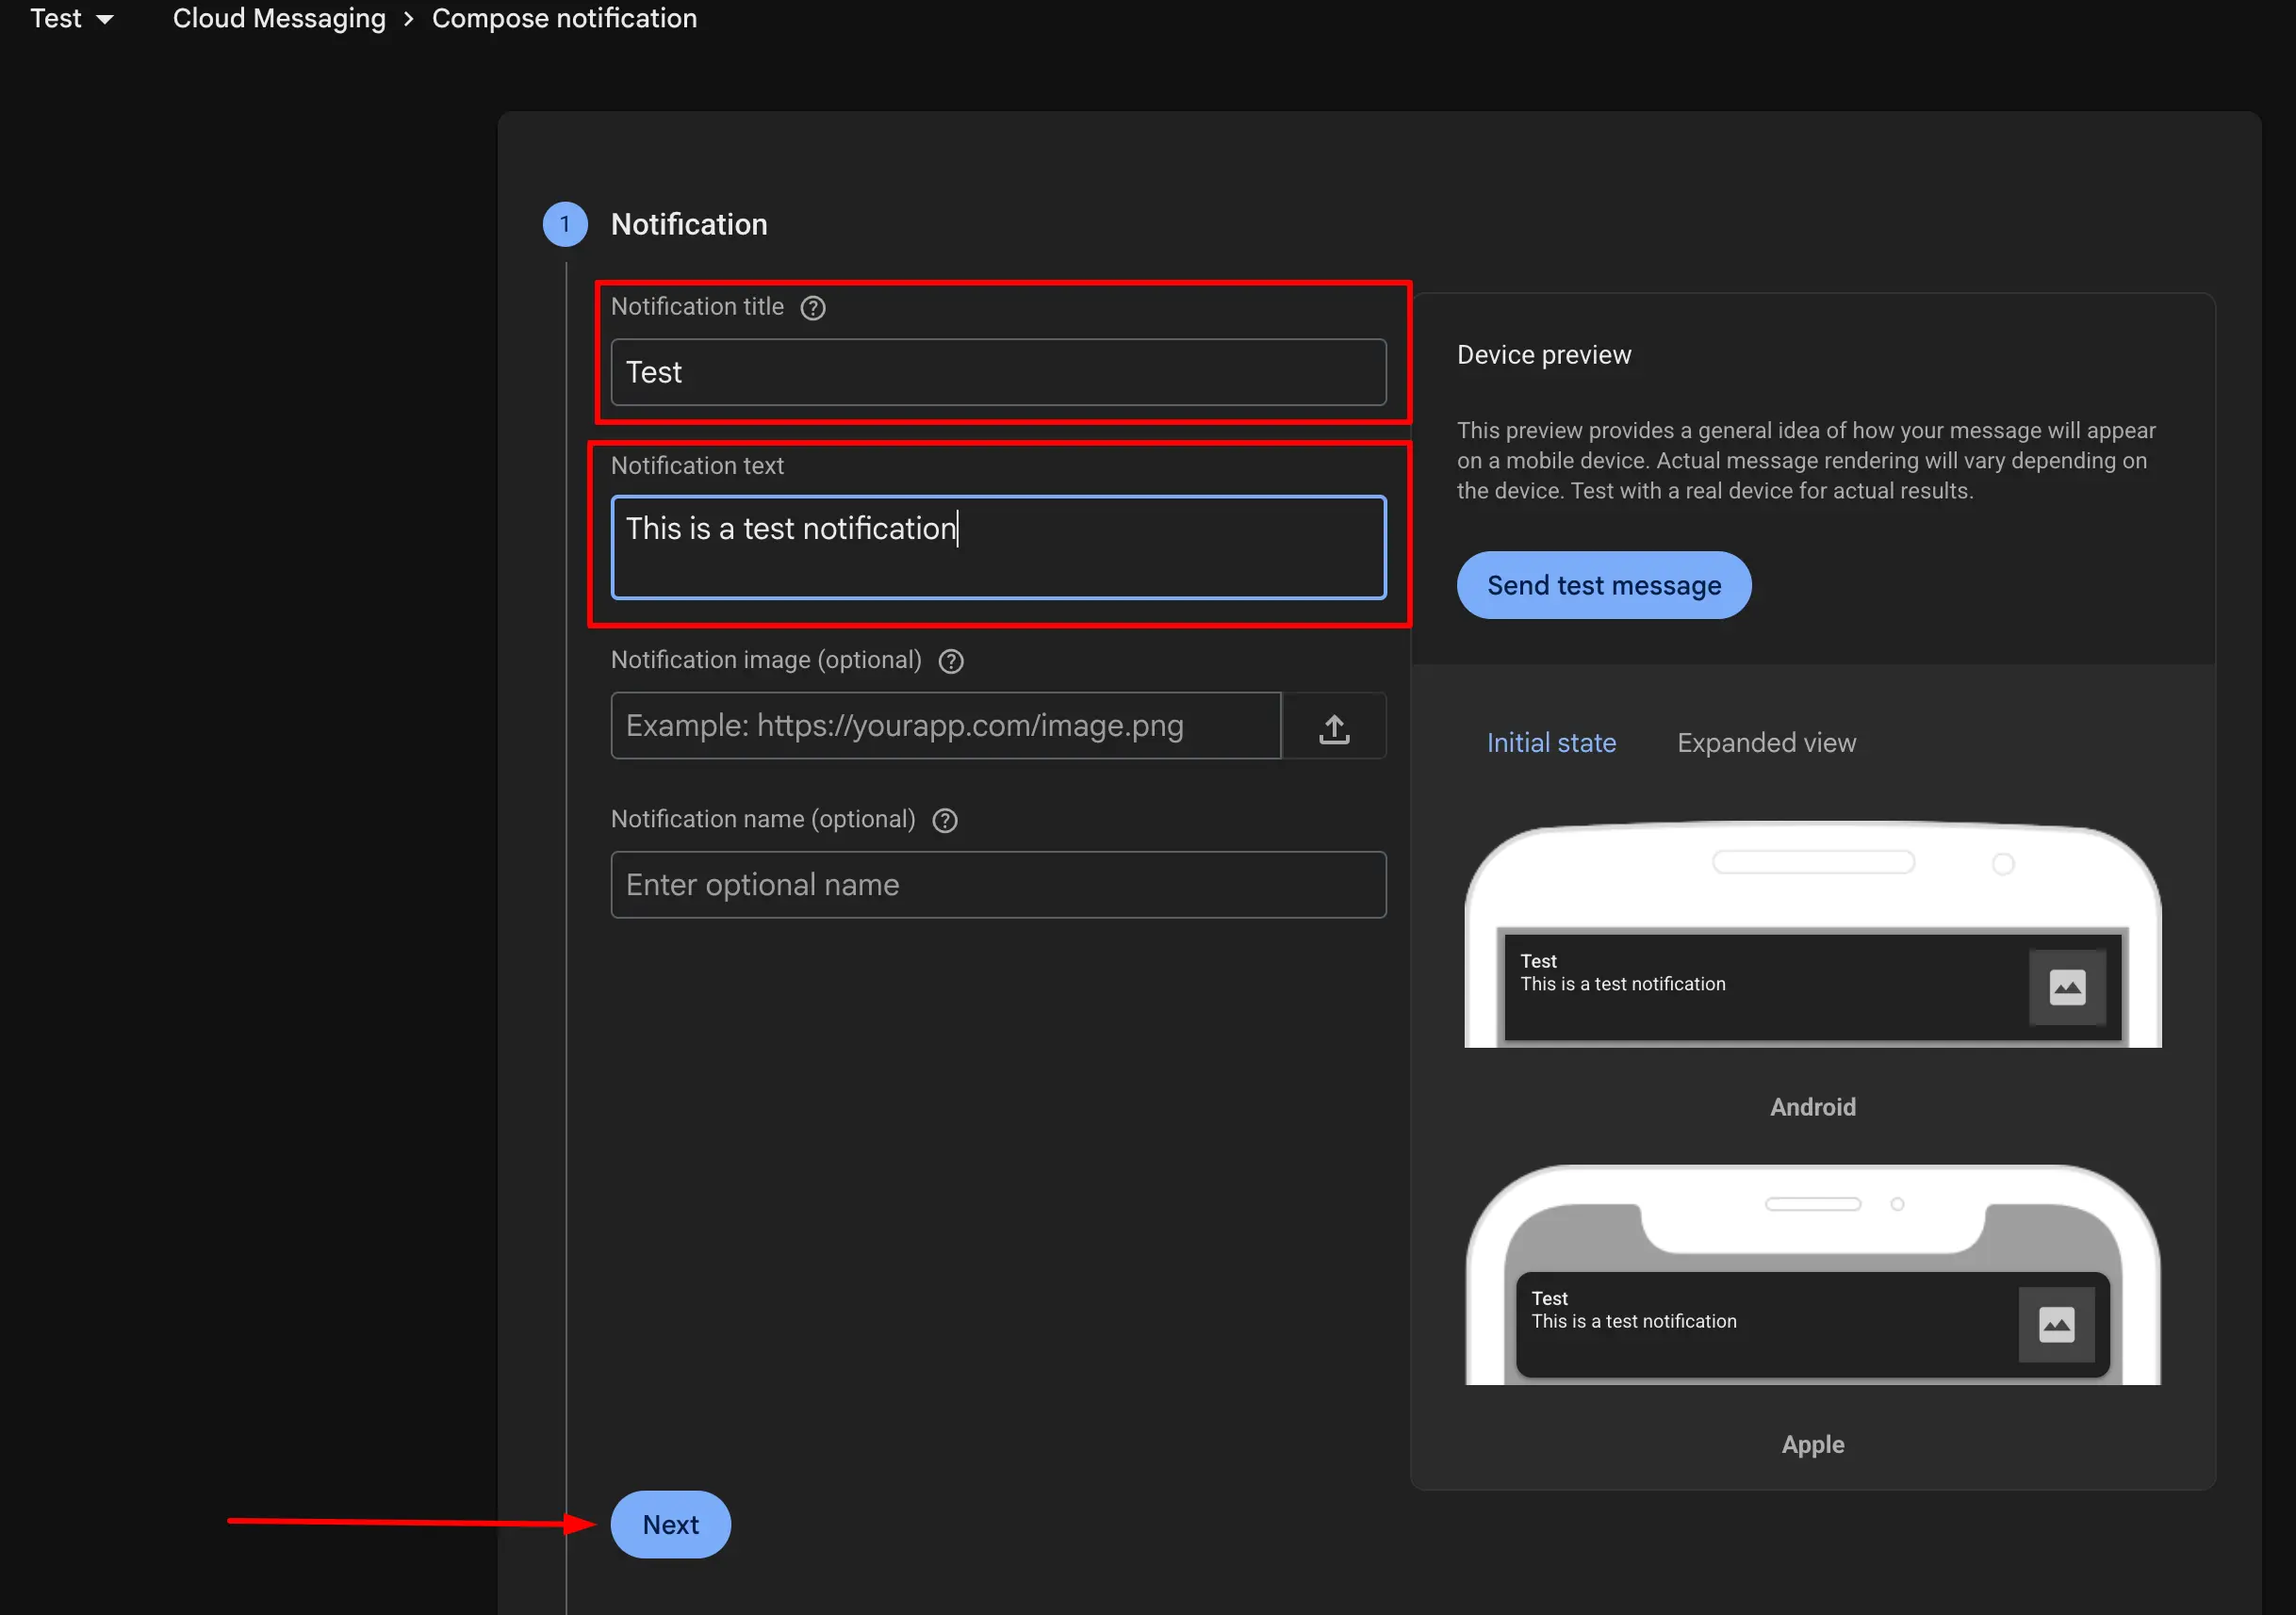
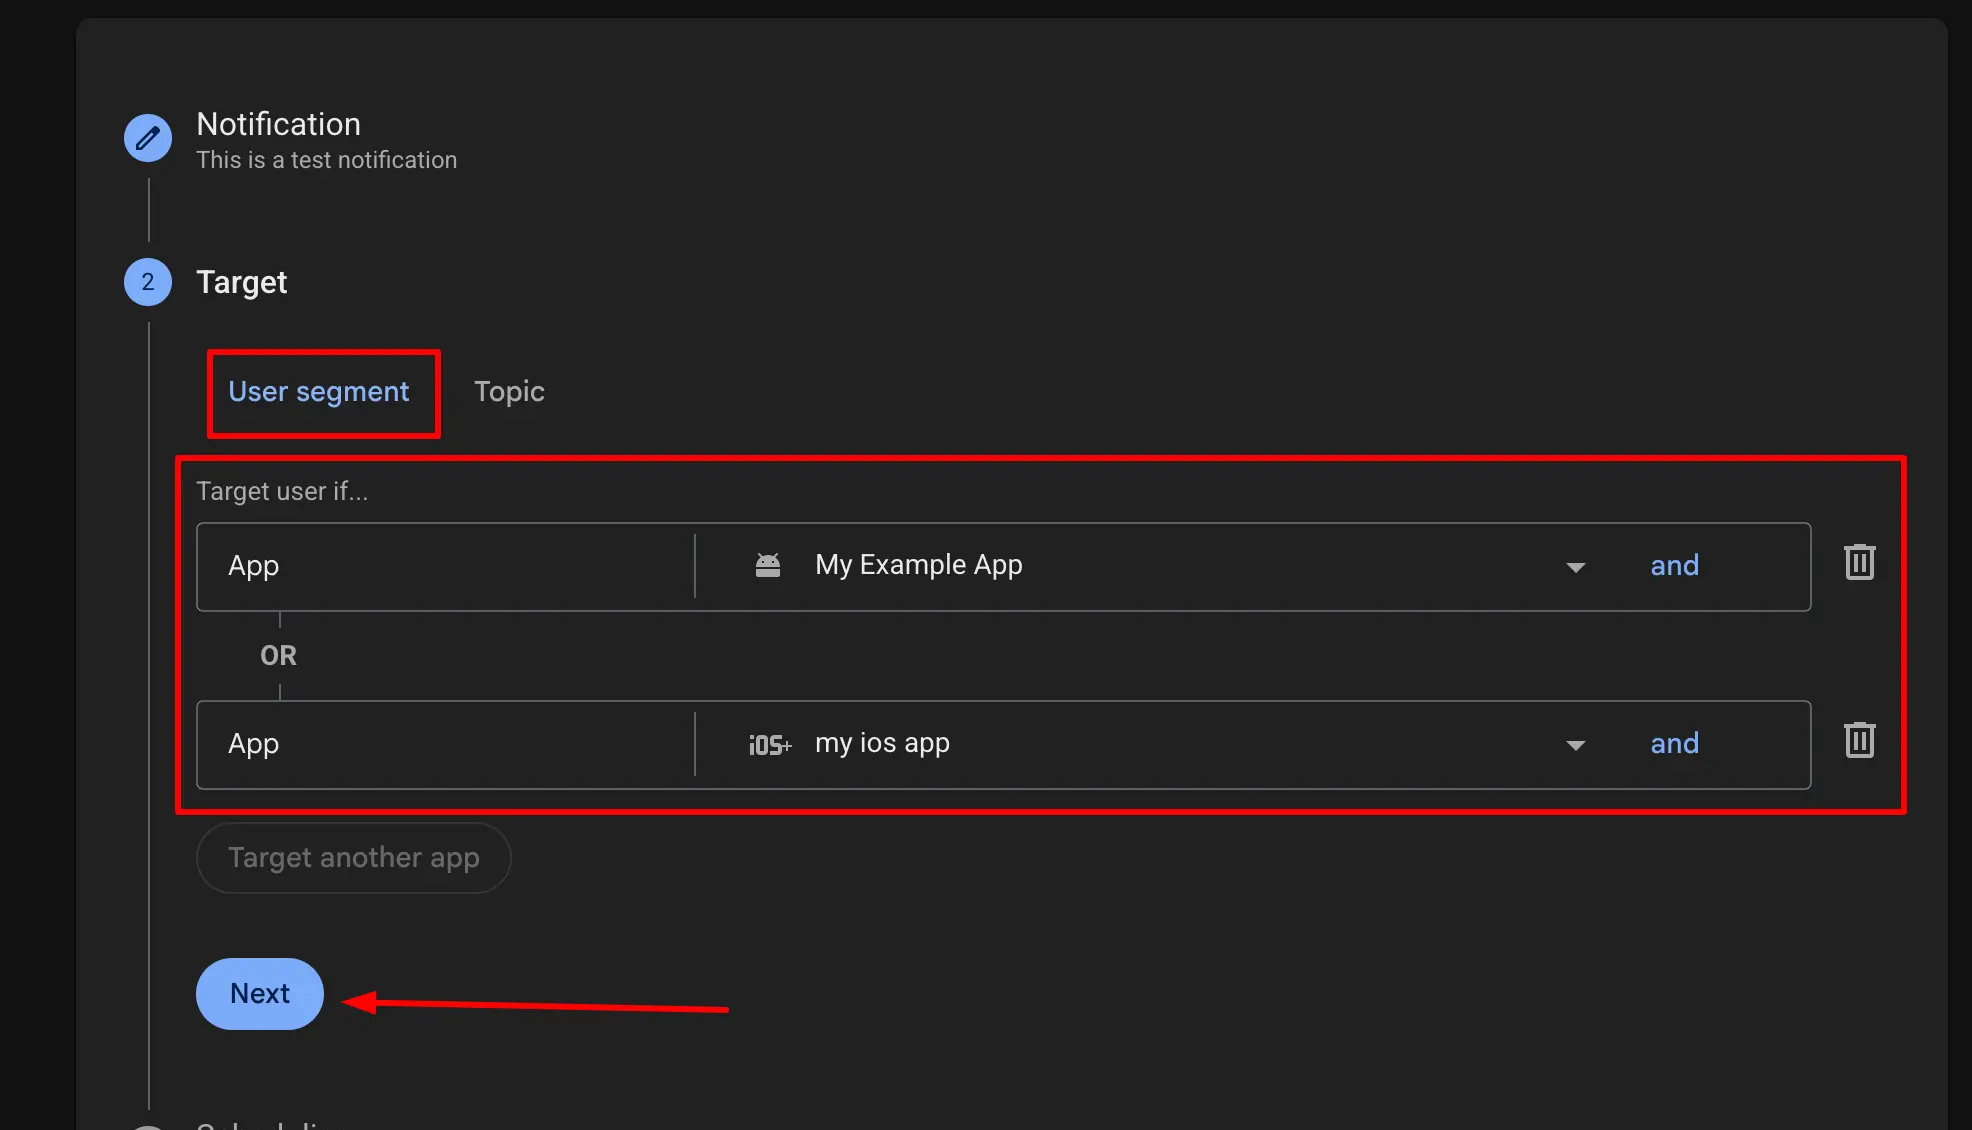
Step 5 — Select Target Audience
In Step 2 (Target), select the 'User segment' tab. From the app dropdown, choose both your iOS and Android apps — this ensures the test notification reaches all registered devices. We assume you've already registered both platforms with Firebase (if not, see our Android and iOS setup guides).
Step 6 — Schedule and Publish
In Step 3 (Scheduling), select 'Now' to send the notification immediately. You can also schedule it for a specific date/time, but for testing purposes, sending it immediately is the quickest way to verify your setup.
Click 'Review' to see a summary of your notification. Verify the title, body, and target apps are correct, then click 'Publish' in the review modal to send the notification.
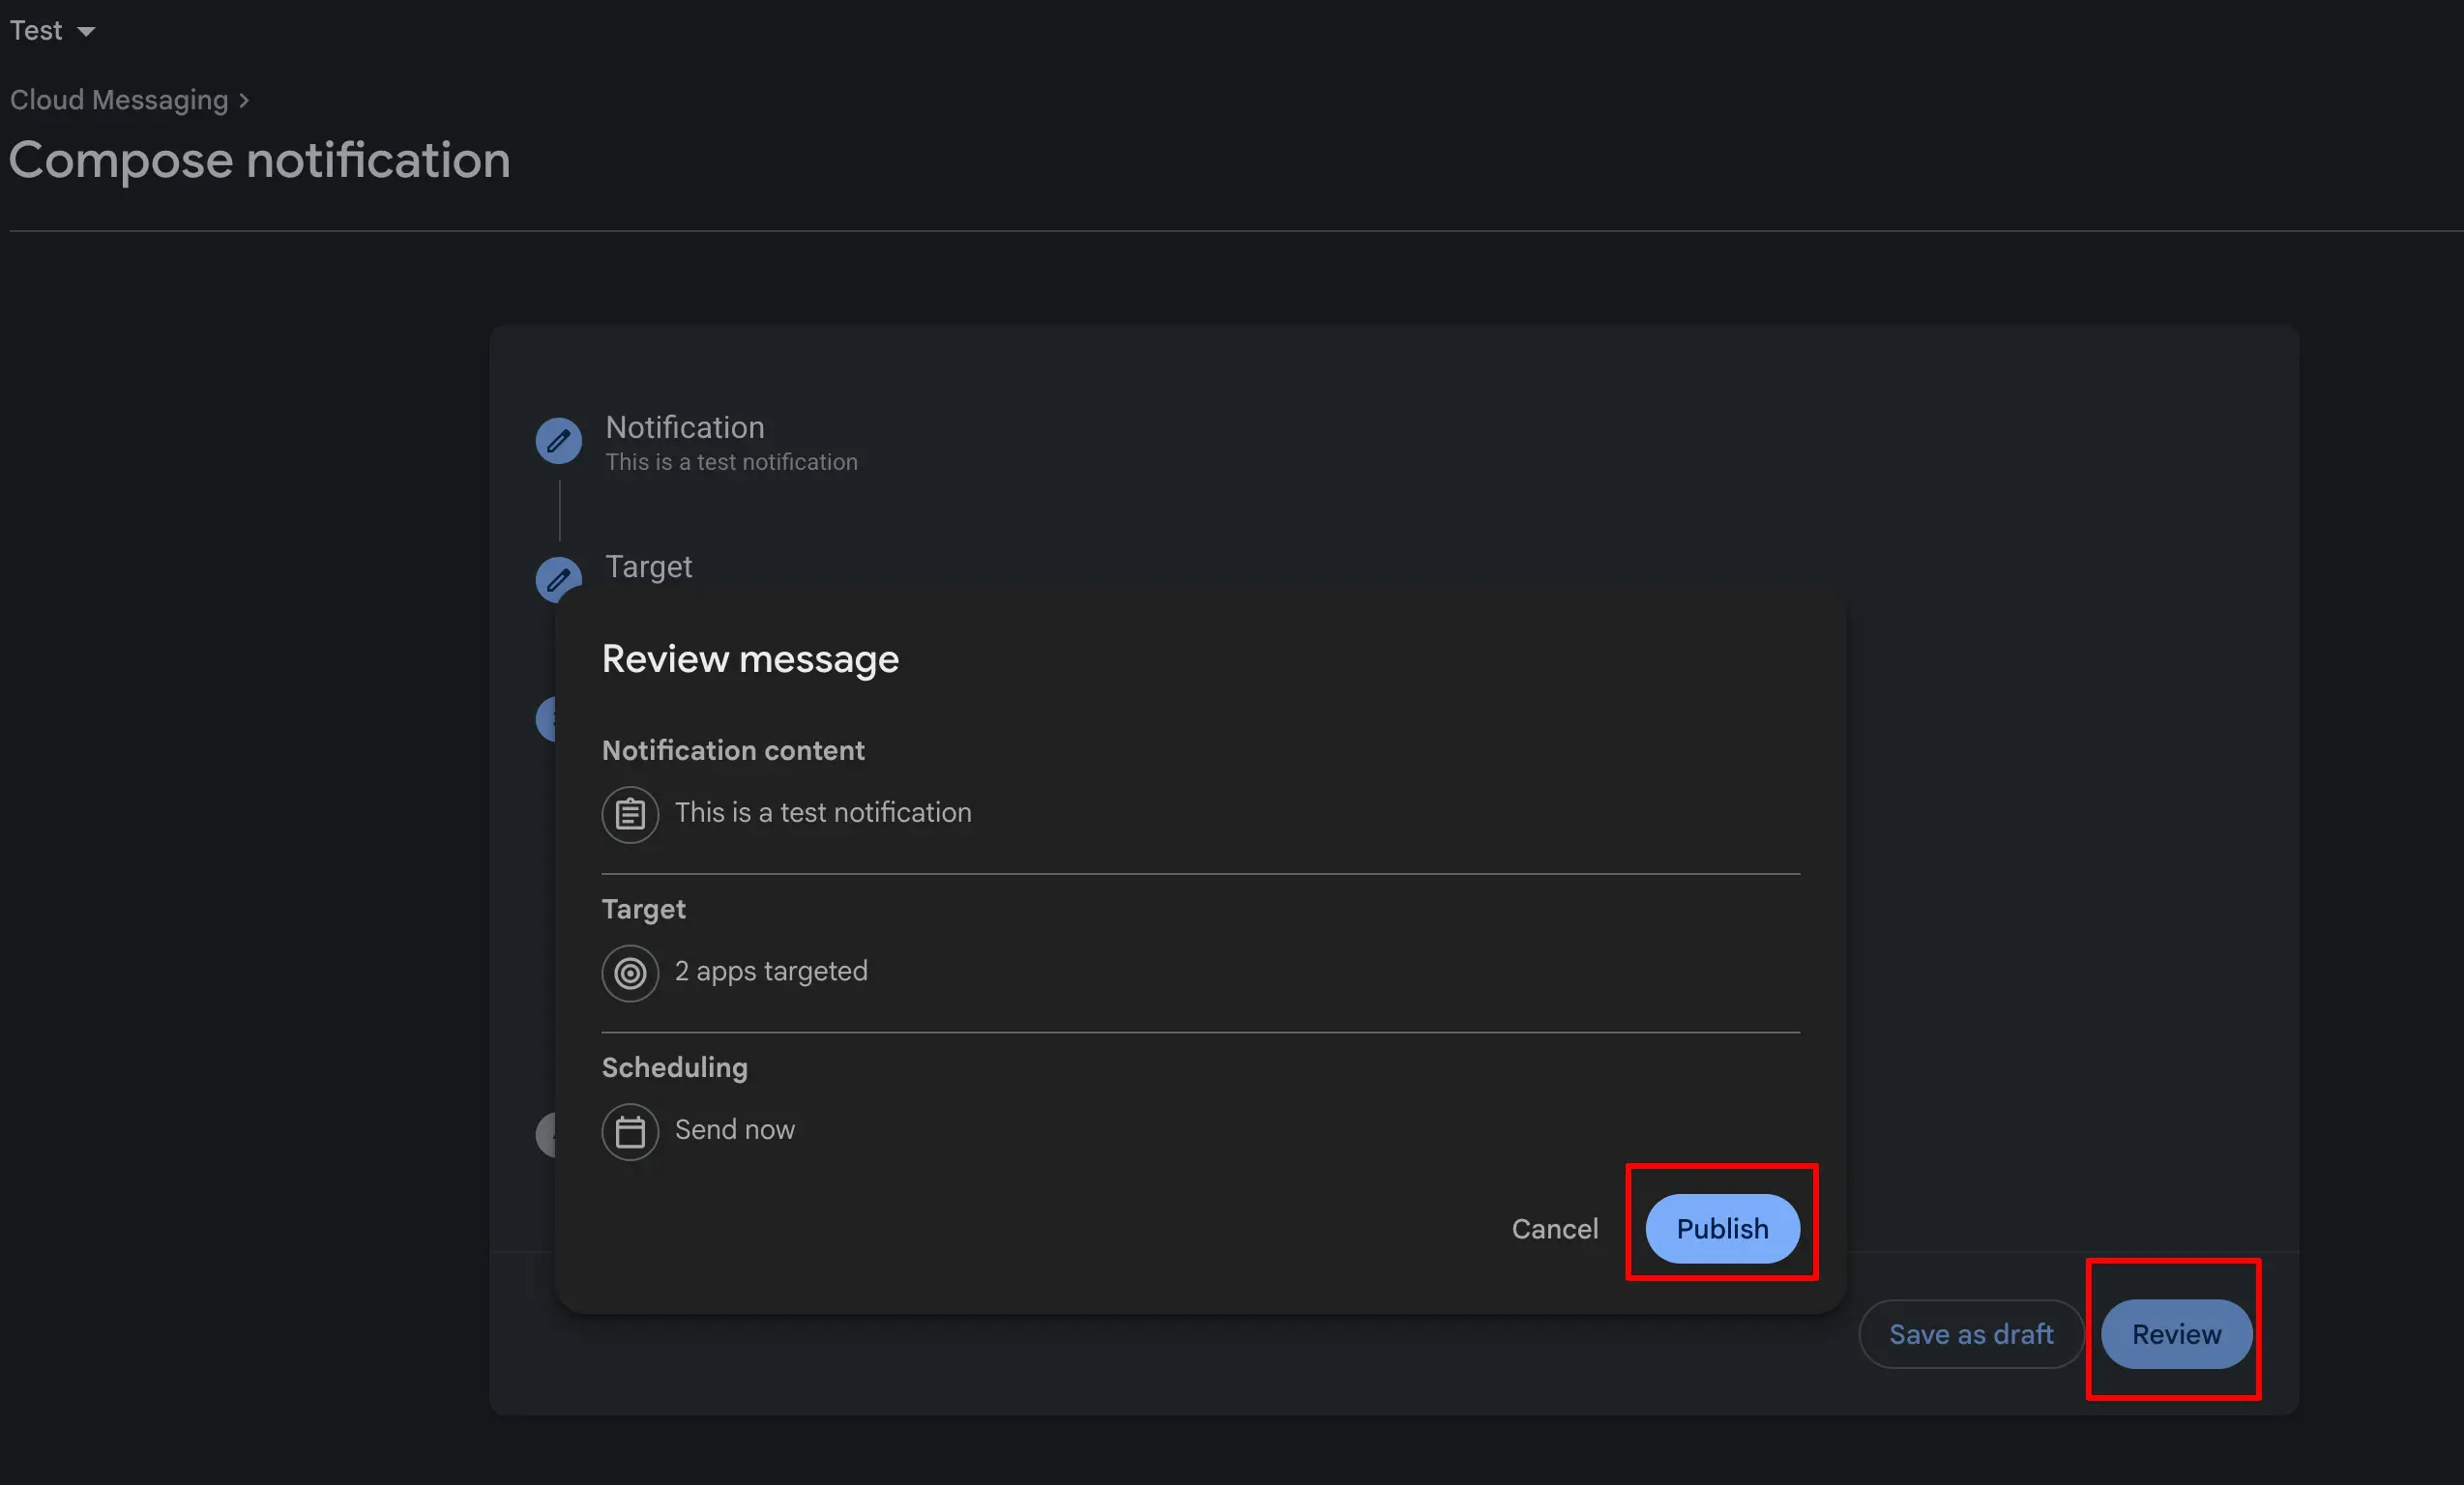
If your apps are running on devices (or emulators with Google Play Services), you should see the test notification appear within a few seconds. If you're on iOS, make sure you've configured your APNs key — otherwise iOS notifications won't be delivered.
What We've Accomplished
At this point, the Firebase side of push notifications is fully configured. Here's a checklist of what's been set up:
✓  Firebase Admin SDK private key generated (admin-sdk.json)
✓  Cloud Messaging enabled in Firebase Console
✓  Test notification sent and verified on devices
✓  Both iOS and Android apps targeted
Firebase Admin SDK Key — What's Inside?
The JSON file you downloaded contains several important fields. Here's what each one does:
{
  "type": "service_account",
  "project_id": "your-project-id",
  "private_key_id": "key-id",
  "private_key": "-----BEGIN PRIVATE KEY-----\n...\n-----END PRIVATE KEY-----\n",
  "client_email": "firebase-adminsdk-xxxxx@your-project.iam.gserviceaccount.com",
  "client_id": "123456789",
  "auth_uri": "https://accounts.google.com/o/oauth2/auth",
  "token_uri": "https://oauth2.googleapis.com/token"
}
The project_id identifies your Firebase project. The private_key is used for server-to-server authentication. The client_email is the service account identity. Your Node.js server uses these credentials to authenticate with Firebase and gain permission to send notifications, access Firestore, manage users, and more.
The Firebase Console setup is complete. In Part 2, we'll implement the Node.js backend code — initializing the Firebase Admin SDK, storing FCM device tokens in your database, and building an API endpoint to send targeted push notifications to specific users or user segments. Stay tuned!
In the meantime, if you haven't set up Crashlytics for your React Native app, it's a good time to do that — crash reports + push notifications together give you full observability over your users' experience.
Related Articles
How to Send Push Notifications from Node.js with Firebase — Part 2: Code Implementation
Implement the Node.js backend for Firebase Cloud Messaging — initialize firebase-admin, store FCM tokens per user, expose a save-token API, and send push notifications from your server using a reusable notification service.
Integrate Firebase Cloud Messaging in React Native — Permissions, Tokens, Background & In-App UI
End-to-end guide: APNs key in Firebase, Xcode capabilities, @react-native-firebase/messaging + Notifee, Android 13+ permissions, saving FCM tokens to your backend, navigation on tap, and a Zustand-powered in-app notification banner.