How to Generate an APNs Key for iOS Push Notifications (Step-by-Step Guide)
If you're building a mobile app that targets iOS and need to send push notifications, you'll need an Apple Push Notification service (APNs) authentication key. This /p8 key file is required by services like Firebase Cloud Messaging (FCM), OneSignal, Amazon SNS, and others to communicate with Apple's push notification servers on your behalf.
Unlike the older certificate-based approach (.p12), the key-based method (.p8) is simpler, doesn't expire annually, and works across all your apps under the same Apple Developer team. In this guide, I'll walk you through generating this key from scratch.
Prerequisites
Before you begin, make sure you have an active Apple Developer Program membership ($99/year). You'll also need the Account Holder or Admin role in your developer team — only these roles have permission to create APNs keys. If you're on a free developer account, push notifications are not available.
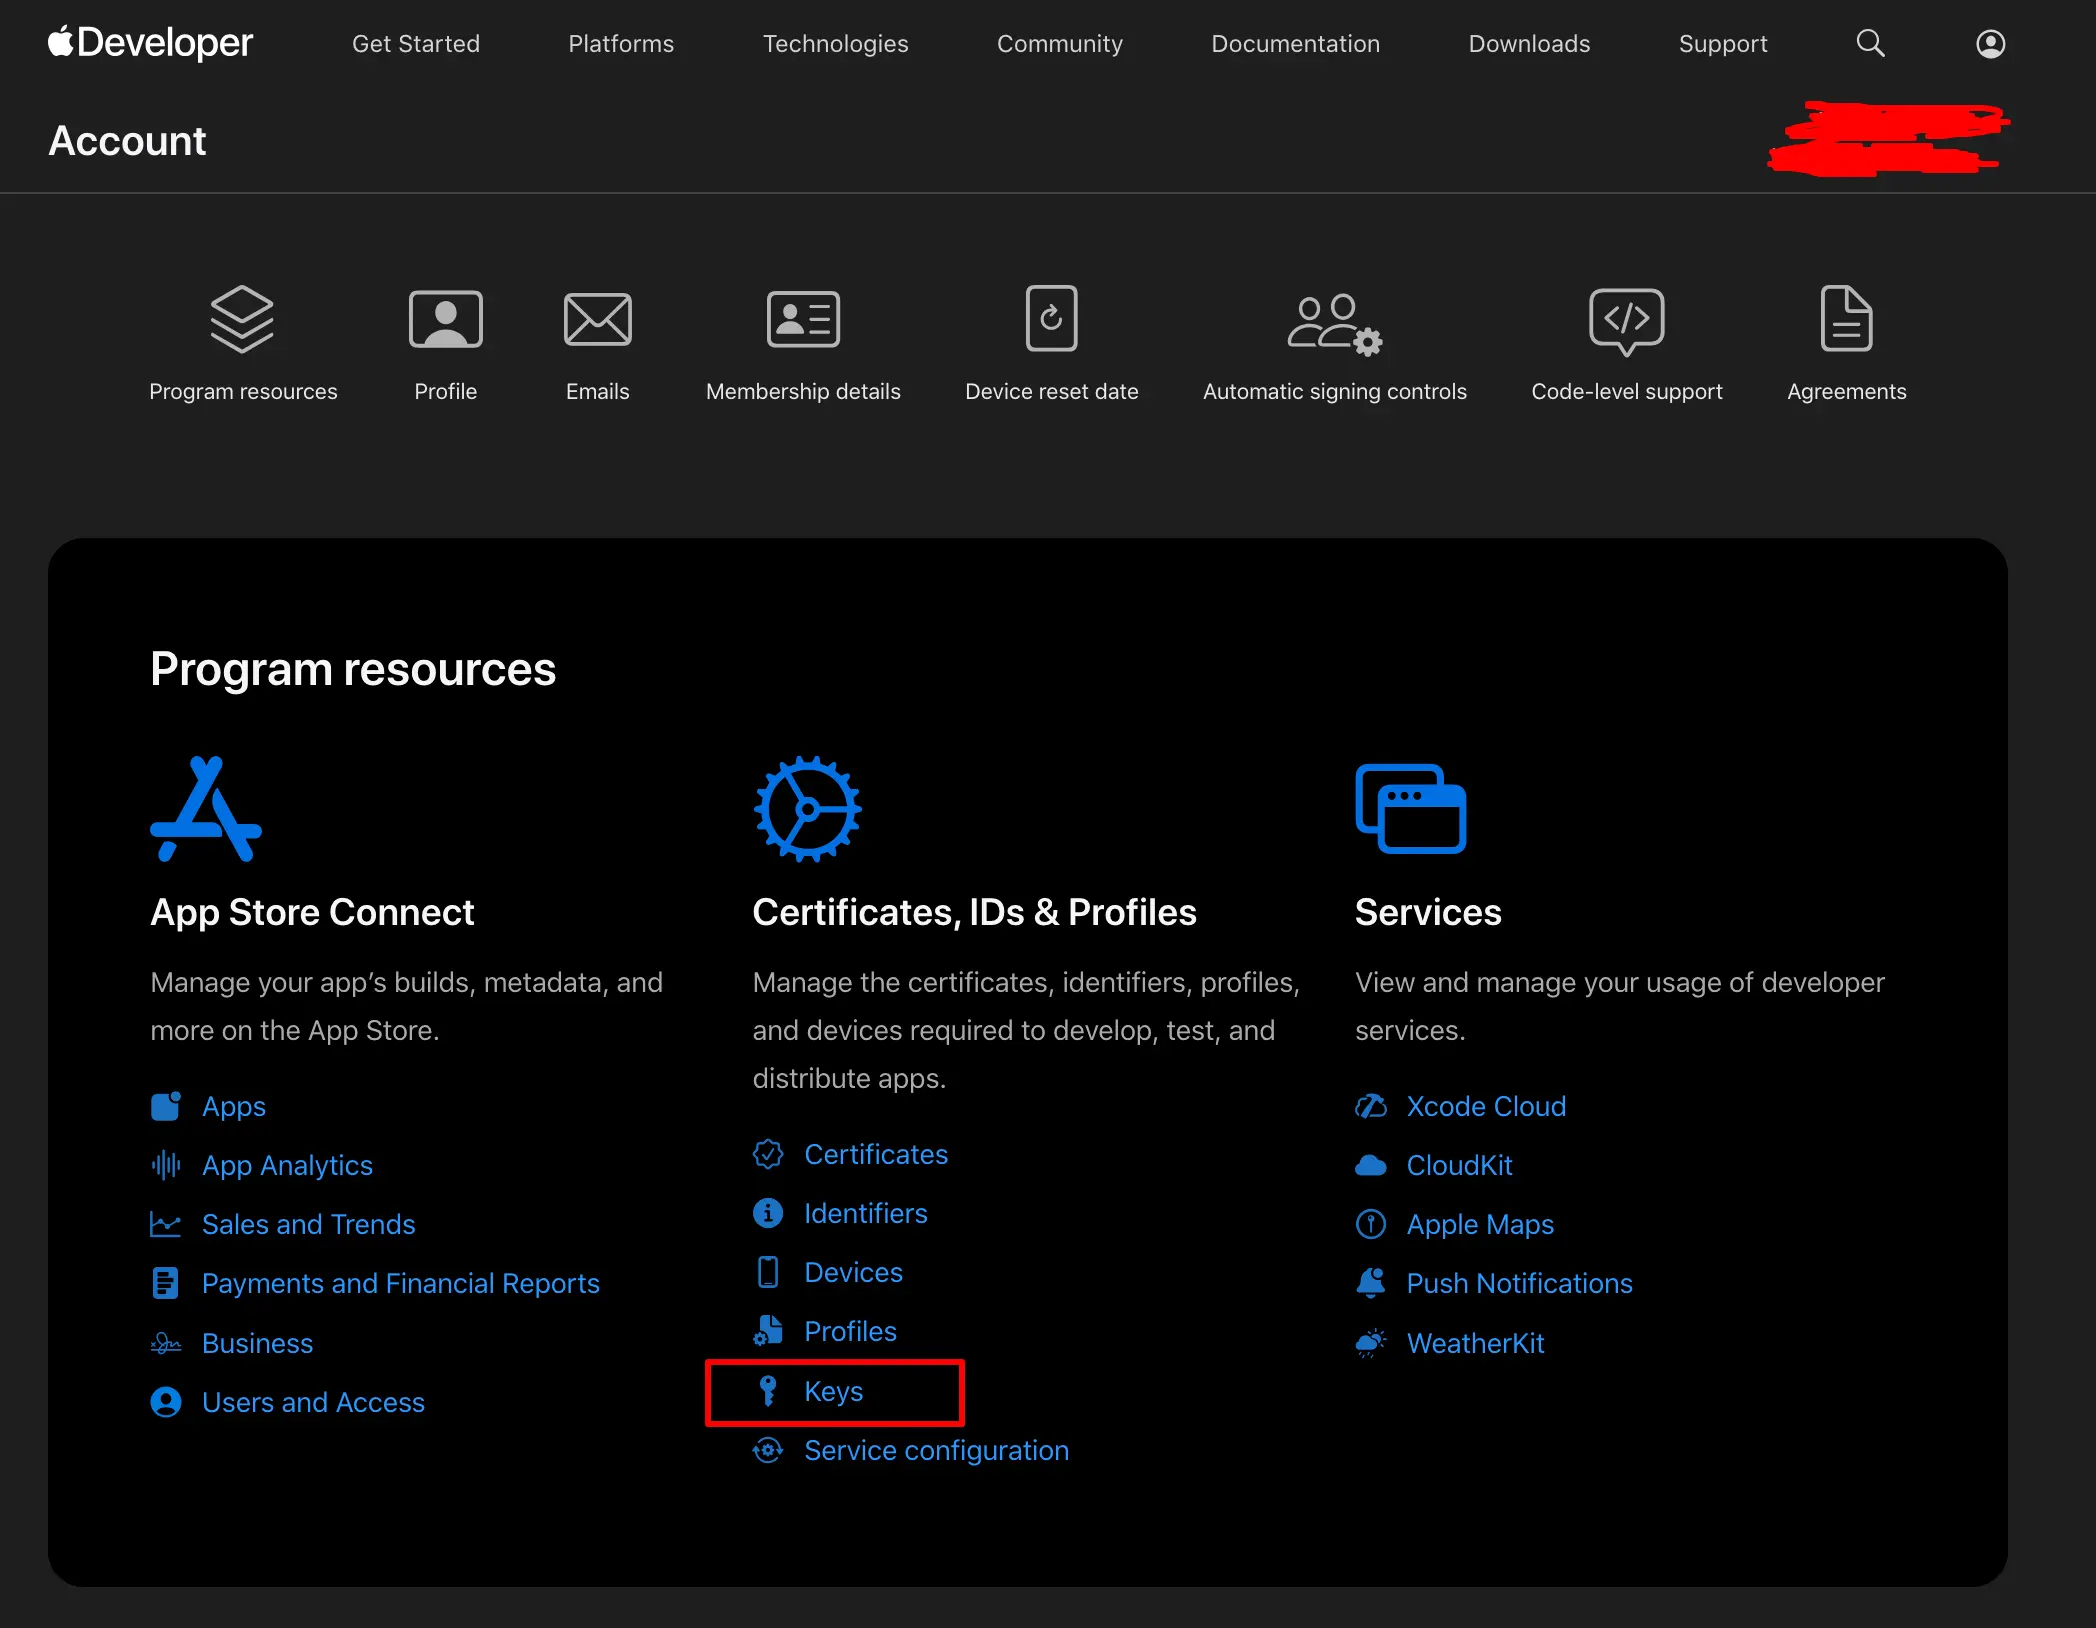
Step 1 — Open the Apple Developer Portal
Navigate to the Apple Developer Account page and sign in with your Apple ID. Once logged in, you'll see the developer dashboard with various sections like Certificates, Identifiers, Profiles, and Keys.
Step 2 — Navigate to Keys
In the left sidebar or under the "Program resources" section, locate and click on "Keys". This is where Apple manages all authentication keys associated with your developer account — including APNs keys, Sign in with Apple keys, and MusicKit keys.
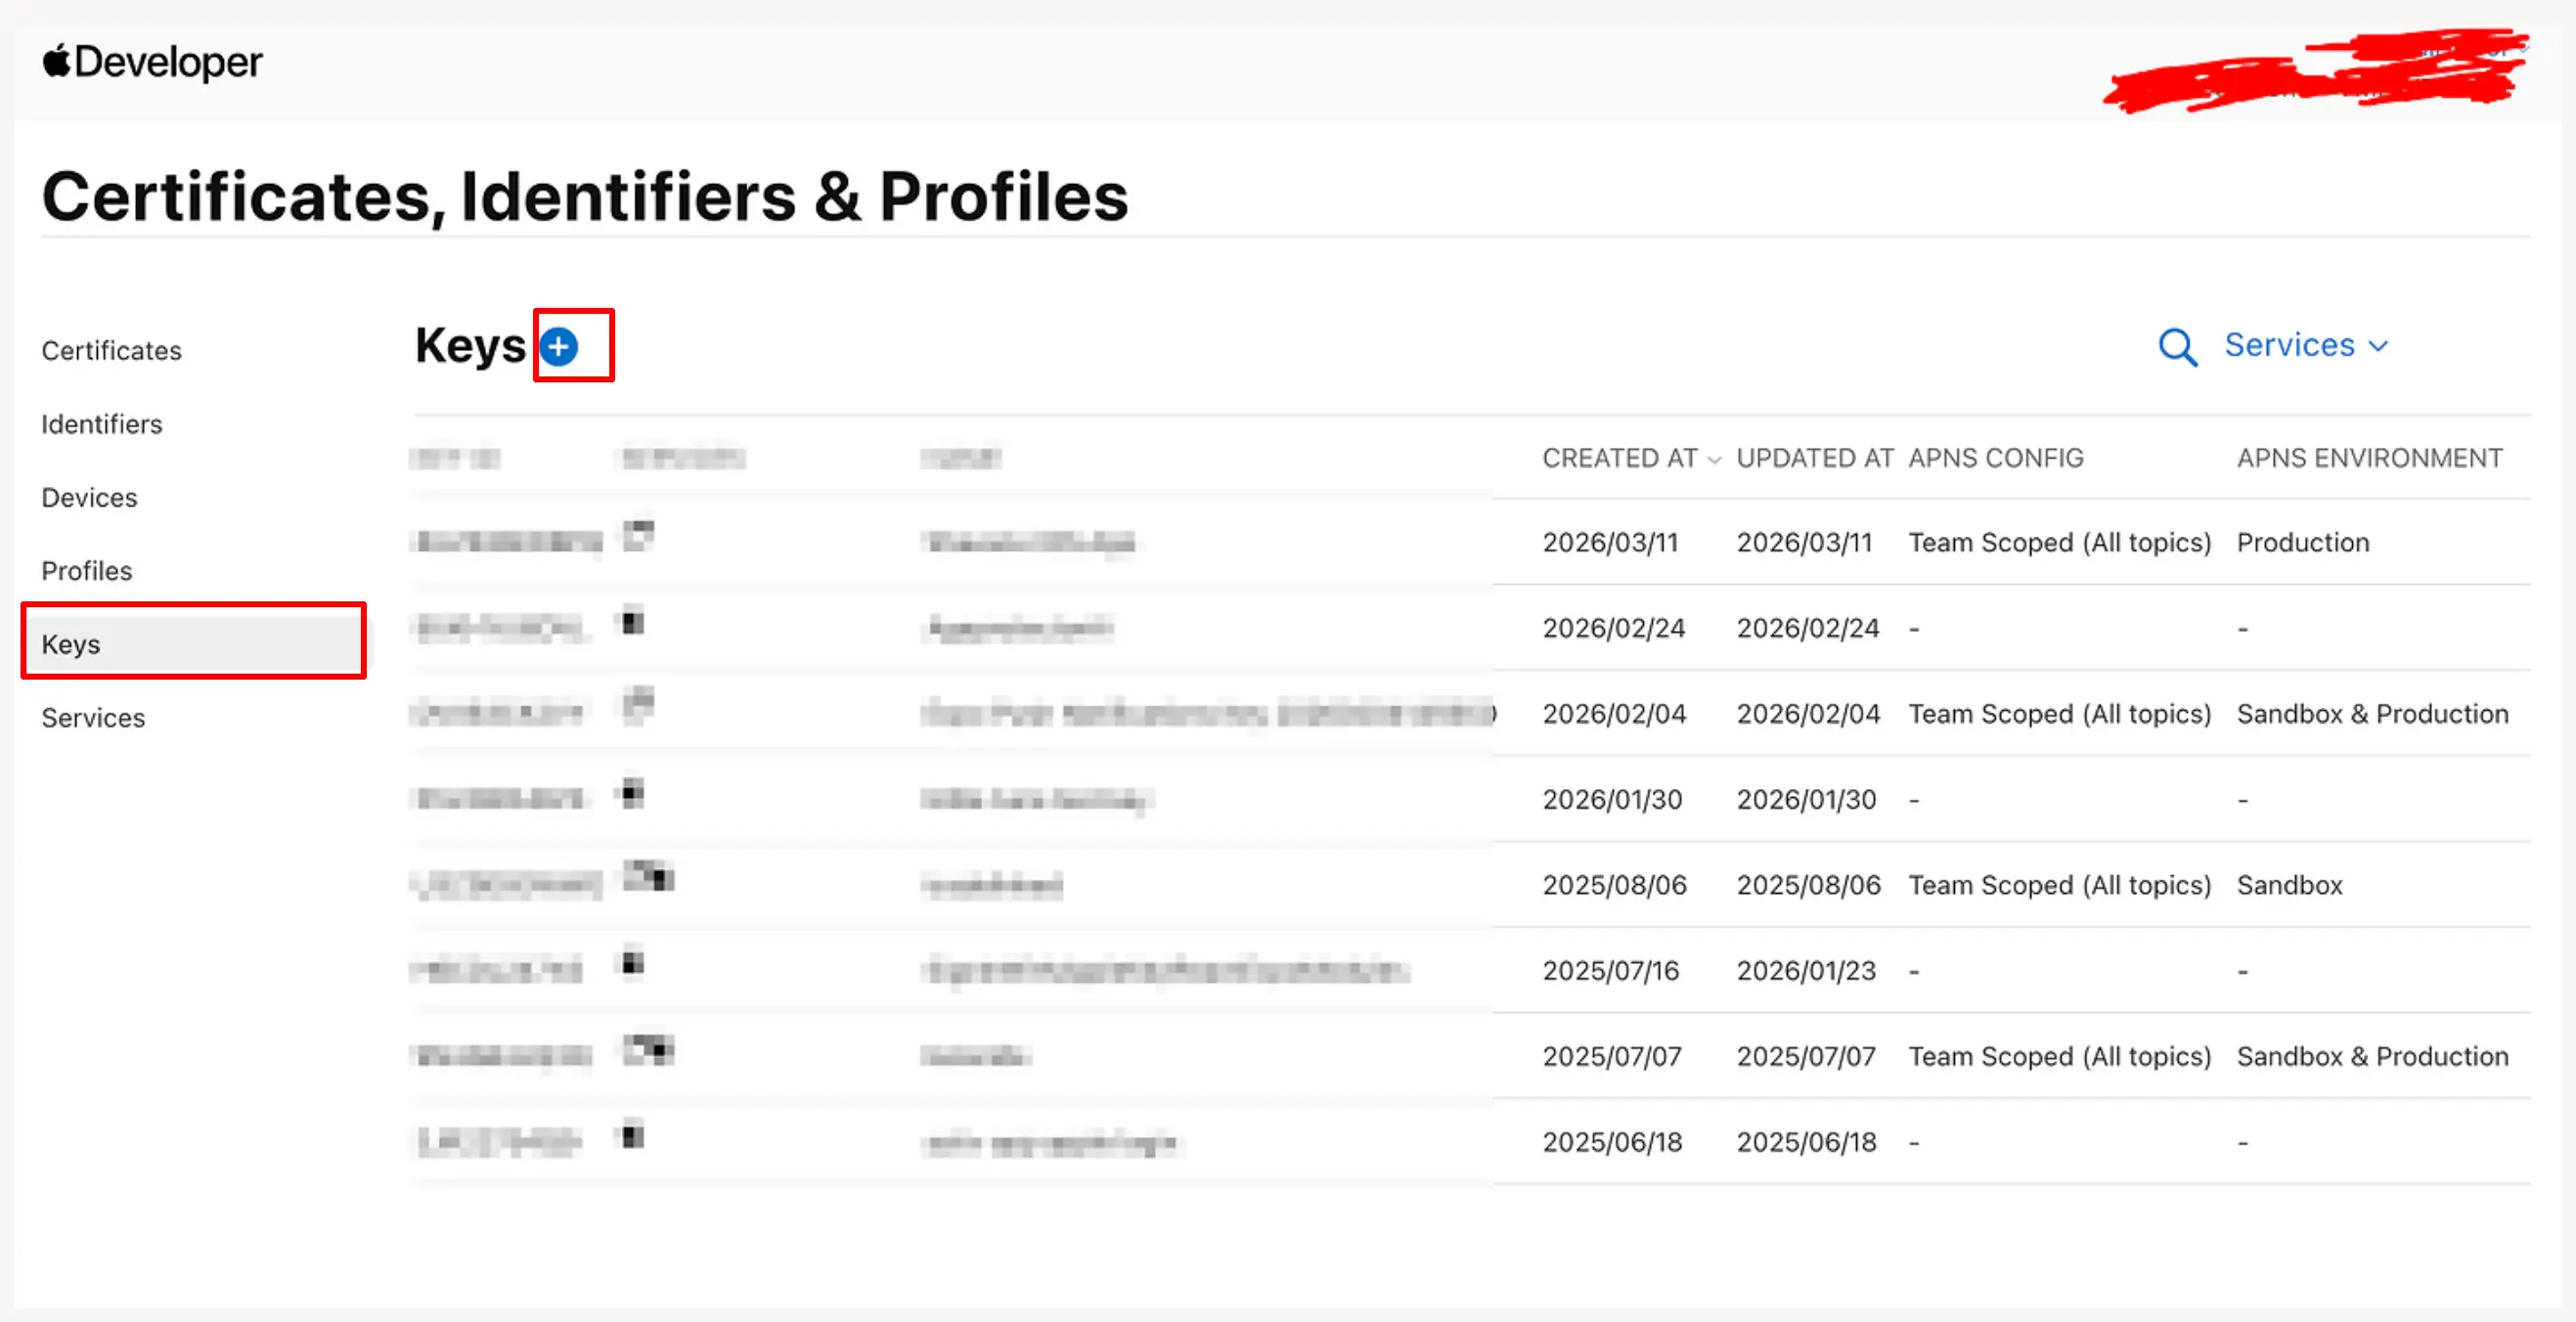
Step 3 — Create a New Key
On the Keys page, click the "+" (plus) icon or the "Create a key" button to register a new key. Apple allows a maximum of 2 APNs keys per developer account, so use them wisely. If you've already reached the limit, you'll need to revoke an existing key before creating a new one.
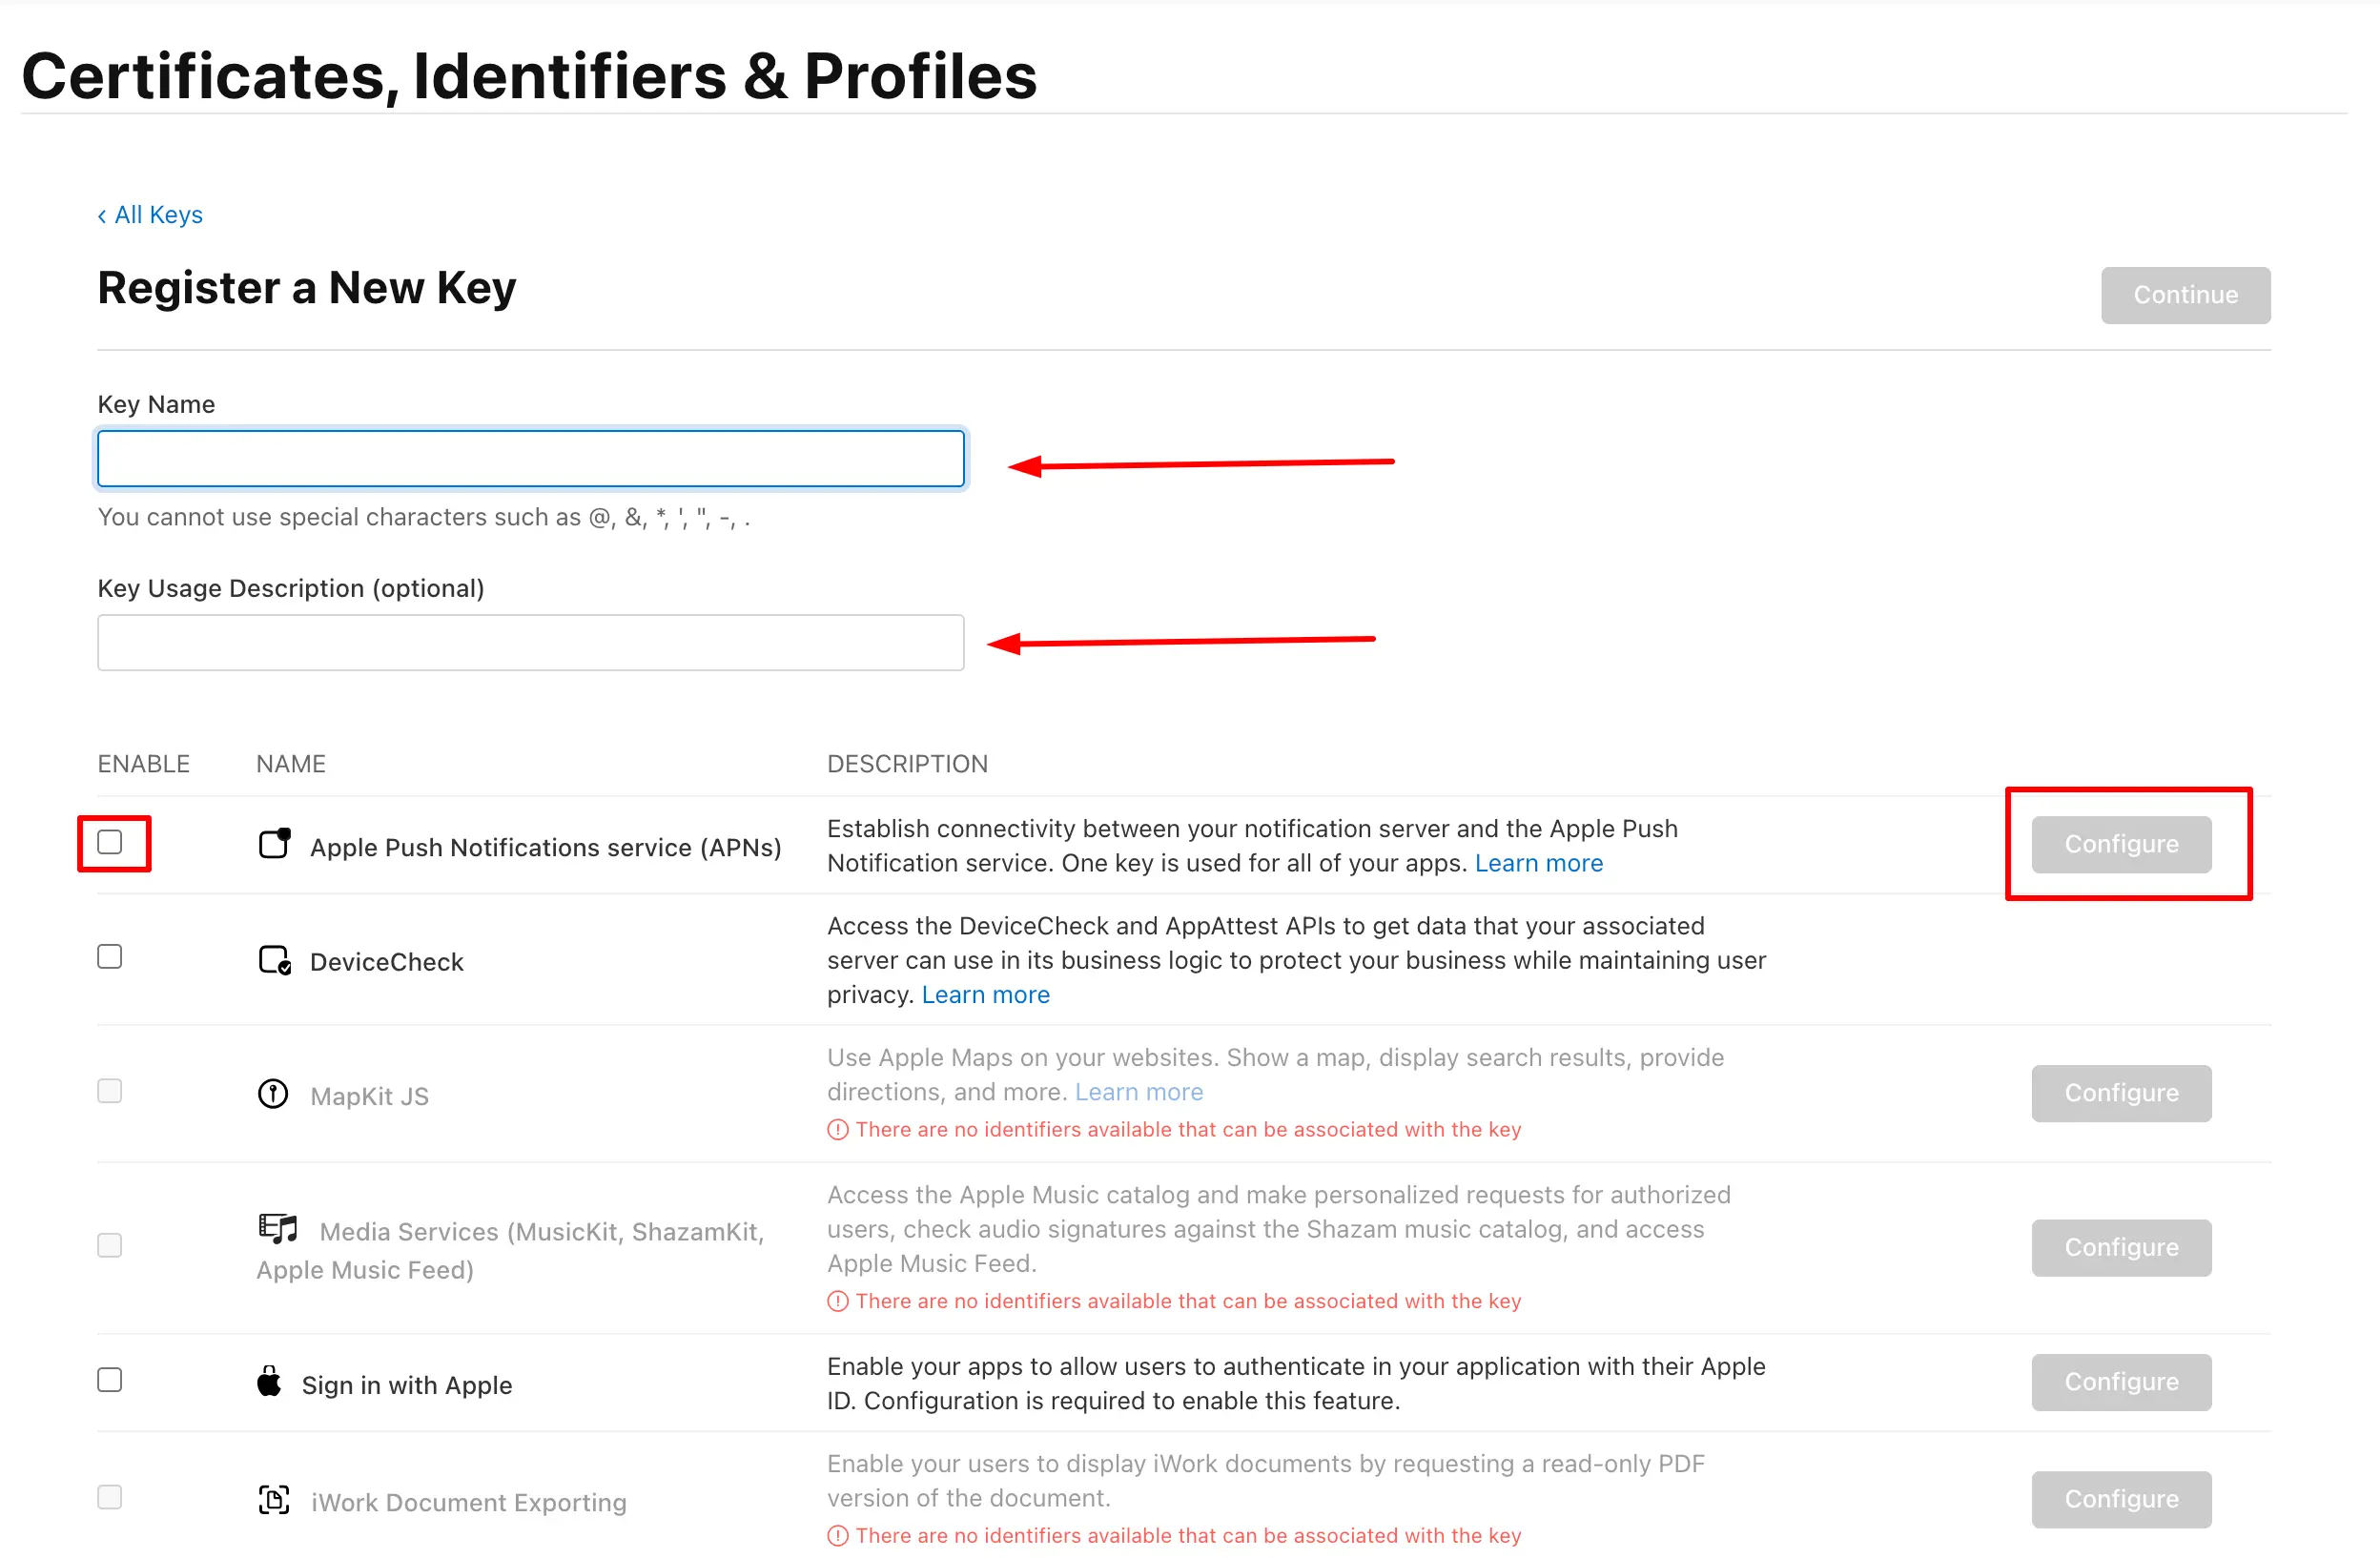
Step 4 — Name the Key and Enable APNs
On the "Register a New Key" page, you'll need to provide a Key Name — this is just a label for your reference, so name it something descriptive like "FCM Push Key" or "Production APNs Key". Below the name field, you'll see a list of services you can enable for this key.
Find "Apple Push Notifications service (APNs)" in the list and check the checkbox to enable it. This is the critical step — without enabling APNs, the key won't be able to send push notifications.
Step 5 — Configure the Key Environment
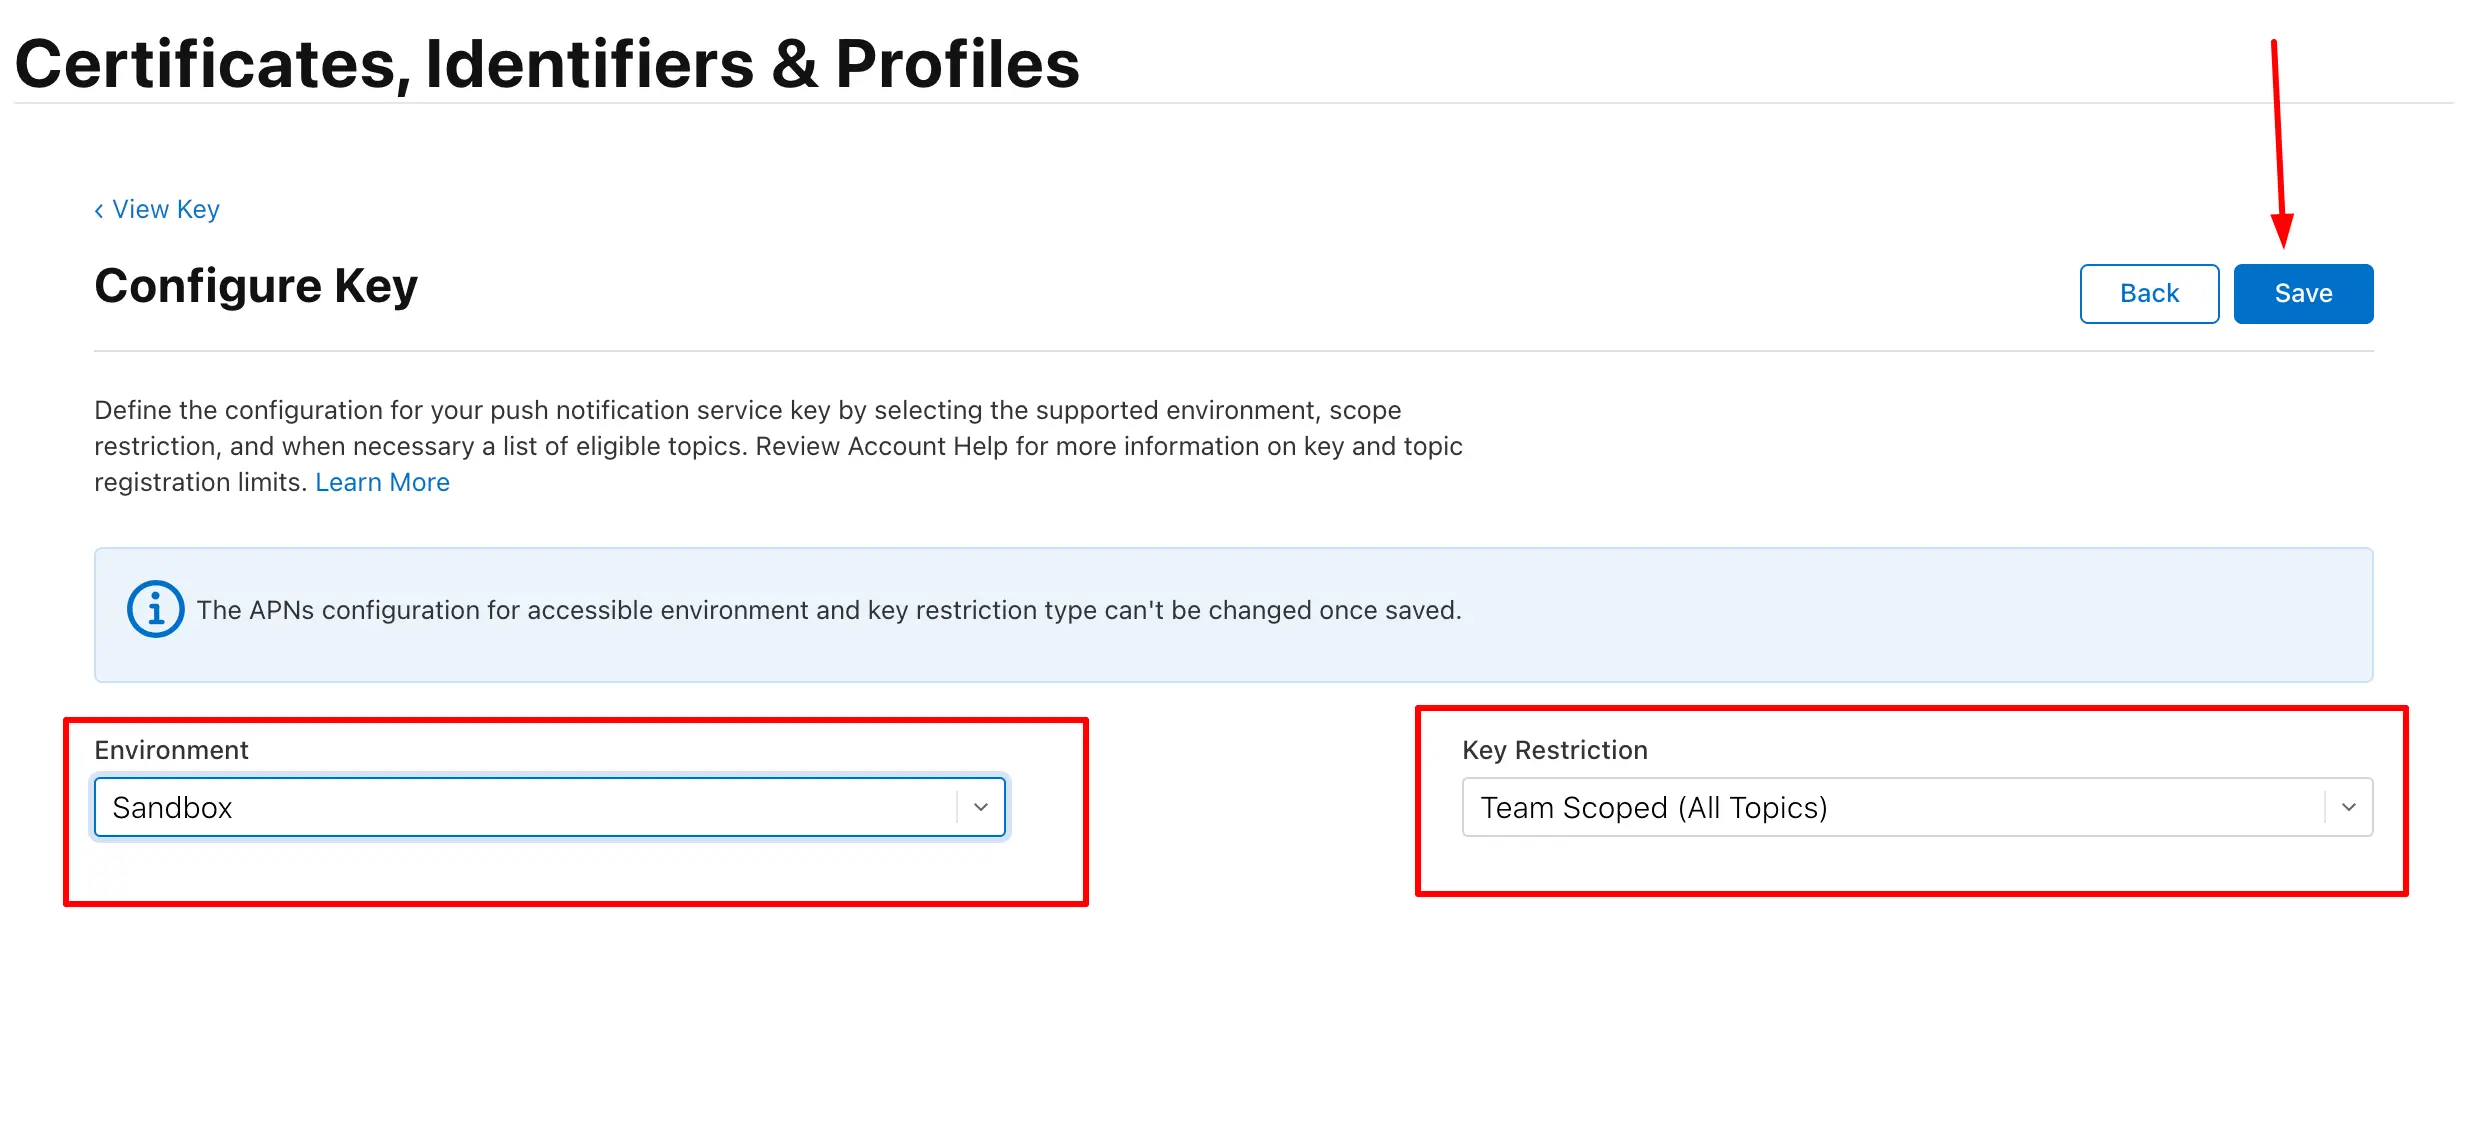
After enabling APNs, click the "Configure" button next to it. This opens the "Configure Key" page where you select the environment your key will work with. Apple provides three options:
Sandbox — for development and testing only. Production — for live App Store builds. Sandbox & Production — works in both environments (recommended for most use cases). Select the environment that matches your needs. For most developers, "Sandbox & Production" is the safest choice since it covers both testing and production workflows.
Under "Key Restrictions", select "Team Scoped" — this means the key can send notifications to any app under your developer team, rather than being restricted to a single app. Click "Save" to apply the configuration.
Step 6 — Register the Key
After configuring the environment, you'll be taken back to the key summary page. Review all the details you've provided — the key name, enabled services, and environment configuration. Once everything looks correct, click 'Register' to finalize the key creation.

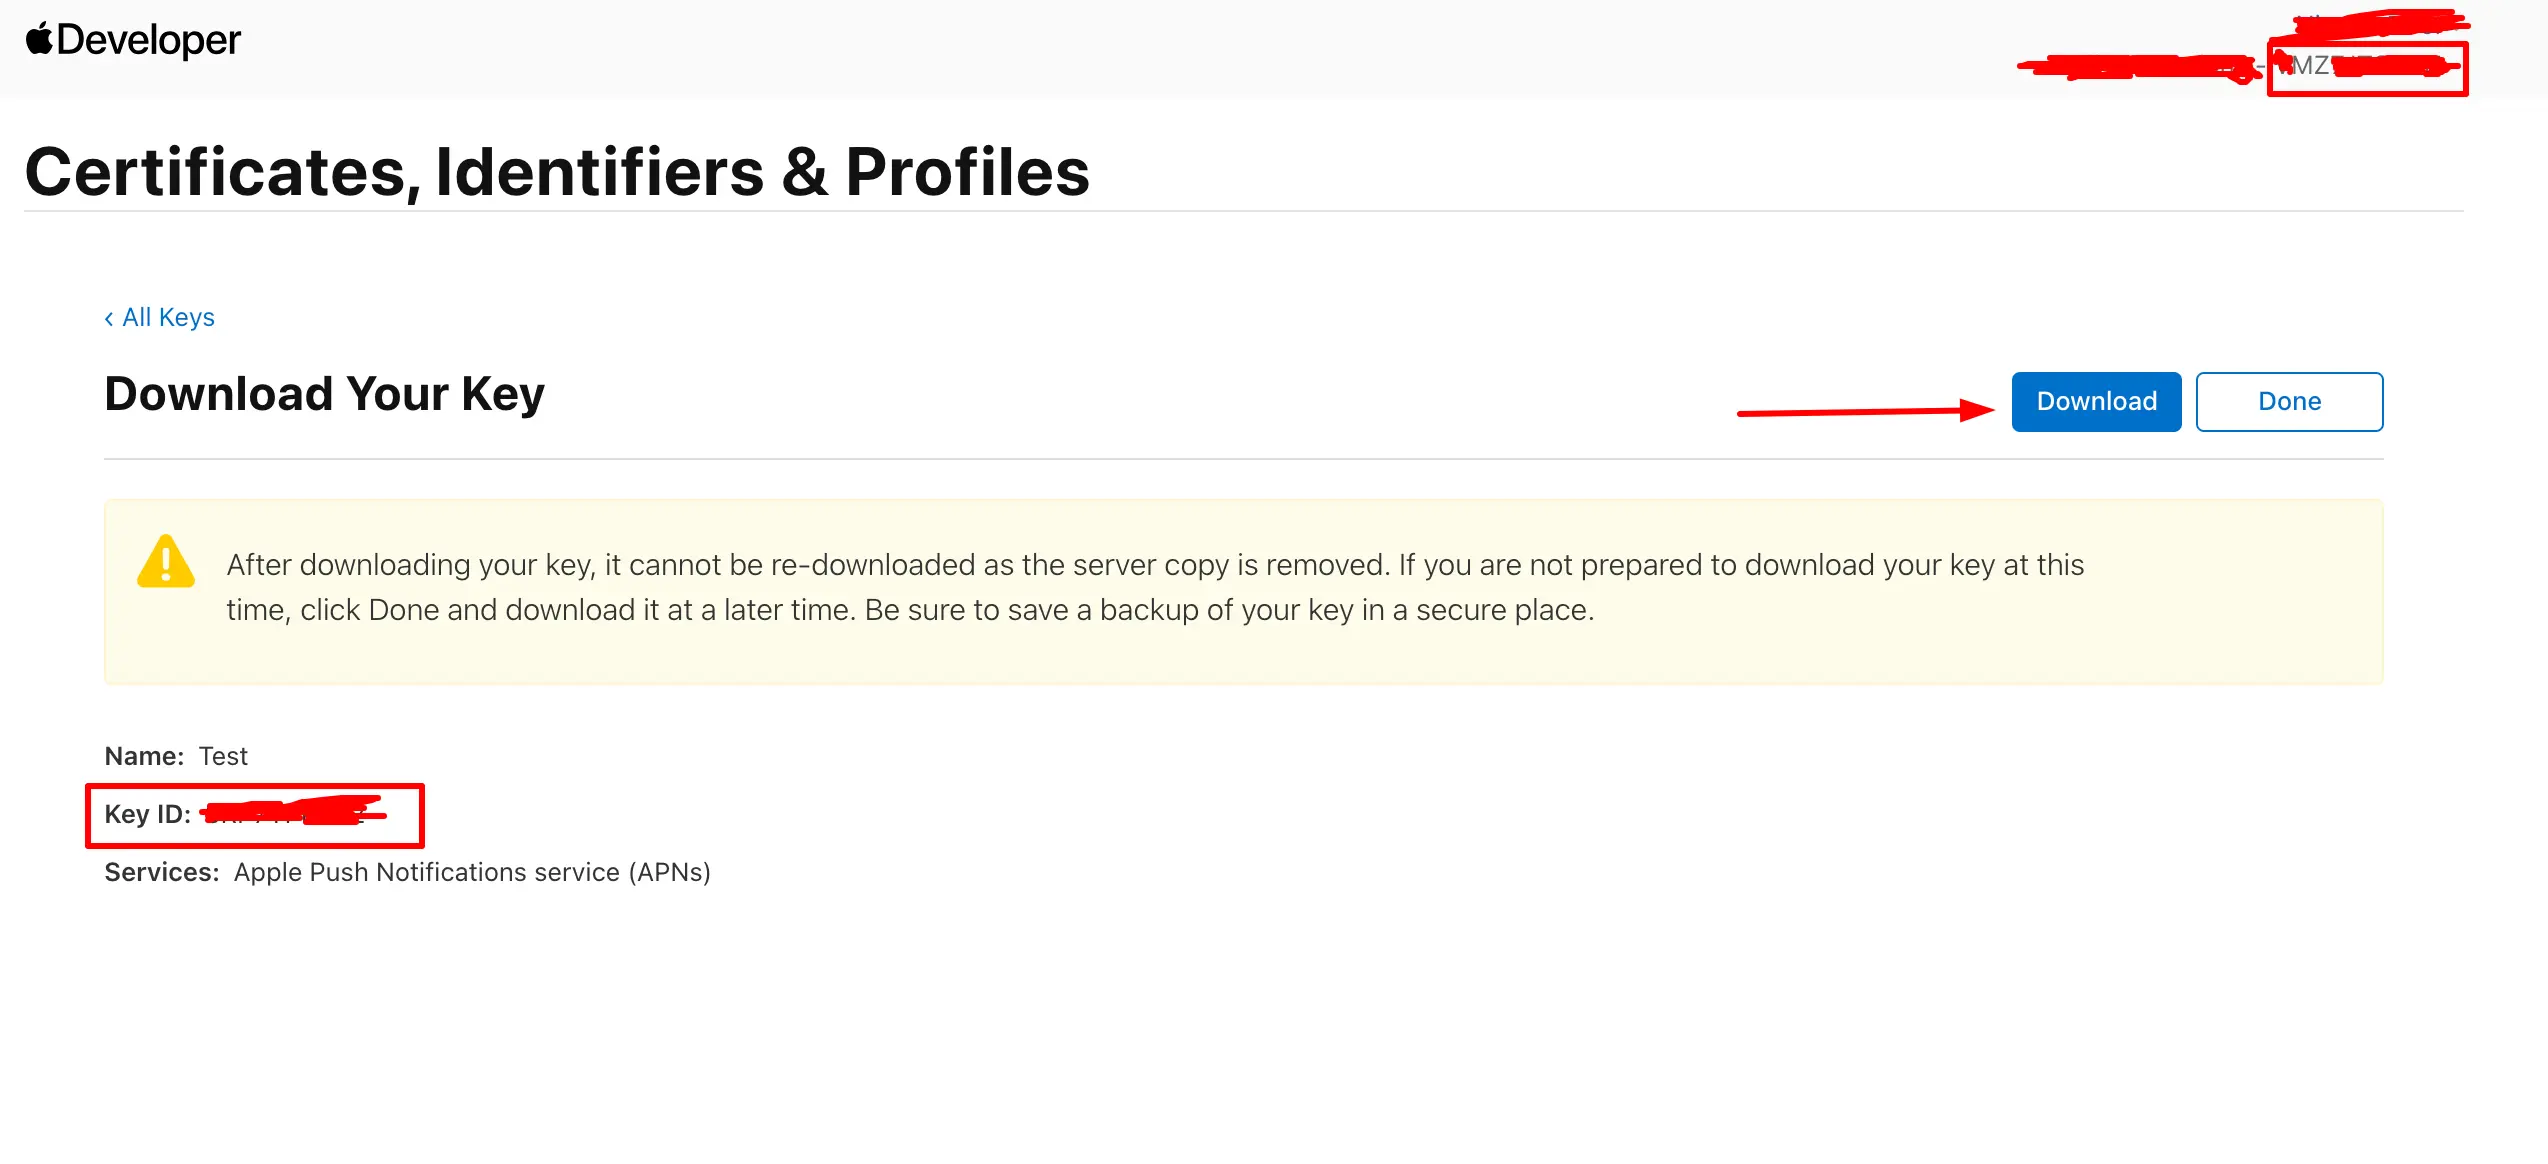
Step 7 — Download the .p8 Key File
This is the most important step. After registration, you'll be taken to the "Download Your Key" page. Click the "Download" button to save the .p8 file to your machine.
Apple only lets you download this file ONCE. If you lose it, you'll have to revoke the key and create a new one. Store it somewhere safe — a password manager, encrypted drive, or your CI/CD secrets vault.
Step 8 — Note Down Key ID and Team ID
On the same download page, you'll see your Key ID (a 10-character alphanumeric string). Note this down — you'll need it when configuring push notifications in Firebase or any other service.
Your Team ID can be found at the top-right corner of the Apple Developer Portal or on the Membership page. It's also a 10-character string. Together with the .p8 file, these three pieces of information are everything you need to configure iOS push notifications.
Using the APNs Key with Firebase
If you're using Firebase Cloud Messaging, head to the Firebase Console → Project Settings → Cloud Messaging tab. Under the "Apple app configuration" section, click "Upload" next to APNs Authentication Key. Upload your .p8 file and enter the Key ID and Team ID you noted earlier.
You'll need these three values:

1. APNs Auth Key (.p8 file)  →  Downloaded in Step 7
2. Key ID                    →  Found on the download page
3. Team ID                   →  Found in Apple Developer Membership
Key-Based (.p8) vs Certificate-Based (.p12) — Which to Use?
Apple supports two methods for APNs authentication. The key-based approach (.p8) is newer and recommended. Here's why: .p8 keys never expire — certificates expire annually and need manual renewal. A single .p8 key works for all apps under your team — certificates are per-app. The .p8 key file is tiny (~200 bytes) — certificates are much larger. Token-based authentication (.p8) is stateless and simpler to implement server-side.
Unless you have a very specific reason to use certificates (like legacy infrastructure that only supports them), always go with the key-based approach.
Troubleshooting Common Issues
"You have already reached the maximum number of keys" — Apple limits you to 2 APNs keys. Revoke an unused one from the Keys page to create a new one. The revoked key will immediately stop working for all apps using it.
"Push notifications not arriving on device" — Make sure you're using the correct environment. If you're testing on a development build, your key must support the Sandbox environment. Also verify that the app has requested notification permissions and the device token is being sent to your backend correctly.
"InvalidProviderToken error from APNs" — This usually means the Key ID or Team ID you configured doesn't match the .p8 file. Double-check all three values in your push service configuration.
Wrapping Up
Generating an APNs key is a one-time process that takes less than 5 minutes, but it's a critical piece of your iOS push notification infrastructure. Keep your .p8 file secure, use it across all your apps, and you won't have to deal with annual certificate renewals. If you're integrating with Firebase, OneSignal, or building your own push server, the Key ID + Team ID + .p8 file trio is all you need to get started.
Related Articles
Integrate Firebase Cloud Messaging in React Native — Permissions, Tokens, Background & In-App UI
End-to-end guide: APNs key in Firebase, Xcode capabilities, @react-native-firebase/messaging + Notifee, Android 13+ permissions, saving FCM tokens to your backend, navigation on tap, and a Zustand-powered in-app notification banner.
How to Send Push Notifications from Node.js with Firebase — Part 1: Firebase Console Setup
Step-by-step guide to configuring Firebase Cloud Messaging for your Node.js backend — generating the Admin SDK key, enabling Cloud Messaging, and sending your first test notification to iOS and Android devices.